Love this? Pin it for later! 📌
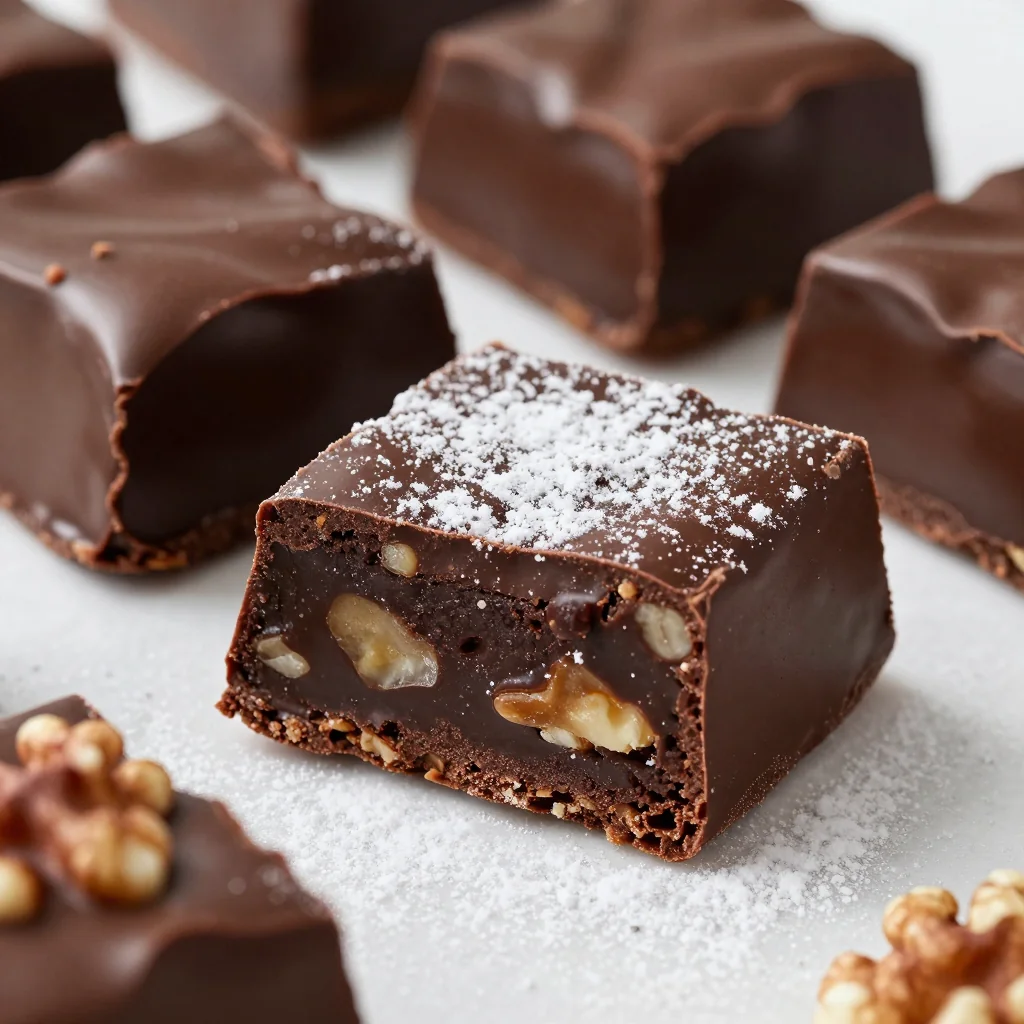
Last Tuesday at 6:43 p.m. I found myself staring into the abyss that was my pantry—half-empty bags of shredded coconut, a rogue bag of dairy-free chips that had survived two house moves, and the last two tablespoons of maple syrup clinging to the bottom of the bottle like it had a lease agreement. Take-out sounded tempting, but the rain was coming down in sheets and my fuzzy socks had already achieved peak coziness. So I did what any dessert-obsessed, plant-powered home cook would do: I turned those pantry stragglers into the fudgiest, most spoon-licking vegan chocolate fudge you’ve ever met. One bite and my husband—an avowed “I don’t do vegan desserts” guy—grabbed the pan, retreated to the sofa, and emerged twenty minutes later asking if we had any more coconut milk. If that’s not a mic-drop endorsement, I don’t know what is.
What makes this recipe a week-night hero is that it was designed for the nights when you think you have “nothing” to make. No coconut milk? Use the last splash of oat creamer. Only brown sugar left? Perfect—its molasses notes deepen the chocolate. The technique borrows from old-fashioned stove-top fudge (think Grandma’s holiday tins) but skips the candy thermometer and the hours of setting time. Instead, we’re using the natural starches in cocoa and a quick simmer to create that dense, truffle-like bite without any condensed milk or butter. It’s naturally gluten-free, soy-free, and—if you swap the nuts—nut-free, which means it disappears at potlucks faster than the veggie tray. Serve it in espresso cups with a pinch of flaky salt for an elegant dinner-party closer, or scoop it straight from the warm pan while you binge documentaries about octopi. Either way, you just turned “nothing” into “how is this gone already?”
Why This Recipe Works
- One-Pot Wonder: Everything melts, simmers, and sets in the same saucepan—no extra bowls to wash.
- Pantry Raid Friendly: Built around odds and ends—half cups of sugar, scant syrups, random chips—so nothing goes to waste.
- 10-Minute Stove Time: A brief boil activates cocoa starch for classic fudge texture without dairy or thermometers.
- Flexible Sweeteners: Maple, agave, or even rice syrup work; we’ll teach you how to adjust for each.
- Secret Silk Factor: A spoonful of tahini or almond butter lends glossy melt-without-the-milk body.
- Freezer-Ready: Slice into bites, freeze on a tray, and you’ve got truffles for midnight cravings.
Ingredients You'll Need
Think of the ingredient list as a friendly formula rather than a rigid roll-call. Once you understand the job each item performs, you can swap confidently and still land that silky, slow-motion melt.
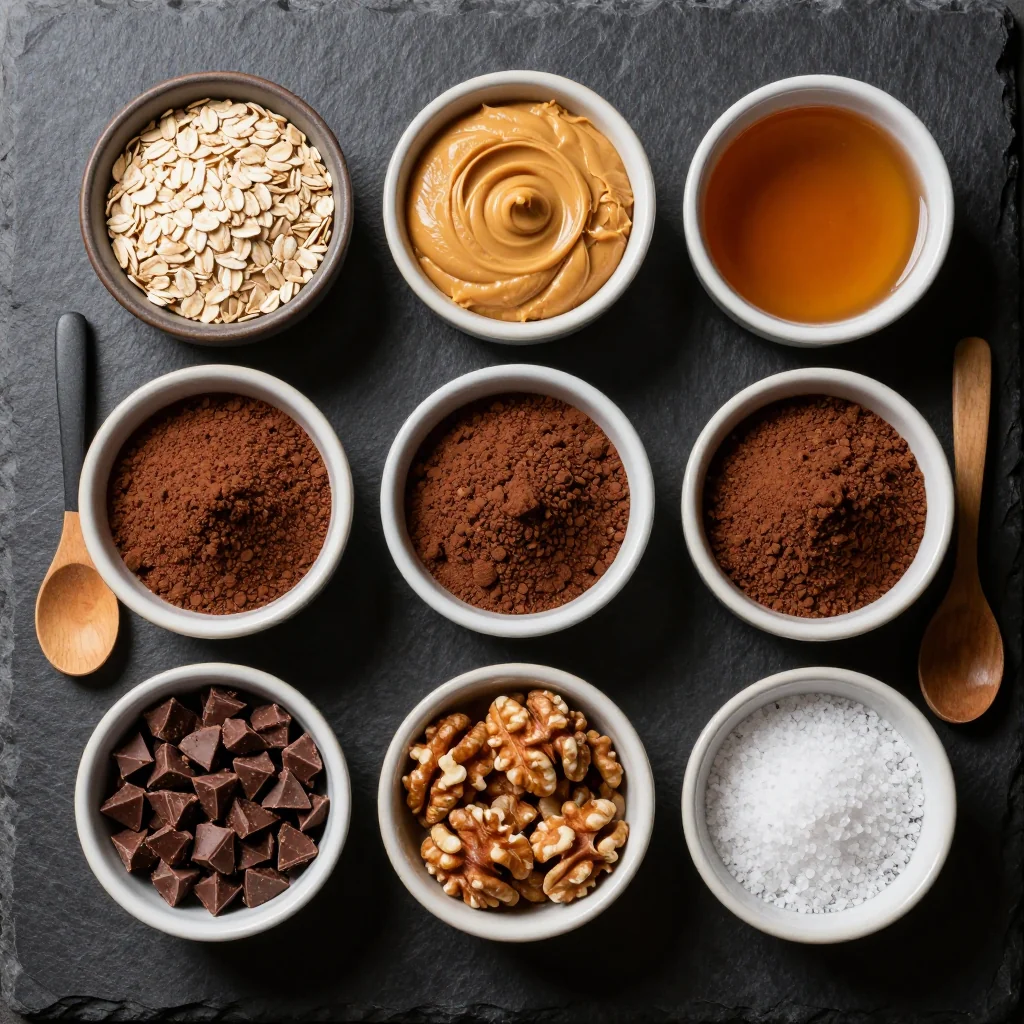
Granulated Sugar: The backbone of traditional fudge structure. Organic cane sugar dissolves quickly and keeps the flavor clean; if you’re down to the last cup of coconut sugar, go for it—your fudge will taste like deep toffee and darken to mahogany. Because coconut sugar is slightly less sweet, bump up vanilla to keep balance.
Unsweetened Cocoa Powder: Use natural cocoa (the label will simply say “cocoa”) for bright, tangy chocolate notes. Dutch-processed will work—expect a darker, Oreo-like flavor—but you’ll need an extra teaspoon of acid (lemon juice or cream of tartar) to help the fudge set.
Full-Fat Coconut Milk: This is our stand-in for evaporated milk. Shake the can vigorously so the cream and liquid homogenize. If you’re allergic to coconut, reach for the highest-fat oat or soy barista creamer you have; anything under 10 g fat per 100 ml may produce a slightly icier texture.
Maple Syrup: Adds nuanced caramel notes and helps prevent crystallization. Down to the last tablespoon? Augment with agave, brown-rice syrup, or even corn syrup in equal volume. Avoid blackstrap molasses unless you want assertive bitter tones that compete with chocolate.
Tahini or Almond Butter: These lend body, stabilize emulsion, and mimic the “buttery” bite missing from vegan recipes. Sunflower-seed butter keeps it nut-free; peanut butter will deliver PB-cup vibes—delicious but dominant.
Vanilla Extract: A mellowing agent that smooths harsh cocoa edges. Paste, powder, or the scrapings of one bean all work; scale up if you like perfumed depth.
Sea Salt: Chocolate without salt tastes flat. Fine sea salt disperses evenly; finish with flaky Maldon for visual drama.
Optional Stir-Ins: This is where the pantry raid shines: stale pretzel bits for salty crunch, dried sour cherries for tang, or espresso powder to amplify cocoa. Keep add-ins under ¾ cup total so the fudge still slices cleanly.
How to Make Gooey Vegan Chocolate Fudge for Pantry Clean Out Treat
Line Your Pan—But Skip Foil
Cut two strips of parchment: one the width of an 8-inch square pan, one the length. Lay them in an “X” so all sides have overhang; this gives you sling handles for effortless removal. Lightly oil any exposed corners to prevent sticking. Resist foil—it can react with cocoa and leave metallic off-flavors.
Whisk Dry First
In a heavy 3-quart saucepan, whisk sugar, cocoa, and espresso powder (if using) until no cocoa lumps remain. This pre-mix keeps cocoa from clumping when the liquid hits the heat.
Add Wet, But Don’t Stir—Yet
Pour coconut milk, maple syrup, and tahini onto the dry mixture but resist stirring. Instead, tilt the pan gently so the liquid finds its own path. This prevents sugar crystals from creeping up the sides (the leading cause of grainy fudge).
Medium Heat, Undisturbed Boil
Slide the pan over medium heat. When you see vigorous bubbles around the perimeter—about 4 minutes—set a timer for 6 minutes and do NOT stir. The mixture will climb; if it threatens the rim, reduce heat a notch, but keep it bubbling. This boil evaporates excess moisture and develops micro-crystals for that old-fashioned fudge bite.
Cold Water Test
Have a coffee mug of ice water nearby. After 6 minutes, drop a teaspoon of hot fudge into the water. If it forms a soft pliable ball you can roll between your fingers, you’re done. If it dissipates, boil 1 additional minute and retest.
Beat to Gloss
Off heat, add vanilla and salt. Stir vigorously with a wooden spoon for 45–60 seconds; you’re encouraging the fudge to “set up” and lose its glossy sheen so it slices rather than pours. When the spoon starts leaving trails that briefly expose the bottom of the pan, you’re there.
Fold in Pantry Treasures
Working quickly, fold in up to ¾ cup total of any mix-ins—crushed pretzels, toasted quinoa, candied ginger, or the last handful of marshmallows from the camping trip. Over-loading will impede setting.
Pan, Tap, Chill
Scrape fudge into your lined pan. Smooth the top with an offset spatula lightly misted with neutral oil. Tap the pan on a towel-covered counter to release air pockets. Slide into the freezer for 20 minutes (or refrigerator for 1 hour) to firm. The surface should be matte, not shiny, when ready.
Score for Clean Slices
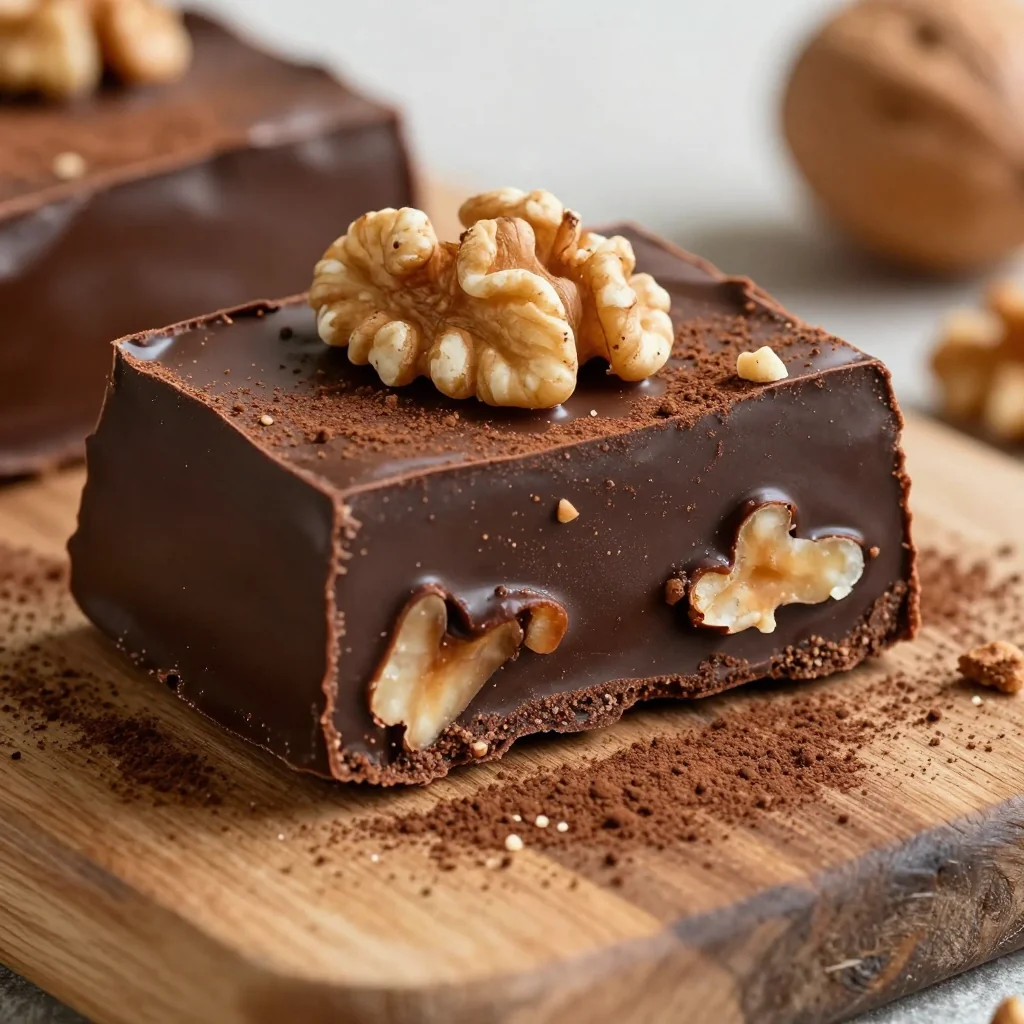
Lift the parchment sling onto a cutting board. Using a large chef’s knife warmed in hot water, score a grid. Wipe the blade between cuts for bakery-perfect edges. Aim for 1-inch squares; they’re rich.
Serve at Room Temp for Ultimate Gooeyness
While the fudge is firm from the fridge, let squares sit at room temp for 15 minutes before serving. The edges soften, the interior becomes truffle-lush, and the flavor blooms like a velvet chocolate cloud.
Expert Tips
Use a Wide, Heavy Pan
A broad surface speeds evaporation, shaving minutes off cook time and reducing the risk of sugar scorching on the bottom.
Humidity Matters
If you’re in a tropical climate, add 1 tablespoon of cornstarch with the sugar to absorb excess airborne moisture and ensure a clean set.
Save the Scrapings
After the boil, there will be a thin ring of crystallized sugar on the pot rim. Dampen a pastry brush with warm water and swipe the sides before you beat the fudge; you’ll prevent unwanted crunch in the final squares.
Make-Ahead Truffles
Roll chilled fudge into ¾-inch balls, toss in cocoa or finely chopped nuts, and freeze on a tray. Once solid, store in a jar for instant gifts or lunch-box surprises.
Salt Layering
Stir ¼ teaspoon fine salt into the hot fudge, then finish with flaky salt on top. The dual salting gives a more complex, bakery-style profile.
Rescue Over-Cooked Fudge
If your fudge sets rock-hard, cube it, warm ½ cup plant milk, and melt cubes into the most decadent hot chocolate you’ll ever sip.
Variations to Try
Mexican Hot-Chocolate
Whisk ½ teaspoon cinnamon and a pinch of cayenne with the cocoa. Top squares with candied orange peel.
PB & J Swirl
Beat in ⅓ cup peanut butter at Step 6, then marble 3 tablespoons raspberry jam on top before chilling.
Mocha Crunch
Dissolve 2 teaspoons instant espresso with the wet ingredients and fold in crushed chocolate-covered coffee beans.
White Chocolate Ribbon
Melt vegan white chocolate, drizzle over set fudge, and feather with a toothpick for a bakery-worthy finish.
Storage Tips
At Room Temperature: Fudge keeps 3 days in an airtight tin, separated by wax paper layers. Expect a softer, almost brownie-batter center by day three—arguably the best stage.
Refrigerator: Store up to 2 weeks in a sealed container. Chill in the pan uncut for maximum moisture retention, then slice as needed. Bring to room temp 15 minutes before serving for that slow ooze.
Freezer: Wrap individual squares in parchment, then foil, and freeze up to 3 months. Thaw 10 minutes at room temp for immediate gratification or pop into lunch boxes; they’ll be perfectly soft by noon.
Frequently Asked Questions
Gooey Vegan Chocolate Fudge for Pantry Clean Out Treat
Ingredients
Instructions
- Prep Pan: Line an 8-inch square pan with parchment, leaving overhang, and lightly oil exposed corners.
- Mix Dry: In a heavy 3-quart saucepan whisk sugar, cocoa, espresso powder until lump-free.
- Add Wet: Pour in coconut milk, maple syrup, and tahini; do not stir yet.
- Boil: Place over medium heat. When edges bubble vigorously, boil 6 minutes without stirring.
- Test: Drop a bit into ice water; it should form a soft ball. If not, boil 1 minute more.
- Beat: Off heat, add vanilla and salt. Stir 45–60 seconds until glossy sheen fades and fudge thickens.
- Add-Ins: Fold in any optional mix-ins quickly.
- Set: Spread into lined pan, tap to release air, chill 20 minutes in freezer or 1 hour in refrigerator.
- Slice: Lift parchment, score grid with a warm knife, and serve at room temp for maximum gooeyness.
Recipe Notes
For firmer fudge, boil 1 extra minute; for sauce-like dessert, undercook by 1 minute and serve warm over ice cream.