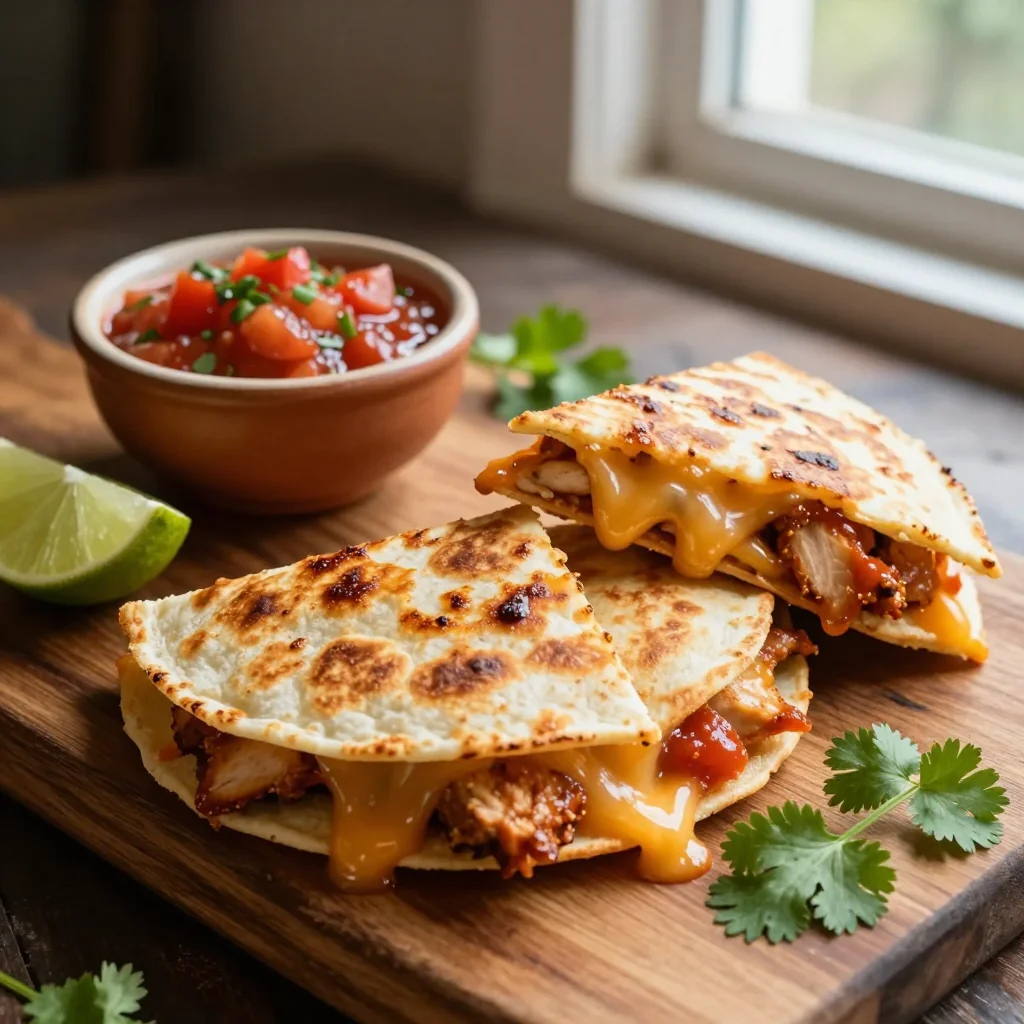
Crispy, cheesy chicken quesadillas paired with fresh homemade salsa – a fiesta in every bite.

When I was a teenager, my family gathered around a sizzling skillet on Friday nights, the air thick with the aroma of melted cheese and smoky chicken. I remember the first time I tasted a perfectly folded quesadilla – the crunch of the tortilla gave way to a warm, gooey center that made my taste buds dance. That memory sparked a lifelong love for handheld, flavor‑packed dishes.
Quesadillas have roots in Mexican street food, where they were traditionally made with corn tortillas and simple fillings. Over time, the dish has traveled far beyond its origins, adapting to regional tastes and ingredients. My version blends tender chicken, a medley of cheeses, and a bright, fresh salsa that balances richness with acidity.
In this guide, I’ll walk you through every step, from seasoning the chicken to achieving that golden‑brown crust without burning the cheese. You’ll learn how to create a salsa that stays crisp even after sitting on the plate, and how to adjust the heat level to suit any palate.
Grab your skillet, gather the ingredients, and let’s embark on a culinary adventure that will become a staple in your weekly rotation.
🌟 Why This Recipe Will Capture Your Heart
These quesadillas are more than a quick dinner – they’re a celebration of texture, flavor, and simplicity.
- ✨ Perfect Balance of Crunch and Melt: The tortilla crisps on the outside while the cheese stretches luxuriously inside, delivering a satisfying bite every time.
- ✨ Customizable Heat: Adjust the chili powder or add fresh jalapeños to make it as mild or as fiery as you like.
- ✨ Speedy Weeknight Solution: From start to finish it takes under 40 minutes, making it ideal for busy evenings.
- ✨ Nutrient‑Rich Protein: Chicken breast supplies lean protein, while the vegetables in the salsa add vitamins and antioxidants.
- ✨ Crowd‑Pleaser: Both kids and adults love the cheesy goodness, and the salsa adds a fresh twist that feels grown‑up.
- ✨ Versatile Base: Use the same technique with shrimp, tofu, or even roasted vegetables for endless variations.
🥗 Ingredients
📝 Complete Ingredient List
For the Chicken Filling:
For the Fresh Salsa:
For Garnish & Serving:

🔍 Focus on Key Ingredients
Chicken Breast
The star of the filling, chicken breast provides lean protein and a mild flavor that absorbs the spices beautifully. For the juiciest result, cut the meat into bite‑size cubes and sear quickly over high heat. If you prefer a richer taste, you can substitute thigh meat, but keep the cooking time short to avoid dryness.
Cheddar & Mozzarella Blend
Combining sharp cheddar with stretchy mozzarella gives the quesadilla both flavor depth and that coveted melt. Cheddar adds a tangy bite, while mozzarella ensures the cheese pulls apart in glorious strings. For a smoky twist, try adding a small amount of smoked Gouda.
Fresh Salsa
The salsa is the bright counterpoint to the rich cheese. Using ripe tomatoes, crisp red onion, and a splash of lime juice creates a balanced acidity. Adjust the jalapeño amount to control heat – more for a daring kick, less for a gentle warmth.
🔄 Quick Substitutions
| If you don’t have… | Use instead… |
|---|---|
| Flour tortillas | Corn tortillas (but expect a slightly different texture) |
| Cheddar cheese | Monterey Jack or pepper jack |
| Fresh cilantro | Fresh parsley or a pinch of dried oregano |
👨🍳 Step‑by‑Step Instructions
Follow these detailed steps to achieve perfectly crisp quesadillas with a burst of fresh salsa.
📋 Phase 1: Preparation & Mise en Place
Gather and prep all components before you start cooking.
Dice the Chicken
Trim any excess fat from the chicken breasts, then cut them into 1‑centimeter cubes. Pat the pieces dry with paper towels – moisture is the enemy of a good sear. Season the diced chicken with cumin, smoked paprika, chili powder, garlic powder, salt, and black pepper. Toss to coat evenly.
Prepare the Salsa
Dice the tomatoes and red onion finely. Mince the jalapeño, discarding the seeds if you prefer less heat. In a medium bowl, combine tomatoes, onion, jalapeño, cilantro, lime juice, salt, and pepper. Stir gently and set aside to let the flavors meld while you cook the chicken.
🔥 Phase 2: Cooking & Assembly
This is where the magic happens – cooking the chicken and building the quesadillas.
Sear the Chicken
Heat a large skillet over medium‑high heat. Add the olive oil, then the seasoned chicken cubes. Cook, stirring occasionally, for about 6‑8 minutes until the chicken is golden brown and cooked through. The edges should be slightly caramelized, giving a deep flavor.
Combine Cheese with Chicken
Reduce the heat to low. Sprinkle the shredded cheddar and mozzarella over the cooked chicken, allowing the cheese to melt gently. Stir until the cheese is fully incorporated, creating a creamy, cohesive filling.
Assemble the Quesadillas
Wipe the skillet clean and return it to medium heat. Place a tortilla in the pan, spread a generous spoonful of the chicken‑cheese mixture over half of the tortilla, then fold the other half over to enclose the filling. Cook for 2‑3 minutes per side, pressing gently with a spatula, until the tortilla is golden and the cheese is fully melted.
✨ Phase 3: Finishing Touches & Serving
Final checks and plating for a restaurant‑quality presentation.
Check for Doneness
Slice a small corner of the quesadilla; the cheese should be fully melted and the chicken no longer pink. The tortilla should be crisp but not burnt. If needed, give it another minute on each side.
Plate and Garnish
Transfer the cooked quesadilla to a cutting board, let it rest for 30 seconds, then cut into three wedges. Arrange the wedges on a plate, drizzle a spoonful of fresh salsa over the top, add a dollop of sour cream, and sprinkle extra cilantro leaves for color.
Serve Immediately
Quesadillas are best enjoyed hot, while the cheese is still stretchy. Pair with extra salsa on the side for those who love a saucy bite, and serve with a chilled glass of your favorite beverage.
💡 Expert Tips & Tricks
🛒 Choosing the Right Ingredients
When shopping for chicken, look for breasts that are firm, pink, and free of any gray spots. Freshness is key – a slight tackiness when you touch the meat is normal, but any slime indicates spoilage. For tortillas, opt for those labeled “soft” rather than “hard” to ensure they fold without cracking. Lastly, choose ripe tomatoes that give slightly under pressure; they’ll add natural sweetness to the salsa.
🔪 Preparation Techniques
Dice the chicken uniformly so it cooks evenly. Use a sharp chef’s knife to achieve clean cuts, which also helps retain the meat’s juices. When chopping cilantro, stack the leaves, roll them into a tight bundle, and slice with a rocking motion to avoid bruising the herb. This technique preserves its bright flavor.
🌡️ Mastering the Cooking Process
Preheat your skillet before adding oil – a hot pan prevents the chicken from sticking. Keep the heat at medium‑high for searing, then lower it when melting cheese to avoid scorching. If the tortilla starts to brown too quickly, reduce the heat and cover the pan briefly to trap steam, ensuring the cheese melts fully.
🍽️ Presentation & Service
For a polished look, arrange the quesadilla wedges in a fan shape on a white plate, drizzle salsa in a zig‑zag pattern, and add a small ramekin of sour cream. A wedge of lime on the side adds a pop of color and invites guests to add a fresh splash of acidity.
🏆 Pro Tips
Elevate your quesadilla game from home‑cooked comfort to restaurant‑level excellence.
- 🎯 Use a Cast‑Iron Skillet: The even heat distribution of cast iron creates a uniform golden crust and retains heat longer, which is essential for achieving that perfect crunch without burning.
- 🎯 Double‑Layer Cheese Technique: Place a thin layer of cheddar, then the chicken, and finish with mozzarella. This sandwiching method prevents the cheese from leaking out during cooking.
- 🎯 Rest the Filling: Allow the chicken‑cheese mixture to sit for a couple of minutes after cooking. The residual heat continues to melt the cheese, making the filling more cohesive when you assemble the quesadilla.
- 🎯 Lightly Toast the Tortilla First: Warm each tortilla for 15 seconds on each side before adding filling. This creates a barrier that reduces sogginess from the salsa.
- 🎯 Finish with a Spritz of Lime: A quick spray of lime juice just before serving brightens the flavors and balances the richness of the cheese.
- 🎯 Use a Press or Heavy Pan: Pressing the quesadilla with a heavy lid or a dedicated press ensures even contact with the skillet, resulting in a uniformly crisp surface.
"The secret to a great quesadilla is simple: great ingredients, a hot pan, and patience." — Chef Alejandro García
🔄 Variations & Adaptations
This versatile recipe can be tweaked to suit any dietary preference or flavor craving.
🥬 Vegetarian / Vegan Version
Swap the chicken for black beans or roasted cauliflower florets. Use plant‑based cheese such as vegan cheddar or mozzarella alternatives, and keep the same salsa for freshness. The texture changes, but the flavor profile remains vibrant.
- Replace chicken with 400 g canned black beans, rinsed and drained.
- Use 150 g vegan shredded cheese blend.
🌶️ Flavor Variations
Explore different culinary directions by adjusting the spice blend or adding new ingredients to the filling.
Spicy Version
Increase the chili powder to 1 teaspoon, add ½ teaspoon of cayenne, and include a sliced serrano pepper in the salsa for a bold heat.
Mediterranean Version
Mix in ¼ cup crumbled feta cheese, a handful of chopped Kalamata olives, and a pinch of oregano. Serve with a side of tzatziki.
Asian‑Inspired Version
Marinate the chicken in soy sauce, ginger, and a dash of sesame oil before cooking. Add shredded carrots and bean sprouts to the filling, and finish with a drizzle of sriracha mayo.
⚠️ Dietary Adaptations
Gluten‑Free
Swap flour tortillas for certified gluten‑free corn or rice tortillas. Ensure the cheese you use is also gluten‑free, though most hard cheeses are naturally gluten‑free.
Lactose‑Free
Use lactose‑free cheese alternatives and replace sour cream with coconut‑based yogurt or a lactose‑free sour cream substitute.
Low‑Calorie
Reduce the cheese amount by half, use skinless chicken breast, and replace the tortillas with low‑carb wraps. Serve with a side salad instead of sour cream.
👶 Kid‑Friendly Version
For picky eaters, omit the jalapeño and reduce the amount of spices. Use mild cheddar only, and serve with a side of guacamole for extra creaminess. Cutting the quesadillas into smaller bite‑size pieces makes them easier for small hands.
📦 Storage & Reheating
🧊 Conservation
Refrigerator:
- Duration: 3 days
- Container: Airtight glass or plastic container
- Tip: Place a sheet of parchment between layers to prevent sticking.
Freezer:
- Duration: 2 months
- Method: Wrap each quesadilla tightly in foil, then place in a zip‑top freezer bag.
- Defrosting: Transfer to refrigerator overnight or use the microwave’s defrost setting.
💡 Note: For best texture, reheat from frozen rather than thawing completely first.
♨️ Reheating
🔥 Oven (Recommended):
- Preheat to 190 °C (375 °F).
- Place quesadillas on a baking sheet, cover loosely with foil.
- Heat for 10 minutes, then remove foil and bake an additional 5 minutes to restore crispness.
⚡ Microwave (Quick):
- Cover with a microwave‑safe lid.
- Heat on medium power for 1 minute, flip, then heat another 30 seconds.
- Check for even heating; if needed, add another 15 seconds.
🍳 Skillet:
Heat a non‑stick skillet over medium heat, add a few drops of oil, and cook each side for 2‑3 minutes until the tortilla regains its crunch.
🍷 Perfect Pairings
🥗 Side Dishes
- Mexican Street Corn Salad: Charred corn mixed with mayo, cotija, lime, and cilantro adds a sweet‑savory crunch.
- Black Bean & Avocado Salad: Creamy avocado balances the spiciness of the quesadilla.
- Simple Mixed Greens: Lightly dressed with citrus vinaigrette to refresh the palate.
🍷 Wine & Drink Pairings
- Rosé (dry): Its bright acidity complements the lime‑y salsa and cuts through the cheese richness.
- Light Lager: The carbonation cleanses the palate between bites.
- Non‑Alcoholic: Sparkling water with a splash of grapefruit juice offers a refreshing, bitter note.
🍰 To Complete the Meal
Start with a chilled cucumber‑lime gazpacho, followed by the quesadillas, and finish with a tropical fruit sorbet—mango or passion fruit—to cleanse the palate and keep the fiesta going.
❓ Frequently Asked Questions
Q: Can I use pre‑cooked rotisserie chicken?
A: Absolutely. Shred the rotisserie chicken, toss it with the spices, and skip the searing step. This reduces cooking time to about 5 minutes, perfect for a quick lunch.
Q: How do I prevent the tortilla from getting soggy?
A: Ensure the salsa is drained of excess juice before serving, and lightly toast the tortilla before adding the filling. A hot, dry skillet also helps create a barrier that keeps moisture out.
Q: What if I don’t have fresh cilantro?
A: Fresh parsley works as a milder alternative, though it changes the flavor profile slightly. Dried cilantro is not recommended because it loses its bright, citrusy notes.
Q: My quesadillas stick to the pan—what’s wrong?
A: The pan may not be hot enough, or there isn’t enough oil. Preheat the skillet, add a thin layer of oil, and wait until it shimmers before placing the tortilla.
Q: Can I freeze the salsa?
A: Yes, but the texture may become slightly watery after thawing. To maintain crispness, drain any excess liquid before serving.
Q: How far in advance can I prep the ingredients?
A: The chicken can be seasoned and stored in the refrigerator for up to 24 hours. The salsa keeps well refrigerated for 2 days. Assemble the quesadillas just before cooking for optimal texture.
🎉 Let’s Get Cooking!
These Chicken Quesadillas with Salsa bring together the comforting melt of cheese, the savory depth of seasoned chicken, and the bright zing of fresh salsa. Whether you’re feeding a family, entertaining friends, or simply craving a handheld feast, this recipe delivers on flavor, texture, and speed. Remember the key steps: season well, sear hot, and press gently for that perfect golden crust.
Now it’s your turn—grab a skillet, fire up the stove, and create a plate that looks as good as it tastes. Don’t forget to snap a photo, share it with your loved ones, and let us know how you customized the dish!
Have you tried this recipe?
Leave a comment and rating below! Share your photos on Instagram with #QuesadillaFiesta to be featured on our page.
Chicken Quesadillas with Salsa
Crispy, cheesy quesadillas served with a bright homemade salsa.
📝 Ingredients
Chicken Filling
Salsa
Garnish
👨🍳 Instructions
- 1
Season the diced chicken with cumin, smoked paprika, chili powder, garlic powder, salt, and pepper.
- 2
Heat olive oil in a skillet over medium‑high heat and sear the chicken until golden and cooked through, about 6‑8 minutes.
- 3
Reduce heat, sprinkle cheddar and mozzarella over the chicken, and stir until the cheese melts into a creamy mixture.
- 4
In a separate bowl, combine diced tomatoes, red onion, jalapeño, cilantro, lime juice, salt, and pepper to create the salsa.
- 5
Wipe the skillet clean, add a fresh tortilla, spread a generous spoonful of the chicken‑cheese mixture on one half, fold, and cook 2‑3 minutes per side until crispy.
- 6
Repeat with remaining tortillas, keeping the cooked quesadillas warm in a low oven (90 °C) if needed.
- 7
Slice each quesadilla into thirds, plate, and top with a spoonful of fresh salsa.
- 8
Add a dollop of sour cream and garnish with extra cilantro leaves.
- 9
Serve immediately with lime wedges on the side for an extra burst of acidity.
- 10
Enjoy the fiesta of flavors and share your experience with friends!
🥗 Nutritional Information (per serving)
*Values are estimates based on standard ingredient data.
📚 You Might Also Like

Chicken Enchiladas with Mole

Beef Fajitas with Peppers

Shrimp Tacos with Avocado Crema


💬 Comments & Reviews
Leave a Comment
Comments will appear here once readers share their thoughts.