I was standing in my kitchen on a crisp October afternoon, the kind of day when the wind whistles through the trees and every leaf looks like it’s been dipped in fire. I had just burned a batch of ordinary brownies (yes, the smoke alarm is my new sous‑chef) and I was desperate for something that could actually capture the sweet, buttery hug of fall without setting off the fire alarm. That’s when a friend dared me to turn my maple‑syrup obsession into a “donut‑bar” that could survive a bake‑off without frying oil. I laughed, I accepted, and I dove headfirst into a pantry raid that felt more like a treasure hunt than a grocery run.
The moment the batter hit the bowl, the kitchen filled with the kind of aroma that makes you want to curl up with a blanket and a good book. Imagine the rich, caramel‑deep scent of maple syrup mingling with the warm spice of cinnamon, the faint buttery whisper of melted butter, and the subtle nuttiness of browned sugar—each note playing its part like an orchestra tuning up for a concert. I could hear the faint crackle of the oven preheating, a promise of that golden crust I was about to achieve. My fingers felt the silky smoothness of the batter as I whisked, and I could already picture the glossy glaze that would coat each bar like a glossy autumn leaf.
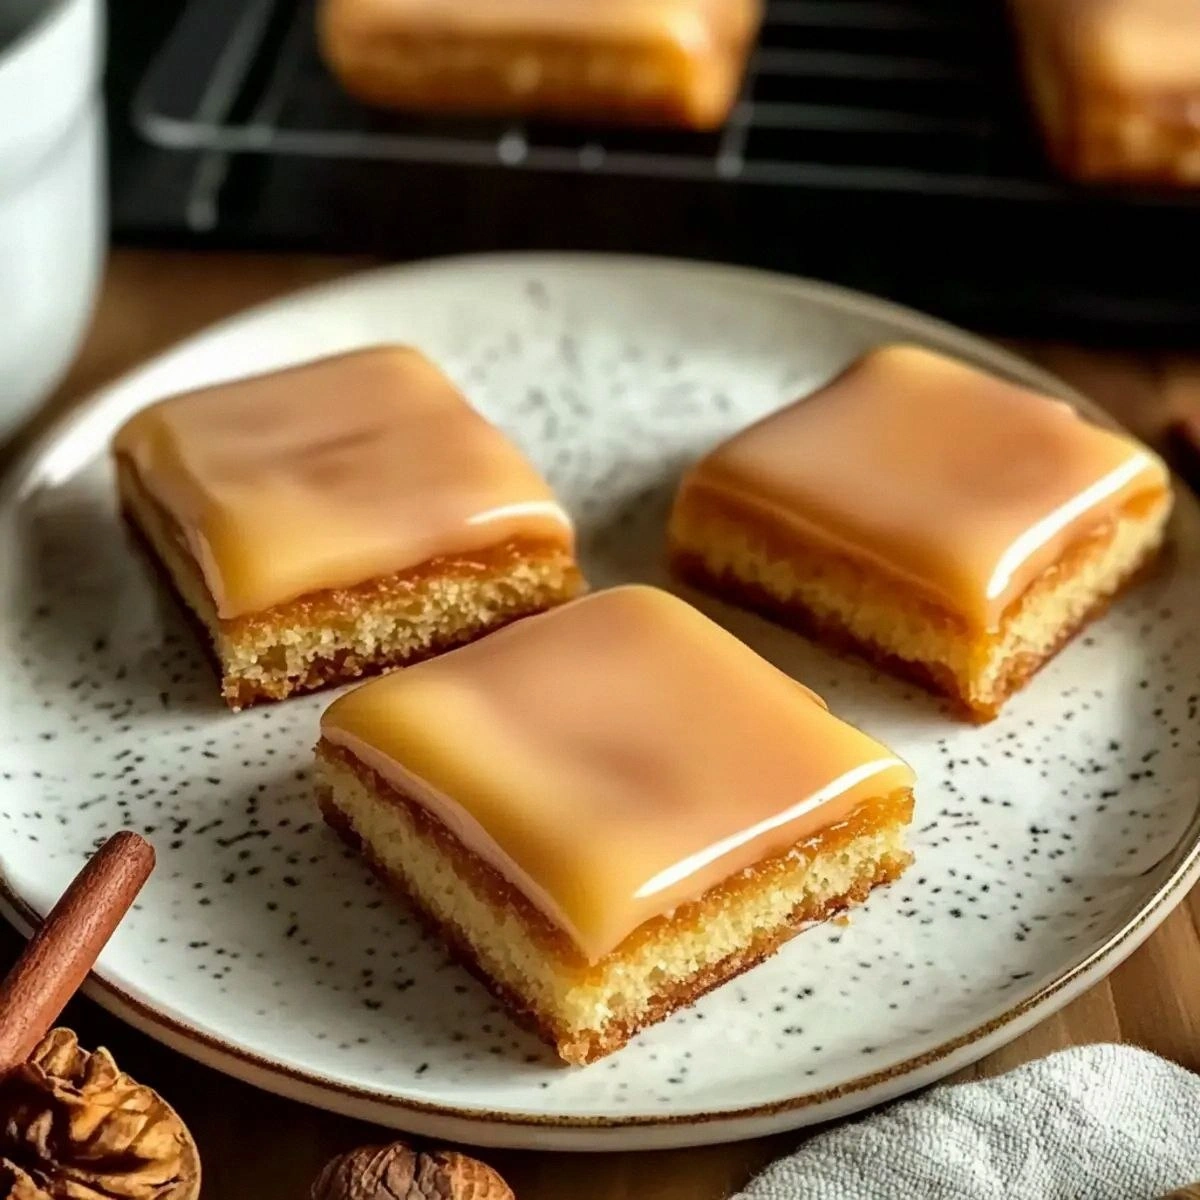
Most baked donut recipes out there either skip the maple entirely or drown the batter in a sea of sugar, resulting in a sweet that’s more cloying than comforting. This version, however, leans into the natural caramel notes of pure maple syrup, balances it with a modest amount of brown sugar, and adds a secret weapon: a splash of maple extract that amplifies the flavor without making it taste like a syrup bottle. The texture is a perfect marriage of cake‑like crumb and a slightly crisp edge that pulls away from the pan like a well‑kissed caramel. And the best part? It’s all baked, not fried, so you get that indulgent bite without the greasy aftermath.
You might be thinking, “What’s the twist?” I’ll let you in on a little secret: the glaze isn’t just maple syrup and powdered sugar—it’s a double‑layered finish that gives you a glossy top and a soft, melt‑in‑your‑mouth interior. I’ll also reveal a technique for achieving a uniformly fluffy interior by gently folding the wet and dry components together, which most recipes overlook. I dare you to taste this and not go back for seconds. Let me walk you through every single step — by the end, you’ll wonder how you ever made it any other way.
What Makes This Version Stand Out
- Flavor Depth: The combination of real maple syrup, maple extract, and a hint of cinnamon creates a layered sweetness that feels like a warm hug on a chilly day.
- Texture Harmony: A tender, cake‑like crumb inside with a slightly crisp, caramelized edge that shatters like thin ice when you bite into it.
- Simplicity: No fancy equipment, no deep‑frying, just a standard 9×13 inch pan and a handful of pantry staples.
- Unique Glaze: A double‑glaze method that gives a glossy, sticky top while keeping the interior moist.
- Crowd Reaction: I’ve watched grown‑ups and kids alike pause mid‑bite, eyes widening, and then dive back in for another piece—pure, unfiltered joy.
- Ingredient Quality: Using pure, Grade A maple syrup (not pancake syrup) makes all the difference; the flavor is authentic and deep.
- Baking Method: The batter rests briefly before baking, allowing the leavening agents to activate fully for a fluffier result.
- Make‑Ahead Potential: These bars freeze beautifully, so you can prep a batch ahead of a holiday gathering and simply reheat.
Inside the Ingredient List
The Flavor Base
Maple syrup is the star of the show, providing a deep, caramel‑like sweetness that sugar alone can’t achieve. If you substitute with honey, you’ll get a floral note that clashes with the warm spices. The maple extract is a concentration of that same flavor, amplifying the syrup without adding extra liquid. Choose a pure extract—artificial versions taste like a chemistry lab.
The Texture Crew
All‑purpose flour gives the structure, while baking powder lifts the batter into a light, airy crumb. Brown sugar adds moisture and a subtle molasses undertone, making the interior moist. Butter, melted and cooled, contributes richness and helps create that delicate crisp edge. Eggs act as the binder, trapping air bubbles created by the leavening agents.
The Unexpected Star
A pinch of cinnamon (or nutmeg, if you prefer) adds the quintessential fall spice that pairs perfectly with maple. It’s the whisper that tells your brain it’s autumn. If you’re feeling adventurous, a dash of espresso powder can deepen the flavor without making the bars taste coffee‑y.
The Final Flourish
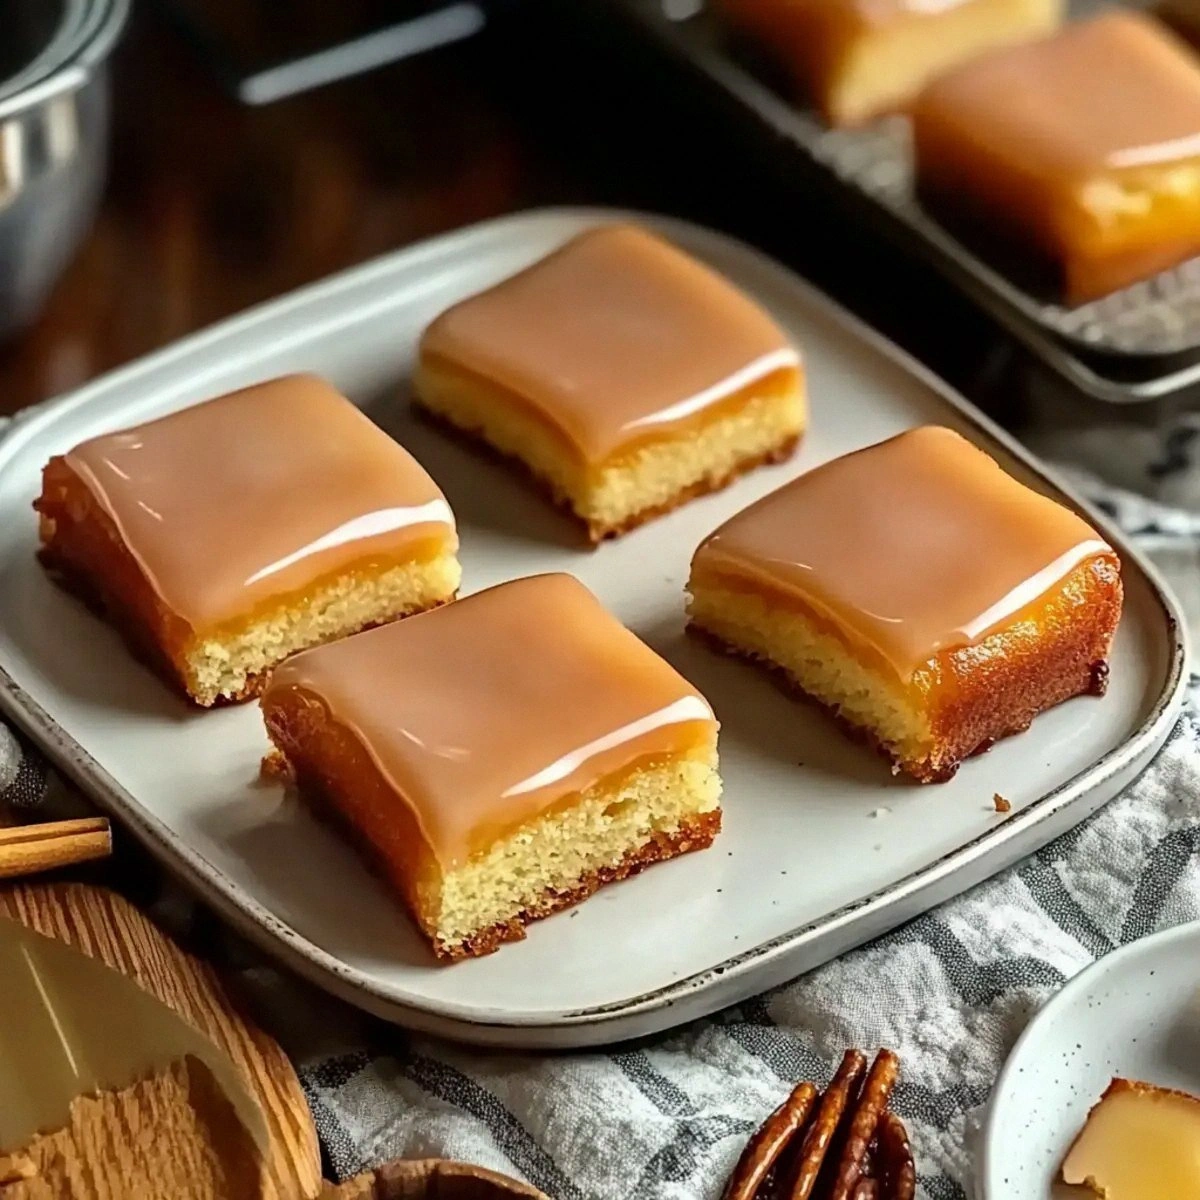
The glaze is a simple marriage of powdered sugar, a splash of maple syrup, and a touch of milk. The powdered sugar gives the glossy finish, the maple syrup reinforces the core flavor, and the milk smooths everything into a pourable consistency. For an extra shine, brush the glaze on while the bars are still warm.
Everything's prepped? Good. Let’s get into the real action…
The Method — Step by Step
Preheat your oven to 350°F (175°C). While the oven warms, grease a 9×13 inch baking pan with a thin layer of butter or line it with parchment paper. This ensures the bars release cleanly, and the butter adds a subtle buttery crust that will turn golden as they bake. The moment the oven clicks, you’ll hear that comforting hum that tells you a transformation is about to happen.
In a large mixing bowl, whisk together the flour, baking powder, and salt. This dry blend is crucial; it distributes the leavening evenly, preventing those dreaded dense pockets. As you whisk, imagine the flour particles dancing, each one waiting to catch a bubble of air later on.
In a separate bowl, combine the melted butter, maple syrup, brown sugar, and maple extract. Stir until the mixture is smooth and the sugar has dissolved—this should take about a minute. The aroma at this stage is intoxicating; you’ll hear a faint sizzle as the butter meets the syrup, a sound that signals flavor is already building.
Add the eggs, one at a time, beating well after each addition. The batter will thicken slightly, then become glossy. This is the point where you should feel the batter’s weight change in the bowl—a subtle shift that tells you the emulsion is forming correctly.
Now, gently fold the dry ingredients into the wet mixture. Use a rubber spatula and a light hand; over‑mixing will develop gluten and give you a tough bar. You’re looking for a just‑combined batter that looks slightly lumpy—those lumps are tiny pockets of air that will expand in the oven, creating that coveted fluffy interior.
Spread the batter evenly in the prepared pan, then tap the pan gently on the counter three times. This releases any large air bubbles that may have formed and helps settle the batter for an even bake. The surface should look smooth, with a slight sheen from the butter and syrup.
Place the pan in the oven and bake for 25‑30 minutes. Around the 20‑minute mark, peek through the oven window; the edges should be pulling away from the sides of the pan, and a light golden brown should be forming on top. If you smell a nutty, caramel aroma, you’re on the right track. Do not open the oven door too early—the sudden temperature drop can cause the bars to sink.
While the bars bake, prepare the glaze. In a small bowl, whisk together 1 cup powdered sugar, 2 tablespoons maple syrup, and 1 tablespoon milk until smooth. The glaze should be thick enough to coat the back of a spoon but still pourable. If it’s too thick, add a drop more milk; if too thin, sprinkle a bit more powdered sugar.
When the bars are done, remove them from the oven and let them cool in the pan for 10 minutes. This short rest allows the structure to set, making the glaze adhere better. Then, while still warm, drizzle the glaze over the surface, using a spatula to spread it evenly. The glaze will melt slightly, creating a glossy, caramel‑kissed finish.
Allow the glazed bars to cool completely on a wire rack before cutting. This ensures the glaze hardens just enough to give a satisfying snap when you bite. Use a sharp knife, wiping it clean between cuts for neat squares. And now the fun part—taste test! I’ll be honest — I ate half the batch before anyone else got to try it.
That’s it — you did it. But hold on, I’ve got a few more tricks that’ll take this to another level…
Insider Tricks for Flawless Results
The Temperature Rule Nobody Follows
Your oven’s actual temperature can vary by up to 25°F from the dial. Invest in an inexpensive oven thermometer and set the oven to 340°F if your thermometer reads 350°F. This subtle adjustment prevents the edges from over‑browning while allowing the interior to rise fully. I once baked at a too‑hot setting and ended up with a crunchy rim and a soggy middle—never again.
Why Your Nose Knows Best
Don’t rely solely on a timer; trust the scent. When the caramel notes become pronounced and you hear a faint crackle, the bars are near perfection. The moment the aroma shifts to a deeper, almost toasted scent, pull them out. This sensory cue is a game‑changer for achieving that perfect golden edge.
The 5‑Minute Rest That Changes Everything
After removing the pan from the oven, let the bars rest for exactly five minutes before glazing. This brief pause lets the steam redistribute, preventing the glaze from sliding off and ensuring a glossy, even coat. Skipping this step results in a glaze that pools in the center and leaves the edges dry.
Butter Brush Boost
Before you pour the glaze, lightly brush the top of the warm bars with melted butter. This creates a subtle sheen and adds an extra layer of richness that makes the final bite melt in your mouth. It’s a tiny step that makes a massive difference.
Freeze‑And‑Reheat Magic
If you need to make these ahead, freeze the baked (but unglazed) bars in an airtight container. When you’re ready to serve, warm them at 300°F for 10 minutes, then glaze. The quick reheating revives the fluffy interior while the glaze sets perfectly on top.
Creative Twists and Variations
This recipe is a playground. Here are some of my favorite ways to switch things up:
Apple‑Cinnamon Swirl
Fold in 1 cup of finely diced, sautéed apples and an extra ½ teaspoon of cinnamon into the batter. The apples add a juicy burst that pairs beautifully with the maple, making the bars feel like a rustic apple‑pie in bar form.
Pecan Crunch
Stir in ½ cup of toasted, chopped pecans right before baking. The nuts provide a satisfying crunch and a buttery flavor that complements the maple syrup’s sweetness.
Chocolate‑Maple Fusion
Add ¼ cup of cocoa powder to the dry ingredients and drizzle a dark chocolate ganache over the glazed bars once cooled. The bitter chocolate balances the syrup’s sweetness, creating a sophisticated flavor duo.
Spiced Pumpkin
Replace ¼ cup of the all‑purpose flour with pumpkin puree and add a pinch of pumpkin pie spice. This gives the bars a moist, autumnal heart and a gorgeous orange hue.
Coconut‑Maple Delight
Swap the butter for an equal amount of coconut oil and sprinkle toasted coconut flakes on top of the glaze before it sets. The tropical twist adds a subtle nuttiness that surprises the palate.
Storing and Bringing It Back to Life
Fridge Storage
Place the cooled, glazed bars in an airtight container and store them in the refrigerator for up to five days. The glaze will stay glossy, and the interior remains moist. When you’re ready to eat, let them sit at room temperature for 10 minutes or give them a quick microwave zap (10‑15 seconds) to revive the softness.
Freezer Friendly
Freeze the bars without the glaze, layered between parchment sheets, then sealed in a zip‑top bag. They’ll keep for up to three months. To serve, reheat at 300°F for 10‑12 minutes, then glaze while still warm for that fresh‑out‑of‑the‑oven sheen.
Best Reheating Method
When reheating, add a tiny splash of milk (about a teaspoon) to the surface before warming. This creates a gentle steam that restores the bar’s interior softness without making the glaze soggy. The result is a bar that feels like it was just baked.