I still remember the first time I tried to make red velvet cookies. It was a disaster of epic proportions — the kind that makes you question your life choices and wonder why you didn't just buy a package of Oreos like a normal person. The cookies spread into one giant, crimson blob that looked like something out of a horror movie, and my kitchen resembled a crime scene from all the food coloring I'd spilled. But here's the thing about kitchen failures: they teach you exactly what not to do, and they make the eventual success taste that much sweeter.
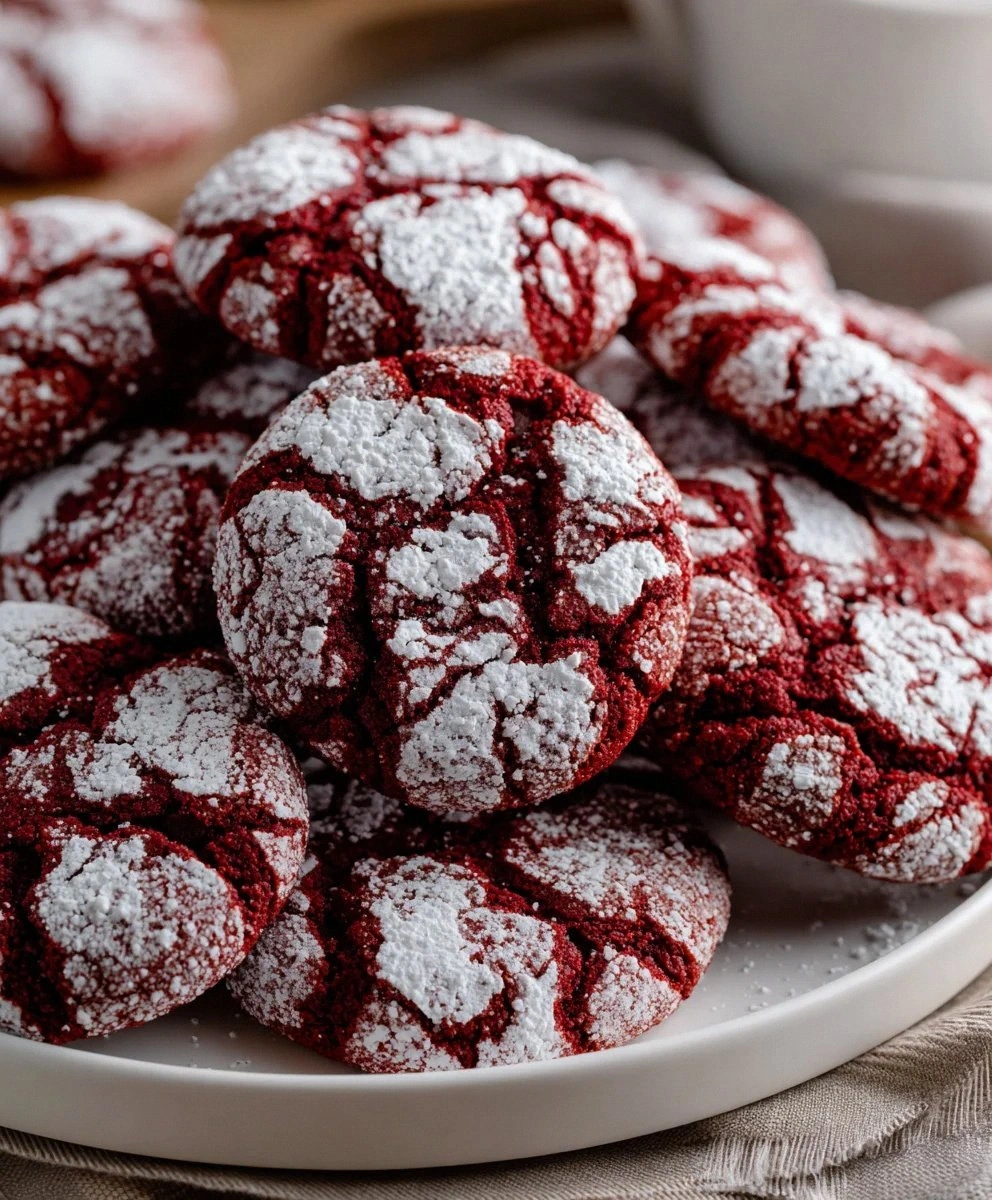
Fast forward through three failed attempts, two bags of wasted flour, and one very understanding husband who ate every single batch with a smile, I finally cracked the code. These red velvet crinkle cookies aren't just good — they're the kind of cookies that make people stop mid-conversation, close their eyes, and make that little satisfied humming sound. You know the one I'm talking about. The exterior has those gorgeous, snow-white crinkles that crackle like thin ice under your teeth, revealing a soft, fudgy interior that's the perfect shade of rich, ruby red.
What makes these cookies absolutely irresistible is the contrast between that delicate, powdered sugar coating and the tender, cake-like center. Each bite delivers a subtle cocoa flavor that's enhanced by the vanilla, with just enough red food coloring to make them look like edible valentines. They're not overly sweet, which means you can absolutely justify having three or four (or seven) in one sitting. Trust me, I've done the research. The best part? You don't need any fancy equipment, no chilling time, and absolutely zero culinary school training to nail these beauties on your first try.
Picture yourself pulling a tray of these from the oven, the whole kitchen smelling like a chocolate factory had a baby with a bakery. The cookies are still warm, the crinkle tops are perfectly set, and there's a gentle cloud of powdered sugar floating in the air like sweet, edible fairy dust. Your neighbors will start knocking. Your kids will abandon their screens. Even that one friend who claims they "don't really like sweets" will be asking for the recipe. Let me walk you through every single step — by the end, you'll wonder how you ever made it any other way.
What Makes This Version Stand Out
I've tested more red velvet cookie recipes than I care to admit, and let me tell you, most of them are doing it wrong. They overcomplicate things, add unnecessary steps, or worse — they produce cookies that look gorgeous but taste like disappointment and food coloring. This version cuts through all that nonsense and delivers exactly what you want: maximum flavor with minimum fuss.
One-Bowl Wonder: Unlike those pretentious recipes that require you to dirty every bowl in your kitchen, this beauty comes together in one large mixing bowl. You literally cream the butter and sugars, add the wet ingredients, dump in the dry ingredients, and you're done. Less dishes means more time for cookie consumption, and honestly, that's the kind of math I can get behind.
Zero Chill Time: Most cookie doughs demand you refrigerate them for hours, testing your patience and self-control. Not these bad boys. You can go from zero to cookie in under 30 minutes, which is perfect for those late-night cravings or unexpected guests who announce they're "in the neighborhood" (we all know what that means).
Guaranteed Crinkle Every Time: The secret isn't some mysterious ingredient you'll never find — it's all in the ratio of leavening agents and the double sugar coating. The baking powder and soda work together to create those perfect cracks, while rolling in both granulated and powdered sugar ensures maximum contrast and that professional bakery look.
Crowd-Splitting Flavor: These cookies have that magical quality of being both familiar and surprising. People taste chocolate, but there's something else — a complexity that comes from the vanilla and the subtle tang that red velvet is famous for. They're rich enough to satisfy chocolate cravings but light enough that you won't feel like you swallowed a brick afterward.
Make-Ahead Champion: The dough freezes beautifully for up to three months, which means you can have fresh-baked cookies whenever the mood strikes. I always keep a log of this dough in my freezer for emergencies — and by emergencies, I mean Tuesday afternoons when I need something to get me through the rest of the week.
Instagram Gold: Let's be real — we all want our food to taste good, but it doesn't hurt when it looks stunning too. The deep red against the white powdered sugar creates such a dramatic contrast that these cookies photograph like supermodels. Your social media feed will thank you, even if your waistline won't.
Alright, let's break down exactly what goes into this masterpiece...
Inside the Ingredient List
Every ingredient in these cookies pulls its weight — there's no filler, no unnecessary fluff, and definitely no weird chemicals you can't pronounce. What you're looking at is a carefully curated team of pantry staples that, when combined in just the right ratios, create something greater than the sum of their parts. Understanding why each component matters will turn you from a recipe follower into a cookie whisperer who can troubleshoot any baking disaster.
The Flavor Base
All-purpose flour is the unsung hero here, providing the structural integrity that keeps these cookies from spreading into puddles. I always use King Arthur flour because it's consistently milled and has the perfect protein content for cookies — not too much that they become tough, but enough to give them chew. If you substitute with cake flour, your cookies will be too tender and might fall apart. Bread flour will make them dense and bread-like, which is great for sourdough but terrible for cookies that should melt in your mouth.
Cocoa powder is where we get that subtle chocolate flavor that defines red velvet. Don't be tempted to use Dutch-processed cocoa here — natural cocoa powder has more acidity, which reacts with our leavening agents to create better rise and more dramatic crinkles. The cocoa also deepens the red color, making it more sophisticated than the artificial brightness you get from food coloring alone. If you skip the cocoa, you're not making red velvet anymore — you're just making red cookies, and nobody wants that.
Salted butter brings richness and that irreplaceable buttery flavor that margarine simply cannot replicate. I specify salted because it enhances all the other flavors and saves you from having to add extra salt. Make sure it's properly softened — I'm talking about leaving it out for at least an hour, not nuking it in the microwave until half of it melts. Softened butter creams properly with the sugars, creating tiny air pockets that give your cookies lift and tenderness.
The Texture Crew
Vegetable oil is my secret weapon for achieving that soft, tender crumb that stays moist for days. While butter provides flavor, oil keeps things tender because it doesn't solidify at room temperature like butter does. The combination of both fats gives you the best of both worlds — buttery flavor with the staying power of oil. Don't substitute with olive oil unless you want cookies that taste like salad dressing.
Brown sugar and granulated sugar work together like a perfectly choreographed dance. The brown sugar adds moisture and a subtle caramel note from the molasses, while the white sugar creates crisp edges and helps achieve that beautiful crinkle top. If you use all brown sugar, your cookies will be too soft and won't crack properly. All white sugar makes them too crisp and sweet. The 50/50 split is scientifically perfect.
Eggs are the binding force that holds everything together — literally. They provide structure, richness, and help with leavening when beaten properly. Room temperature eggs incorporate better into the creamed butter mixture, preventing the batter from breaking or looking curdled. Cold eggs can cause your butter to seize up into little lumps, and nobody wants lumpy cookie dough.
The Unexpected Star
Red gel food coloring is where the magic happens, but here's what most recipes get wrong: they use way too much or way too little. Gel coloring is more concentrated than liquid, which means you get vibrant color without adding extra liquid that could throw off your ratios. Americolor's "Super Red" is my go-to because it creates that classic red velvet hue without making your cookies taste bitter. Start with less than you think you need — you can always add more, but you can't take it out once it's in there.
Milk seems like an afterthought, but it's crucial for achieving the right dough consistency. It hydrates the cocoa powder, helping it bloom and release its full flavor potential. The proteins in milk also interact with the flour to create a more tender crumb. If you skip the milk, your dough will be too stiff and your cookies will be dry and cakey instead of soft and fudgy.
The Final Flourish
Vanilla extract might seem basic, but it's the aromatic backbone that ties all the flavors together. Real vanilla extract (not the imitation stuff) adds depth and warmth that makes people say "what's that amazing flavor?" without being able to put their finger on it. It's like the bass player in a band — you don't always notice it's there, but you'd definitely miss it if it was gone. Splurge on the good stuff; your cookies deserve it.
The sugar coating combination is what transforms these from ordinary cookies into show-stopping crinkle cookies. The granulated sugar creates a slight crust that helps the powdered sugar stay on top instead of dissolving into the cookie. The powdered sugar creates that stunning contrast against the red interior. Roll them twice — first in granulated, then in powdered — for maximum effect.
Everything's prepped? Good. Let's get into the real action...
The Method — Step by Step
- Preheat your oven to 350°F (175°C) and position the rack in the center. This temperature is crucial — too hot and your cookies will burn on the bottom before the tops crack; too cool and they won't develop those beautiful crinkles. Line two baking sheets with parchment paper, not wax paper (trust me, I've made that mistake and ended up with paper fused to my cookies). The parchment prevents sticking and helps the bottoms brown evenly without burning. While the oven heats, grab your largest mixing bowl and let's get this party started.
- In a medium bowl, whisk together the flour, cocoa powder, baking powder, baking soda, and salt. This isn't just about combining — whisking aerates the flour and breaks up any lumps in the cocoa powder. You want everything evenly distributed because once the liquid hits, there's no going back. Take a moment to smell the cocoa — it should smell rich and chocolatey, not dusty or stale. If your cocoa powder has been sitting in your pantry since last Christmas, do yourself a favor and buy fresh; old cocoa tastes like cardboard and will ruin your cookies.
- In your large bowl, cream together the softened butter, brown sugar, and granulated sugar until light and fluffy. This should take about 3-4 minutes with an electric mixer on medium speed. You're not just mixing — you're incorporating air into the butter, which helps with leavening. The mixture should look pale and fluffy, like a butterscotch cloud. Scrape down the sides of the bowl at least twice during this process; those pockets of unmixed butter are sneaky and will cause uneven texture in your final cookies.
- Add the eggs one at a time, beating well after each addition. This is where most people rush and end up with curdled-looking dough. Room temperature eggs blend seamlessly into the creamed butter mixture, creating a smooth, emulsified base. If you forgot to take your eggs out of the fridge (we've all been there), submerge them in warm water for 5 minutes. Beat in the vanilla extract and red food coloring. Start with less coloring than you think you need — you can always add more, but you can't un-dye your dough.
- Pour in the vegetable oil and milk, mixing just until combined. The batter will look slightly separated at this point — don't panic! This is completely normal when combining oil and water-based ingredients. The mixture will come together beautifully once we add the dry ingredients. If it still looks like an oil slick after 30 seconds of mixing, your ingredients might be too cold. Let the bowl sit at room temperature for 5 minutes and try mixing again.
- Add the dry ingredients all at once and mix on low speed just until no streaks of flour remain. This is the moment of truth where overmixing can turn your tender cookies into hockey pucks. Stop mixing as soon as the flour disappears — you should still see some small lumps, which is perfect. Overdeveloping the gluten is the enemy of tender cookies. The dough should be soft and slightly sticky, like thick cake batter rather than firm cookie dough.
- Set up your rolling station with two shallow bowls: one with granulated sugar and one with powdered sugar. This might seem like overkill, but it's the secret to those perfect crinkles. The granulated sugar creates a slight crust that helps the powdered sugar stay on top, while the powdered sugar creates that stunning visual contrast. Use real powdered sugar, not the homemade stuff you made in your blender — it needs to be ultra-fine to create that beautiful snow-like coating.
- Scoop the dough using a tablespoon or small cookie scoop, rolling each portion into a ball between your palms. The dough will be sticky, so lightly flour your hands if needed, but don't go crazy — too much flour will make your cookies tough. Roll each ball first in granulated sugar, coating completely, then in powdered sugar, rolling until heavily coated. The generous powdered sugar coating is what creates those dramatic cracks as the cookies spread and the sugar coating breaks apart.
- Place the coated dough balls on your prepared baking sheets, spacing them 2 inches apart. They need room to spread, and trust me, they will spread. Eight cookies per standard sheet is the maximum — any more and you'll end up with one giant cookie sheet (which, honestly, doesn't sound terrible). For extra-large bakery-style cookies, use 2 tablespoons of dough per cookie. For dainty tea party cookies, use a teaspoon. Just adjust your baking time accordingly.
- Bake for 10-12 minutes, rotating the pans halfway through if your oven has hot spots. The cookies are done when they've spread, the tops are cracked like a dry lake bed, and the edges look set but the centers still appear slightly underbaked. They'll continue cooking on the hot pan after you remove them from the oven — this is called carryover cooking, and it's crucial for achieving that soft, fudgy center. Let them cool on the pan for 5 minutes before transferring to a wire rack. If you try to move them while they're hot, they'll fall apart and you'll burn your fingers. Patience, my friend.
That's it — you did it. But hold on, I've got a few more tricks that'll take this to another level...
Insider Tricks for Flawless Results
The Temperature Rule Nobody Follows
Room temperature isn't just a suggestion — it's the difference between cookies that look like they came from a French bakery and ones that look like they were made by someone wearing oven mitts. Your butter should be soft enough to leave an indentation when you press it, but not so soft that it's melting into a puddle. Eggs straight from the fridge will seize up your beautifully creamed butter, creating little lumps that never quite incorporate. And here's a pro tip: if your kitchen is particularly warm (hello, summer baking), chill your dough for just 15 minutes before rolling. This prevents the cookies from spreading too much and losing their perfect round shape.
Why Your Nose Knows Best
Forget timers — your nose is the best kitchen timer you have. When these cookies are perfectly baked, your kitchen will smell like a chocolate factory had a baby with a vanilla plantation. The aroma should be rich and inviting, not sharp or burnt. If you start to smell something that reminds you of burnt toast, you've gone too far. Pull them immediately, even if they don't look done. They'll finish setting as they cool, and underbaked is infinitely better than overbaked when it comes to cookies. A friend tried to wait until they looked "properly done" once and ended up with cookies that could chip teeth.
The 5-Minute Rest That Changes Everything
I know it's torture, but letting the cookies rest on the hot pan for exactly 5 minutes before moving them is crucial. During this time, the residual heat continues cooking the centers while the bottoms set up enough to handle the transfer. Move them too early and they'll crumble in your hands like sad, warm cookie dust. Wait too long and they'll stick to the parchment. Five minutes is the sweet spot — set a timer and walk away if you have to. Use this time to prepare your next batch or tidy up. Your future self will thank you when you're not scrubbing baked-on cookie bits off your pans.
Creative Twists and Variations
This recipe is a playground. Here are some of my favorite ways to switch things up:
White Chocolate Chunk Delight
Fold in 1 cup of white chocolate chunks after mixing the dough. The creamy sweetness pairs beautifully with the subtle cocoa flavor, and the white chocolate creates little pockets of melty goodness throughout each cookie. Chop your own from a high-quality bar rather than using chips — they melt better and taste more luxurious. This version disappears fastest at potlucks, probably because white chocolate and red velvet are basically soulmates.
Cream Cheese Swirl Dream
Beat together 4 ounces of cream cheese with 2 tablespoons of sugar until smooth. Drop teaspoon-sized dollops onto your rolled cookie dough balls and gently swirl with a toothpick before baking. The cream cheese creates these beautiful marbled patterns and adds a tangy contrast to the sweet cookie. Don't over-swirl or you'll lose the dramatic effect — think elegant marble, not muddy mess.
Triple Chocolate Threat
Add 1/2 cup of mini chocolate chips and 1/2 cup of cocoa nibs to the dough for a chocolate explosion in every bite. The mini chips melt into little pockets of chocolate lava, while the cocoa nibs add intense chocolate flavor and a satisfying crunch. This version is for serious chocolate lovers only — it's like red velvet and chocolate had a beautiful, delicious baby.
Peppermint Bark Remix
Replace the vanilla extract with peppermint extract and fold in 1/2 cup of crushed candy canes. The cool mint pairs beautifully with the chocolate notes, and the candy pieces add a festive crunch. These are perfect for holiday cookie exchanges and taste like Christmas morning. Just don't tell your dentist how many you've eaten.
Salted Caramel Indulgence
Press a small indentation into each rolled dough ball and fill with 1/2 teaspoon of caramel sauce before baking. Sprinkle with flaky sea salt right when they come out of the oven. The salt enhances all the other flavors and creates that sweet-savory balance that makes people weak in the knees. Use good quality caramel — the cheap stuff will disappear into the cookie and you'll lose that beautiful caramel surprise.
Double Red Velvet
For the ultimate red velvet experience, add 1 tablespoon of red velvet emulsion instead of regular food coloring. This intensifies the flavor with natural cocoa butter and vanilla notes while deepening the color. It's like red velvet squared, and it's absolutely stunning. This version is what converted my red-velvet-skeptic husband into a true believer.
Storing and Bringing It Back to Life
Fridge Storage
Store completely cooled cookies in an airtight container at room temperature for up to 5 days. Layer them between sheets of parchment paper to prevent the powdered sugar from transferring between cookies. The powdered sugar will gradually absorb into the cookies over time — to refresh them, simply dust with fresh powdered sugar before serving. Never store warm cookies — the trapped steam will turn your beautiful crinkles into soggy messes.
Freezer Friendly
These cookies freeze beautifully both as dough and as finished cookies. For dough, scoop and roll into balls, then freeze on a baking sheet until solid. Transfer to a freezer bag and store for up to 3 months. Roll in sugar just before baking, adding 1-2 minutes to the baking time. For finished cookies, freeze in a single layer, then transfer to containers. They'll keep for 2 months and taste freshly baked when thawed at room temperature for 30 minutes.
Best Reheating Method
To revive day-old cookies, place them on a microwave-safe plate with a slightly damp paper towel over them. Microwave for 8-10 seconds — just enough to warm them without melting the powdered sugar. For a large batch, wrap in foil and warm in a 300°F oven for 5 minutes. The gentle heat restores that fresh-baked texture and releases the chocolate aroma all over again. Add a fresh dusting of powdered sugar after warming to make them look bakery-fresh.