Love this? Pin it for later! 📌
When life gets busy but you still crave something spectacular, this spicy honey garlic shrimp recipe becomes your culinary superhero. I discovered this gem during one of those chaotic weeks where takeout menus were calling my name, but my wallet (and waistline) were begging for mercy. What started as a desperate attempt to use up some shrimp in my freezer has become my family's most-requested weeknight dinner.
There's something magical about the way the honey caramelizes in the pan, creating that sticky, glossy coating that clings to each plump shrimp. The garlic infuses every bite with savory depth, while the red pepper flakes dance on your taste buds with just enough heat to make things interesting. My kids love it because it's sweet, my husband loves it because it's spicy, and I love it because I can go from fridge to table in under 20 minutes.
This recipe has saved me during countless weeknight dinner emergencies – from those evenings when work ran late to Saturdays when the day slipped away faster than expected. It's elegant enough to serve to guests (they'll think you spent hours in the kitchen), yet simple enough that my teenager can make it. The best part? You probably have every ingredient in your pantry right now, making it the ultimate pantry-to-plate champion.
Why This Recipe Works
- Lightning-Fast Cooking: From prep to plate in just 15 minutes – perfect for those hangry evenings when patience is in short supply
- One-Pan Wonder: Minimal cleanup means more time for family, Netflix, or that glass of wine calling your name
- Flavor Explosion: The perfect balance of sweet, spicy, and savory that makes taste buds sing and keeps everyone coming back for seconds
- Restaurant Quality at Home: Impressive enough for date night, easy enough for Tuesday – you'll feel like a five-star chef without the five-star effort
- Endlessly Versatile: Serve over rice, noodles, quinoa, or salad greens – it plays well with whatever you have on hand
- Healthy Indulgence: Packed with lean protein and antioxidants from fresh garlic, it's a guilt-free pleasure that nourishes while it satisfies
- Meal Prep Champion: Doubles beautifully and tastes even better the next day – perfect for those Sunday prep sessions
- Budget-Friendly: Uses pantry staples to transform simple shrimp into something extraordinary without breaking the bank
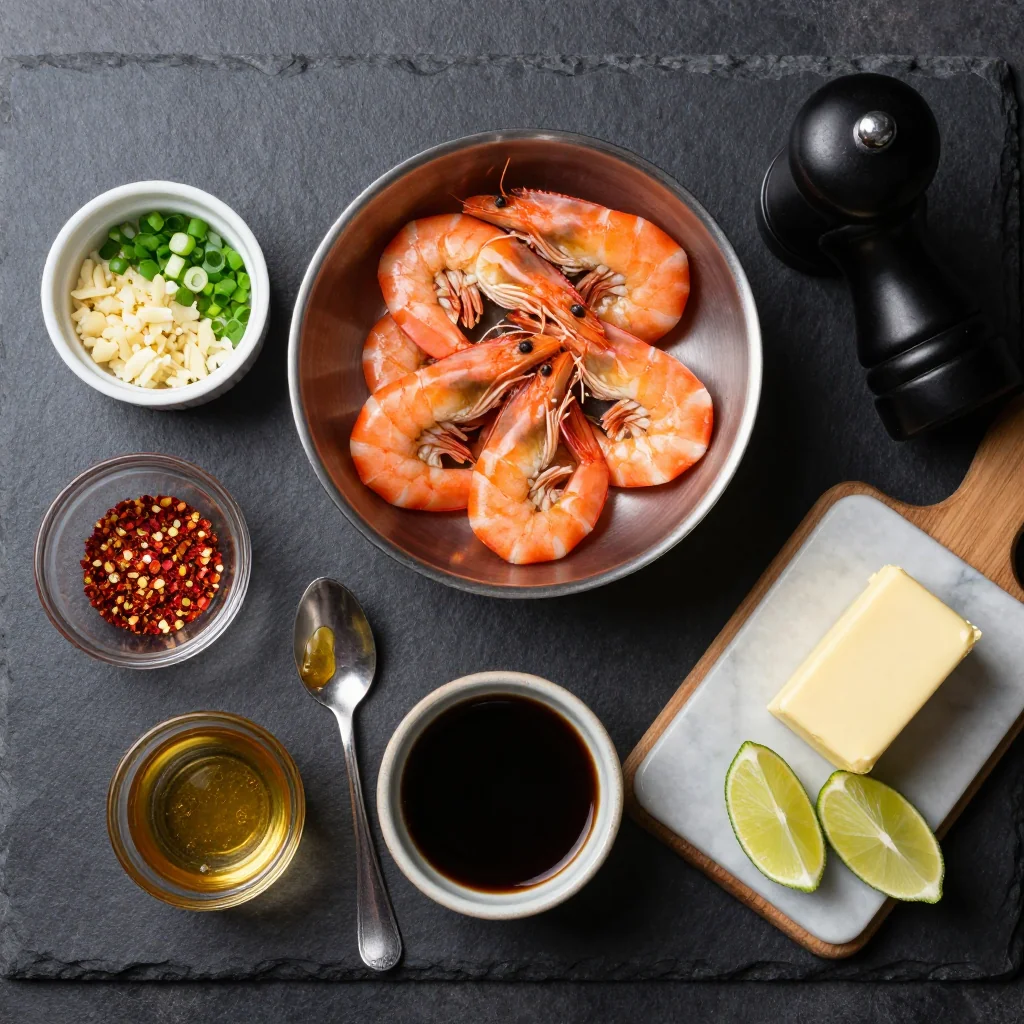
Ingredients You'll Need
This recipe celebrates simplicity, relying on just a handful of carefully chosen ingredients that work together in perfect harmony. Each component plays a crucial role in creating that addictive flavor profile that'll have you licking the pan clean.
Large Shrimp (1-1.5 lbs): I always recommend buying the best quality you can afford – wild-caught when possible. Look for shrimp that's firm, translucent, and smells like the ocean, not fishy. The 16-20 count size works perfectly here – substantial enough to feel like you're getting a real bite, but not so large they take forever to cook. If you're using frozen shrimp (which is totally fine – most shrimp is flash-frozen right on the boat), make sure to thaw completely and pat very dry. This is crucial for achieving that beautiful sear.
Honey (3 tablespoons): The star of our sweet element. I prefer using a good quality wildflower honey for its complex floral notes, but honestly, whatever you have in your pantry will work beautifully. The honey not only provides sweetness but also helps create that gorgeous, sticky glaze that makes this dish so irresistible. If you're feeling adventurous, try orange blossom honey for a citrusy twist or buckwheat honey for a more robust, molasses-like depth.
Fresh Garlic (4-5 cloves): Please, please, please use fresh garlic here. The pre-minced stuff in jars just can't compare to the pungent, aromatic punch that fresh garlic provides. I like to grate my garlic on a microplane for maximum distribution throughout the sauce, but finely mincing works perfectly too. The fresher, the better – old garlic can taste bitter and harsh.
Soy Sauce (2 tablespoons): This provides our salty, umami backbone. I typically use low-sodium soy sauce so I can control the salt level, but tamari works great for gluten-free folks. For an extra layer of flavor, try using dark soy sauce – it's thicker, slightly sweeter, and will give your shrimp a deeper color.
Red Pepper Flakes (½-1 teaspoon): Here's where you control the heat. Start with ½ teaspoon if you're cooking for children or spice-sensitive palates, and work your way up to a full teaspoon (or more!) if you like it hot. I find that ¾ teaspoon hits that perfect sweet spot where there's definitely heat, but you can still taste all the other flavors.
Fresh Ginger (1 tablespoon): While optional, I highly recommend it. Fresh ginger adds a bright, zesty note that complements both the sweetness of the honey and the heat of the pepper flakes. Peel it with a spoon (the easiest method!) and grate it fine.
Green Onions & Sesame Seeds: These garnishes aren't just for show – they add freshness, texture, and visual appeal that elevates the entire dish. The green onions provide a crisp, oniony bite while the sesame seeds add a delightful nuttiness and crunch.
How to Make Spicy Honey Garlic Shrimp for Quick Weeknight Dinners
Prep Your Ingredients (Mise en Place)
Start by patting your shrimp completely dry with paper towels – this is absolutely crucial for achieving that beautiful sear instead of steaming. Season them generously with salt and pepper. Mince your garlic, grate your ginger if using, and whisk together your honey, soy sauce, and red pepper flakes in a small bowl. Having everything ready is essential since this dish cooks lightning-fast. Trust me, you don't want to be fumbling with garlic while your shrimp overcooks!
Heat Your Pan Properly
Place a large skillet (I prefer stainless steel or cast iron) over medium-high heat and let it get nice and hot – about 2 minutes. You want it hot enough that a drop of water sizzles immediately. Add 1 tablespoon of oil (vegetable, canola, or grapeseed work best for their high smoke points) and swirl to coat the pan evenly. A properly heated pan is the secret to that gorgeous golden sear we're after.
Sear the Shrimp
Working in batches if necessary (crowding the pan will steam rather than sear), add the shrimp in a single layer. Let them cook undisturbed for 1-2 minutes until they turn pink and opaque about halfway up. Resist the urge to move them around – this is how you get that beautiful caramelization! Flip each shrimp individually and cook for another 30-60 seconds on the second side. They should be just cooked through but still tender. Transfer to a plate and tent loosely with foil.
Create the Magic Sauce
In the same pan (don't you dare wash it – those browned bits are flavor gold!), reduce heat to medium. Add a touch more oil if the pan looks dry, then add your garlic and ginger. Sauté for just 30 seconds until fragrant but not browned – burnt garlic turns bitter and will ruin your beautiful sauce. Pour in your honey-soy mixture and let it bubble away for about 1 minute, stirring constantly with a wooden spoon to scrape up all those gorgeous browned bits.
The Glorious Glaze
Let the sauce simmer for 2-3 minutes until it thickens slightly and becomes glossy and syrupy. You're looking for a consistency that will coat the back of a spoon but still be pourable. If it gets too thick, thin with a splash of water. Taste and adjust – add more honey if you want it sweeter, more soy for saltiness, or more pepper flakes for heat. This is your moment to make it perfectly yours!
The Grand Finale
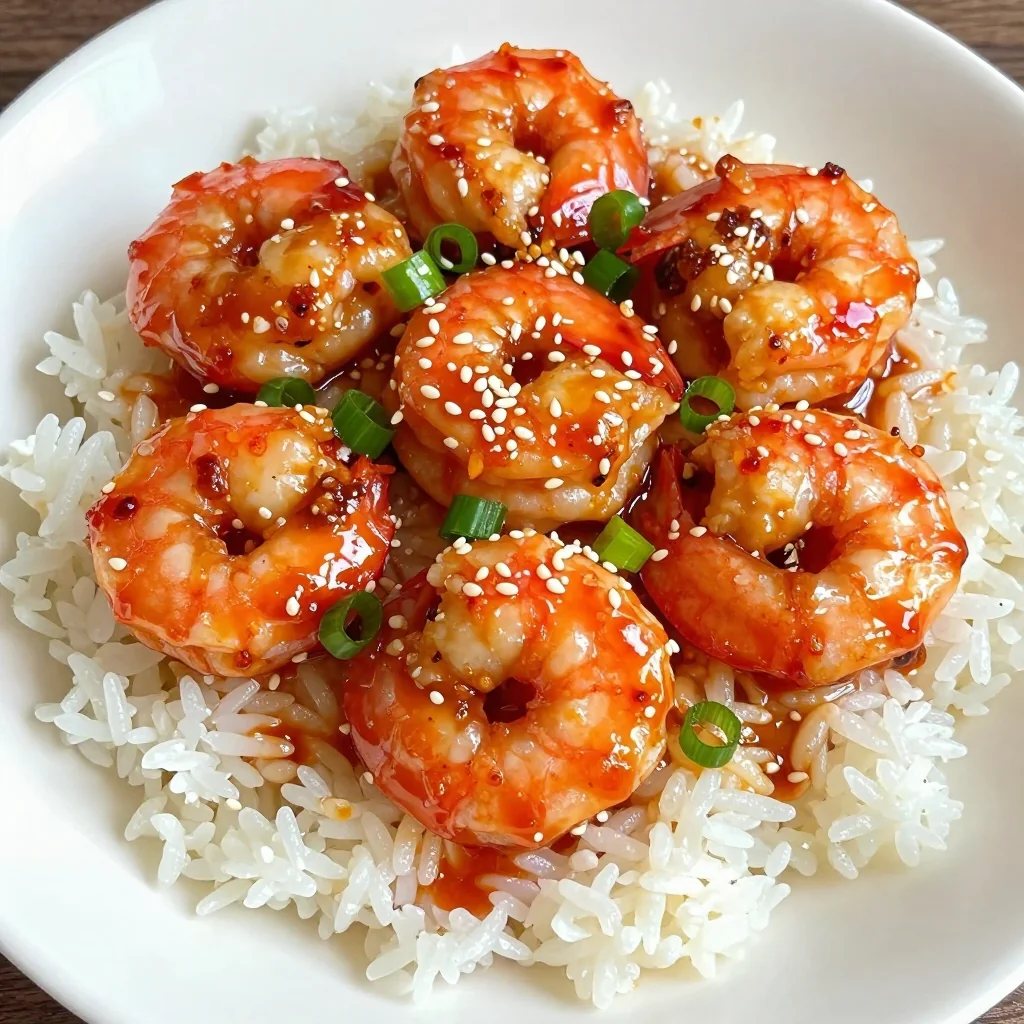
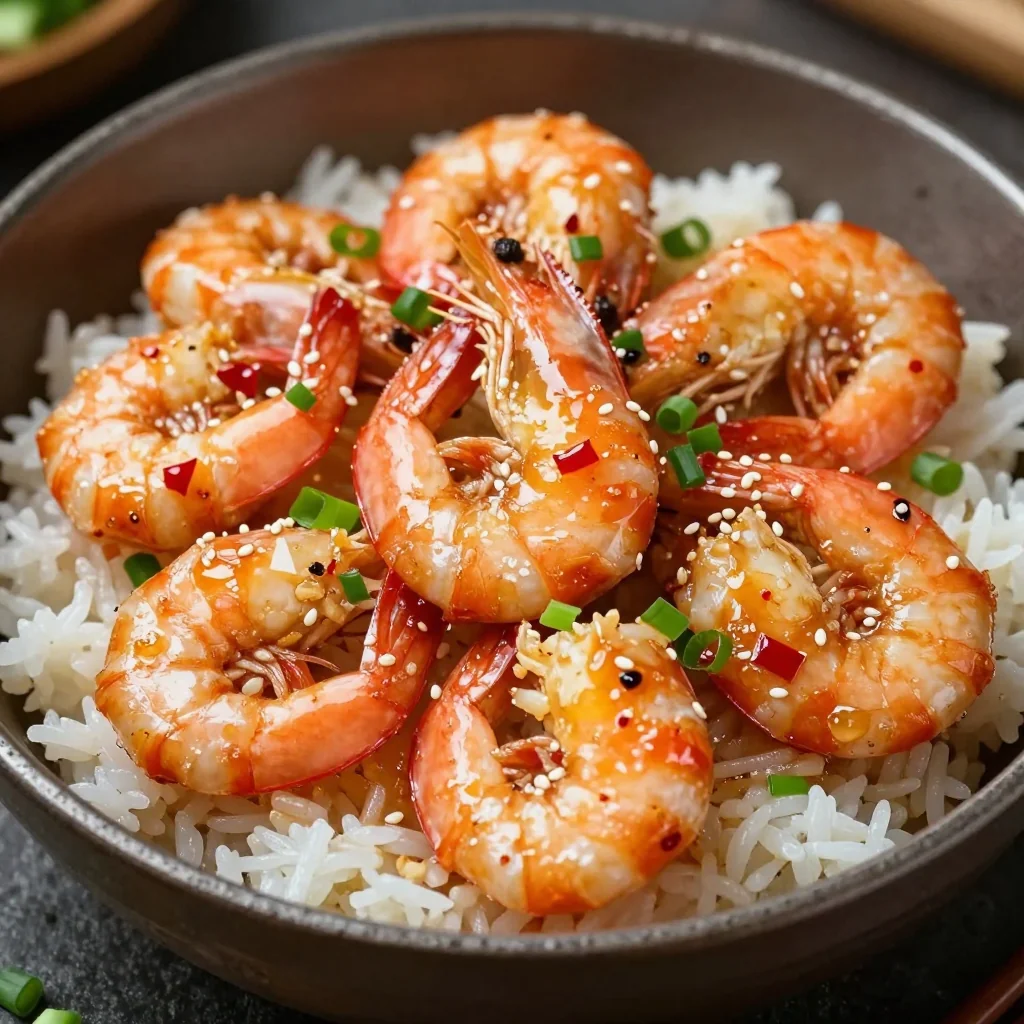
Return the shrimp to the pan and toss gently to coat each piece in that glorious sauce. Cook for just 30-60 seconds more – you want the shrimp heated through but not overcooked. Remove from heat immediately (shrimp continue cooking from residual heat) and sprinkle with green onions and sesame seeds. Serve over steaming rice, noodles, or alongside your favorite vegetables. Dive in immediately while it's hot and that sauce is at its glossy, sticky peak!
Expert Tips
Dry = Sear
I can't stress this enough – pat your shrimp absolutely dry. Even a little moisture will create steam instead of that gorgeous golden sear we're after. I use three paper towels per pound of shrimp, pressing gently but firmly. Your taste buds will thank you!
Hot Pan, Cold Oil
Heat your pan first, then add the oil. This prevents sticking and gives you that restaurant-quality sear. The oil should shimmer immediately but not smoke. If it starts smoking, lower the heat slightly.
Don't Overcook
Shrimp cook in mere minutes and turn rubbery if overdone. They're perfect when they form a "C" shape. If they curl into a tight "O," they're overcooked. When in doubt, pull them off heat – they'll finish cooking from residual heat.
Double the Sauce
If you love sauce (and who doesn't?), double the glaze ingredients. The extra sauce is incredible drizzled over rice, steamed vegetables, or even as a dipping sauce for dumplings. I always make extra and keep it in the fridge for up to a week.
Deveining Made Easy
If your shrimp aren't deveined, use kitchen shears to cut along the back and lift out the vein. It's much easier than using a paring knife and you don't have to split the shrimp completely. Save time without sacrificing presentation!
Batch Cooking Success
Cook shrimp in batches to avoid overcrowding. Overcrowded shrimp steam instead of sear. Keep cooked shrimp warm in a 200°F oven while you finish the rest. They'll all be perfectly cooked and beautifully seared.
Variations to Try
Vegetable-Packed Version
Add bell peppers, snap peas, or broccoli florets to the pan after searing the shrimp. Sauté until crisp-tender, then proceed with the sauce. This turns it into a complete one-pan meal that's both colorful and nutritious!
Sweet Heat Explosion
For serious heat lovers, add 1-2 teaspoons of gochujang or sriracha to the sauce. The fermented chili paste adds incredible depth and complexity that takes this from weeknight simple to restaurant spectacular.
Citrus Brightness
Add the zest of one orange or lemon to the sauce, plus a squeeze of fresh juice at the end. The citrus notes cut through the sweetness and add a bright, fresh dimension that's perfect for summer evenings.
Low-Sugar Option
Replace half the honey with sugar-free maple syrup or monk fruit sweetener. You won't miss the extra sugar, and this version is diabetic-friendly while maintaining all the flavor you love.
Thai-Inspired Twist
Add 1 tablespoon of fish sauce and a handful of fresh Thai basil at the end. The fish sauce adds incredible umami depth, while the basil provides that authentic Thai restaurant flavor that'll transport your taste buds to Bangkok.
Mediterranean Fusion
Swap the soy sauce for balsamic vinegar and add sun-dried tomatoes and fresh oregano. Top with crumbled feta cheese for a Greek-inspired version that's equally addictive and weeknight-fast.
Storage Tips
Refrigerator Storage
Store cooled shrimp in an airtight container in the refrigerator for up to 3 days. The sauce may thicken when cold – simply reheat gently with a splash of water or chicken broth to loosen it. I like to store the shrimp and sauce together so the flavors continue to meld. Pro tip: The cold leftovers make an incredible addition to salads or lettuce wraps!
Freezer Instructions
While cooked shrimp can be frozen, the texture will change upon thawing. If you must freeze, place cooled shrimp in a freezer-safe container with as much sauce as possible (it helps protect the texture) and freeze for up to 2 months. Thaw overnight in the refrigerator and reheat very gently. For best results, I recommend freezing the raw shrimp in the marinade instead – just thaw overnight and cook as directed.
Reheating Without Overcooking
The key to reheating shrimp without turning them rubbery is gentle heat. Microwave at 50% power in 30-second intervals, stirring between each interval. Or better yet, reheat in a skillet over low heat with a splash of water or broth, just until warmed through. They'll be almost as good as fresh!
Make-Ahead Components
The sauce can be mixed up to 5 days ahead and stored in the refrigerator. You can also prep your aromatics (garlic, ginger, green onions) and store them in separate containers for up to 3 days. This turns your 15-minute dinner into a 10-minute miracle on those truly hectic evenings.
Frequently Asked Questions
Absolutely! In fact, most shrimp is flash-frozen right on the boat, so frozen shrimp can be even fresher than "fresh" shrimp that has been sitting on ice. The key is proper thawing: place frozen shrimp in a bowl of cold water for 10-15 minutes, changing the water if it gets too cold. Pat them absolutely dry before cooking. I've made this recipe hundreds of times with frozen shrimp, and it's always delicious.
Perfectly cooked shrimp form a gentle "C" shape and are pink and opaque throughout. If they curl into a tight "O" or look like tiny footballs, they're overcooked. The timing is usually 1-2 minutes per side, depending on size. When in doubt, err on the side of undercooking – they continue cooking from residual heat, and slightly undercooked shrimp are far better than rubbery, overcooked ones.
Of course! Simply omit the red pepper flakes entirely, or start with just a pinch. You can also add a bit more honey to balance any heat. For families with mixed preferences, I often make the sauce without pepper flakes, then add hot sauce at the table for the adults. Another trick is to use sweet chili sauce instead of honey for a milder, kid-friendly version that still has that sweet-savory appeal.
Brown sugar, maple syrup, or agave all work beautifully as honey substitutes. Brown sugar will give you a deeper, more molasses-like flavor, while maple adds a lovely complexity. Use a 1:1 ratio for all substitutes. If you're using brown sugar, you might want to add a tablespoon of water to help it dissolve into the sauce properly.
Absolutely, but cook the shrimp in batches to avoid overcrowding the pan. I usually cook 1 pound at a time, keeping the first batch warm in a 200°F oven while I cook the second. The sauce can be doubled without any issues – just increase the simmering time by a minute or two to achieve the right consistency. This recipe scales beautifully for dinner parties and potlucks!
It can be! Simply substitute tamari or coconut aminos for the soy sauce. Tamari has a richer, smoother flavor that's actually preferred by many who aren't avoiding gluten. The rest of the ingredients are naturally gluten-free, making this an easy adaptation that doesn't sacrifice any flavor. Just be sure to check that your red pepper flakes and other spices are processed in a gluten-free facility if you're cooking for someone with celiac disease.
Spicy Honey Garlic Shrimp for Quick Weeknight Dinners
Ingredients
Instructions
- Prep shrimp: Pat shrimp completely dry with paper towels. Season with salt and pepper. Whisk together honey, soy sauce, and red pepper flakes in a small bowl.
- Heat pan: Heat oil in a large skillet over medium-high heat until shimmering hot.
- Cook shrimp: Add shrimp in a single layer (work in batches if needed). Cook 1-2 minutes per side until pink and opaque. Transfer to a plate.
- Make sauce: In the same pan, sauté garlic and ginger for 30 seconds. Pour in honey mixture and simmer 2-3 minutes until glossy and thick.
- Combine and serve: Return shrimp to pan, toss to coat, and cook 30-60 seconds more. Garnish with green onions and sesame seeds. Serve immediately over rice or noodles.
Recipe Notes
Shrimp cook quickly - avoid overcooking for the best texture. The sauce thickens as it cools, so serve immediately for the best consistency. For meal prep, store sauce separately and combine just before serving.