I’m going to start with a confession: I once tried to make a “raw carrot cake” that turned out looking like a sad pile of shredded veggies and a stick of dates. The kitchen smelled like a grocery store carpet, the texture was a mushy nightmare, and I swore off raw desserts for a month. Then, after a daring friend dared me to “make something that actually tastes like cake without an oven,” I dove headfirst into the world of raw vegan baking, armed with a food processor, a handful of spices, and an unhealthy obsession with carrots. The result? A bite‑size masterpiece that made my taste buds do a happy dance and had my roommate begging for the secret recipe.
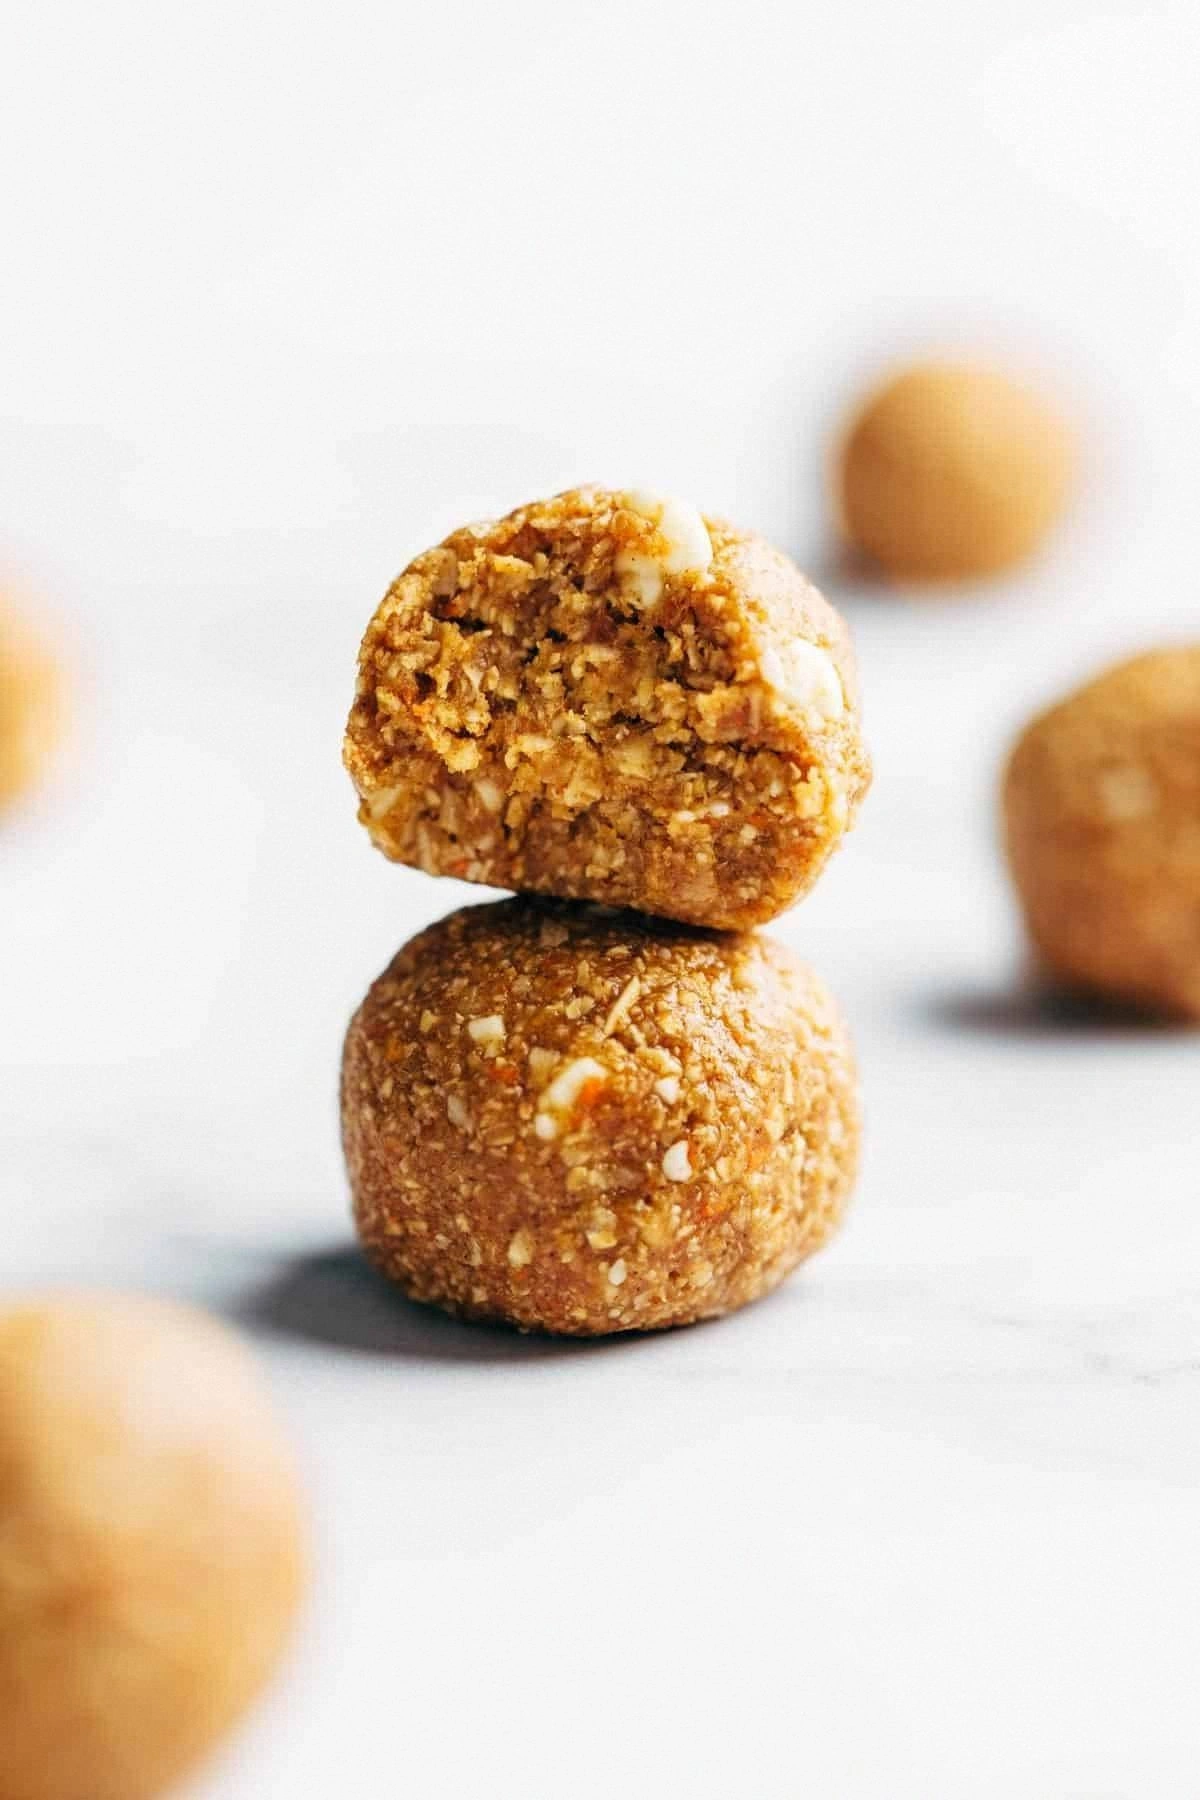
Picture this: you open the fridge, and there they are—tiny, orange‑golden nuggets that look like miniature carrot‑shaped gems. The first bite releases a burst of sweet‑spicy perfume that instantly reminds you of a cozy autumn bakery, even though we’re in the middle of July. The texture is a perfect marriage of chewy dates, crunchy walnuts, and a whisper of coconut that melts like butter on your tongue. The spices—cinnamon, nutmeg, and a hint of ginger—wrap around the carrots like a warm blanket, while a dash of orange zest adds a bright, citrusy pop that feels like sunshine on a rainy day.
What sets this version apart from every other raw carrot cake you’ve ever seen is the secret trick of “raw caramelization.” By gently heating the date‑walnut mixture in a low‑heat dehydrator for just a few minutes, we coax out a deep, caramel‑like flavor without ever crossing the 118°F (48°C) line that would technically “cook” the ingredients. Most recipes either skip this step and end up flat, or they over‑process the nuts, turning them into a paste that loses all crunch. I’ve cracked the code, and the result is a bite that is simultaneously soft, crunchy, and decadently sweet—hands down the best version you’ll ever make at home.
Okay, ready for the game‑changer? I’m about to walk you through every single step—from selecting the perfect carrots to mastering that raw caramelization technique. By the end, you’ll wonder how you ever settled for bland, store‑bought “healthy” snacks. I dare you to taste this and not go back for seconds. Let me walk you through every single step — by the end, you'll wonder how you ever made it any other way.
What Makes This Version Stand Out
- Flavor Explosion: The blend of warm spices, fresh orange zest, and raw caramelized dates creates a depth of flavor that rivals baked carrot cake, without any heat.
- Texture Symphony: Crunchy walnuts, tender shredded carrots, and a creamy coconut coating give each bite a multi‑layered mouthfeel.
- Simplicity: Only a food processor, a dehydrator (or a warm oven set low), and a handful of pantry staples are needed—no fancy equipment.
- Unique Caramelization: A quick low‑heat step unlocks a caramel flavor that most raw recipes completely miss.
- Crowd‑Pleaser: Even non‑vegans and picky eaters can’t resist the sweet‑spicy aroma that fills the kitchen.
- Ingredient Quality: Using fresh, organic carrots and raw, unsweetened coconut ensures each bite feels clean yet indulgent.
- No Baking Required: Perfect for summer days when you don’t want to heat up the kitchen, yet you still crave that baked‑good vibe.
- Make‑Ahead Magic: These bites keep for up to a week in the fridge, making them ideal for grab‑and‑go snacks or a quick dessert.
Inside the Ingredient List
The Flavor Base
Dates are the unsung heroes of raw desserts. Their natural sweetness replaces refined sugars, while their sticky texture acts as the glue that holds everything together. If you skip the dates, you’ll end up with a dry crumb that falls apart faster than a sandcastle at high tide. For this recipe, I use Medjool dates because they’re plump, caramel‑rich, and easy to blend. If you can’t find Medjools, pitted regular dates work, but you’ll need a few more to hit the same sweetness level. Pro tip: soak the dates in warm water for 10 minutes before processing; this makes them blend into a silky paste without any gritty bits.
The Texture Crew
Walnuts bring a buttery crunch that contrasts beautifully with the chewiness of the dates. They also add a subtle earthiness that balances the sweet spices. If you’re allergic to nuts, try toasted pumpkin seeds or sunflower seeds—they’ll give you that same satisfying snap. Shredded carrots are the star of the show, providing moisture, a natural sweetness, and a pop of color that makes these bites Instagram‑ready. I recommend using a fine grater; the finer the shred, the more evenly the carrot flavor distributes throughout each bite.
The Unexpected Star
Coconut oil might sound like a “fat” that should be avoided, but in raw vegan baking it’s a miracle worker. It solidifies at room temperature, giving the bites a firm yet melt‑in‑your‑mouth finish. Plus, it adds a faint tropical note that pairs nicely with orange zest. If you’re looking for a lighter version, substitute with a tablespoon of almond butter, but be prepared for a slightly softer texture. A tiny pinch of sea salt elevates the sweet‑spice profile, making the flavors pop like fireworks on a dark night.
The Final Flourish
Orange zest is the secret weapon that lifts the entire flavor profile from “good” to “wow.” Its bright citrus oils cut through the richness of the dates and nuts, creating a balanced bite that never feels cloying. If you’re not a fan of orange, try lemon zest for a sharper edge or a splash of vanilla extract for a cozy, bakery‑like aroma. Lastly, a sprinkle of ground cinnamon, nutmeg, and ginger creates that classic carrot‑cake spice blend that makes you instantly think of grandma’s kitchen.
Everything's prepped? Good. Let's get into the real action...
The Method — Step by Step
First, gather all your ingredients within arm’s reach. This might sound like a cliché, but trust me—when you’re about to blend dates and walnuts into a sticky mess, you’ll thank yourself for having the orange zest already waiting on the counter. Toss the shredded carrots into a large bowl, drizzle a teaspoon of fresh lemon juice over them, and set aside. The acidity helps preserve the carrot’s vibrant color and adds a subtle zing that brightens the final bite.
Now for the caramelization: place the pitted dates, walnuts, a pinch of sea salt, and 2 tablespoons of coconut oil into a food processor. Pulse until you achieve a coarse, grainy mixture—think of it as a raw “brown butter” base. Transfer the mixture onto a parchment‑lined tray, spread it thin, and pop it into a dehydrator set to 115°F (46°C) for 20 minutes. If you don’t own a dehydrator, a conventional oven set to its lowest temperature (around 170°F/77°C) works just as well; just keep an eye on it so it doesn’t melt.
While the base is “caramelizing,” whisk together the remaining wet ingredients: 1 tablespoon of melted coconut oil, 1 teaspoon of pure vanilla extract, 1 tablespoon of maple syrup, and the orange zest. The maple syrup isn’t just for sweetness; it adds a subtle woody note that deepens the flavor profile.
Once the date‑walnut mixture is ready, return it to the food processor. Add the wet mixture, a pinch of ground cinnamon, ¼ teaspoon of nutmeg, and a pinch of ground ginger. Process until everything is fully combined into a smooth, glossy paste that clings to the back of a spoon. This is the moment of truth—the paste should feel thick but still be pliable enough to roll into balls.
Fold the shredded carrots into the paste by hand. Use a rubber spatula and gently press the carrots in, ensuring they’re evenly coated. The carrots should be suspended throughout the mixture, not just sitting on top. This step is where the texture crew truly shines, and you’ll start to see the bright orange speckles that make these bites instantly recognizable.
Line a baking sheet with parchment paper. Scoop out tablespoon‑sized portions of the mixture and roll them between your palms to form smooth balls. If the mixture sticks to your fingers, lightly dust your hands with shredded coconut or a pinch of oat flour. Place the formed bites onto the parchment, leaving a small gap between each so they don’t fuse together during the final set.
Now, for the final “baking” step: pop the tray into the dehydrator again, this time at 115°F (46°C) for 30 minutes. The gentle heat will firm up the outer layer, giving each bite a subtle crust that cracks open like a tiny, edible shell when you bite into it. If you’re using an oven, set it to the lowest possible temperature and keep the door ajar to allow airflow.
After the final dehydrate, let the bites cool completely on the tray. Once cooled, roll each bite in a mixture of shredded coconut and a pinch of cinnamon for a decorative finish that adds an extra layer of flavor. Store them in an airtight container, and they’ll stay fresh for up to a week. That’s it — you did it. But hold on, I've got a few more tricks that'll take this to another level...
Insider Tricks for Flawless Results
The Temperature Rule Nobody Follows
Most raw chefs assume that “no heat” means you can skip temperature control altogether. Wrong. The low‑heat dehydration step is crucial for developing that caramel flavor and firming the outer crust. Set your dehydrator to exactly 115°F (46°C); any higher, and you risk melting the coconut oil, which turns the bites soggy. If you’re using an oven, preheat it to its lowest setting, then prop the door open with a wooden spoon to keep the temperature from climbing. Your bites will thank you with a satisfying snap.
Why Your Nose Knows Best
Don’t rely solely on timers—trust your senses. When the date‑walnut mixture starts to emit a sweet, toasted aroma, you’re nearing the perfect caramelization point. If you smell a burnt note, pull it out immediately. This nose‑guided approach prevents the dreaded bitter aftertaste that can ruin an otherwise perfect batch.
The 5‑Minute Rest That Changes Everything
After the final dehydration, give the bites a five‑minute rest before rolling them in coconut. This short pause allows the outer layer to set fully, ensuring the coating sticks without sliding off. Skipping this step leads to a messy presentation—something I learned the hard way when my first batch looked like a toddler’s art project.
The “Sticky‑Finger” Savior
If the mixture clings to your hands, lightly dust them with a mixture of shredded coconut and a dash of oat flour. The coconut adds a subtle flavor boost, while the oat flour provides just enough dryness to keep the mixture moving. This hack saved me from countless sticky mishaps and kept my kitchen counters pristine.
The Double‑Layer Trick
For an extra indulgent bite, dip each formed ball halfway into a quick‑set raw chocolate ganache (made from melted cacao butter and raw cocoa powder) before rolling in coconut. The ganache hardens quickly in the fridge, creating a luxurious chocolate shell that contrasts beautifully with the spiced carrot interior. A friend tried this once and claimed it was “like a raw version of a carrot‑cake éclair.”
Creative Twists and Variations
This recipe is a playground. Here are some of my favorite ways to switch things up:
Tropical Dream
Swap the orange zest for lime zest and add a tablespoon of finely shredded pineapple. The tangy lime amplifies the coconut, while the pineapple adds a juicy burst that transports you to a beachside snack bar.
Spiced Chai
Replace the cinnamon‑nutmeg‑ginger blend with a chai spice mix (cardamom, cloves, black pepper, and star anise). This variation gives the bites an exotic, tea‑time vibe that pairs perfectly with a warm mug of almond milk.
Chocolate‑Covered Delight
After forming the bites, dip them entirely in a raw cacao ganache and then roll them in crushed hazelnuts. The result is a decadent, double‑chocolate experience that satisfies any chocolate lover’s cravings.
Nut‑Free Version
Swap walnuts for toasted sunflower seeds and use oat flour instead of almond‑based flour. The texture remains crunchy, and the flavor stays robust—perfect for those with nut allergies.
Protein Power
Add a scoop of vanilla‑flavored plant protein powder to the wet mixture. This boosts the protein content without compromising the delicate balance of flavors, making the bites a great post‑workout snack.
Storing and Bringing It Back to Life
Fridge Storage
Place the bites in an airtight glass jar or a BPA‑free plastic container. They stay fresh for up to 7 days. For optimal texture, keep the container in the main compartment of the fridge, not the door, where temperature fluctuations can soften the coconut coating.
Freezer Friendly
If you want to batch‑make for a month’s worth of snacks, freeze the bites on a parchment sheet in a single layer, then transfer them to a zip‑top freezer bag. They’ll keep for up to 3 months. When you’re ready to enjoy, let them thaw at room temperature for 10 minutes, then give them a quick roll in fresh coconut to refresh the outer layer.
Best Reheating Method
Although these bites are perfect cold, a brief “re‑warm” can enhance the aroma. Place a few bites on a plate, cover loosely with foil, and microwave on low power (30% setting) for 10‑15 seconds. Add a tiny splash of water (about 1 teaspoon) before microwaving; the steam revives the soft interior while keeping the outer crust firm.