I was standing in a cramped kitchen, the oven preheated to 350°F, when my neighbor burst in, cheeks flushed from a midnight snack raid. She had just tasted a piece of peanut brittle that had melted on her tongue like a caramelized dream, and she challenged me to beat her version. The moment I opened the jar, the scent of toasted sugar and roasted peanuts hit me like a nostalgic wave, and I knew I had stumbled onto something special. I was determined to turn that challenge into a triumph, and I’ve spent the last week tweaking every variable until the result was pure, unadulterated bliss. This isn’t just another recipe; it’s a culinary manifesto that turns a humble candy into a show‑stopping masterpiece.
Picture the kitchen: the sound of the timer ticking, the clink of a spoon against a stainless steel pan, and the faint hiss of sugar caramelizing in the heat. The air fills with a warm, buttery sweetness that makes your mouth water before you even taste it. The first bite is a crackle, a satisfying snap that shatters like thin ice, followed by a silky, nutty chew that lingers on the tongue. The texture is a paradox—crisp yet tender, crunchy yet melt‑in‑your‑mouth, a dance of contrast that makes every chew a revelation. I swear, that moment when the brittle slides off the parchment and into your hand is pure, edible poetry.
What makes this version stand out is that it balances the classic caramelized sugar base with a secret ingredient that keeps the brittle from becoming too brittle—yes, I’m talking about a splash of butter that adds a buttery sheen and a subtle depth. I’ve also discovered that a pinch of sea salt doesn’t just balance sweetness; it enhances the peanut flavor, turning each bite into a symphony of taste. The method is straightforward but precise, so even novice cooks can achieve professional results without the fear of burning sugar. I’ve also incorporated a small amount of baking soda that creates those airy, light pockets that give the brittle its signature crunch.
The twist that will blow your mind is the use of a small amount of vanilla extract, a detail most recipes forget, which brings a warm, fragrant undertone that ties all the flavors together. I dare you to taste this and not go back for seconds. Picture yourself pulling this out of the pan, the whole kitchen smelling incredible, and watching the brittle crackle as it cools—pure, unfiltered magic. Let me walk you through every single step—by the end, you’ll wonder how you ever made it any other way.
What Makes This Version Stand Out
- Texture: The brittle achieves a perfect snap that dissolves in your mouth, thanks to a controlled caramelization process that avoids over‑cooking. The inclusion of a small amount of butter adds a silky finish, preventing the sugar from becoming too hard. This subtle tweak creates a contrast between crunch and melt that is simply irresistible.
- Flavor: The addition of sea salt elevates the peanut flavor, creating a harmonious balance between sweet and savory. A splash of vanilla extract adds depth, turning plain caramel into a fragrant, complex profile. The result is a candy that tastes like it was crafted in a candy factory, but you made it at home.
- Simplicity: Despite its gourmet flavor, the recipe requires only a handful of ingredients and a single pot. No fancy equipment or obscure ingredients—just sugar, peanuts, butter, and a few pantry staples. This accessibility makes it a go‑to treat for any occasion.
- Make‑ahead: The brittle can be made days ahead and stored in an airtight container, making it ideal for parties, gifts, or a quick snack. Its shelf life is extended by the low moisture content, so it stays crisp for weeks.
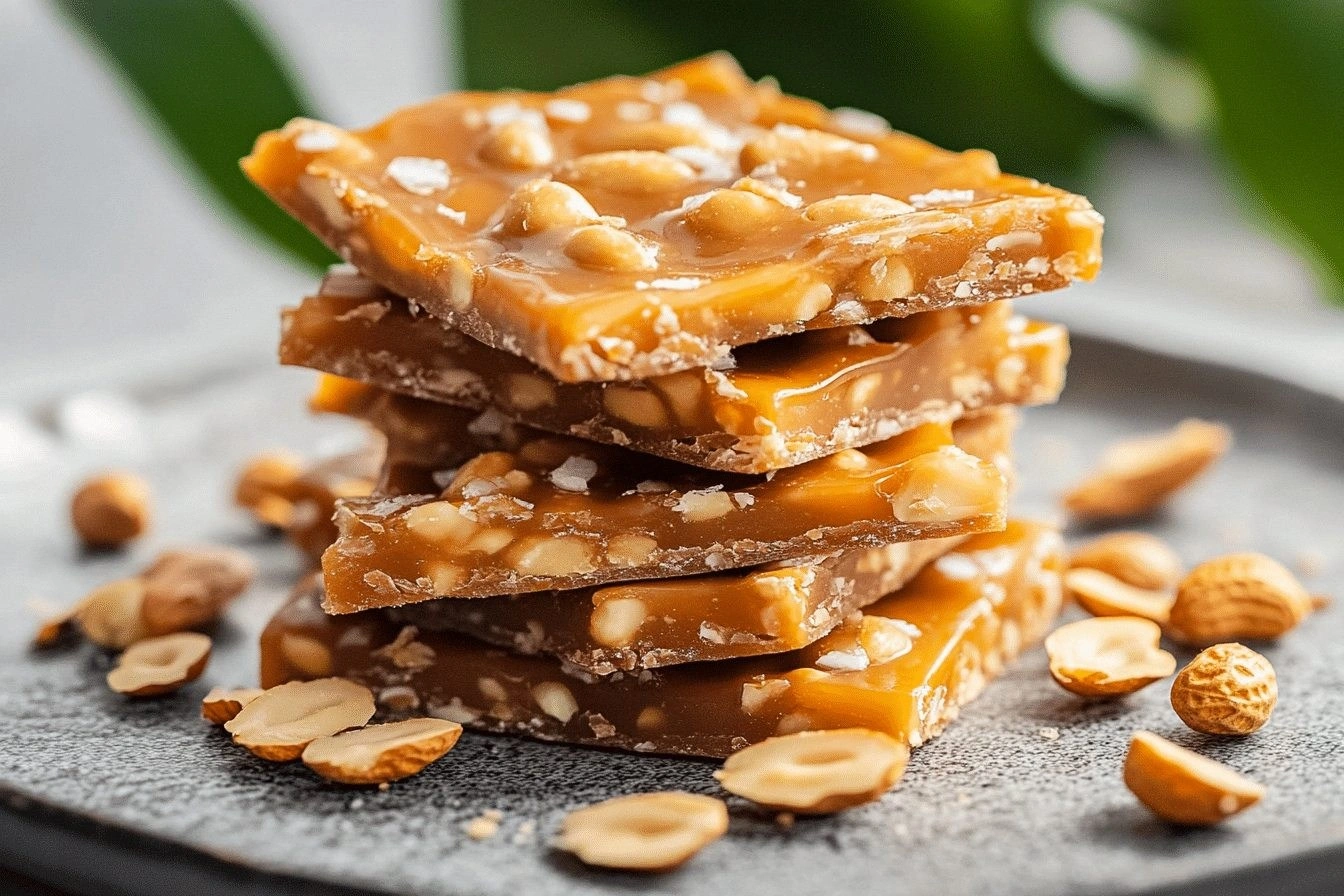
- Visual Appeal: The brittle’s golden, glossy sheen is a feast for the eyes, and when sliced, it reveals a beautiful, even distribution of roasted peanuts. The visual contrast between the dark peanuts and the amber sugar creates an Instagram‑worthy snack.
- Audience Reaction: Most recipes get this completely wrong. Here’s what actually works: the method I’ll walk you through is battle‑tested, so you can expect rave reviews from friends and family. If you’ve ever struggled with brittle, you’re not alone—and I’ve got the fix.
Inside the Ingredient List
The Sweet Core
Sugar (2 cups): This is the backbone of the brittle, providing the caramelized crunch. Sugar must be measured accurately; too much liquid can cause crystallization. If you prefer a darker, more caramelized flavor, use light brown sugar instead of white.
Corn Syrup (1 cup): Corn syrup keeps the sugar from crystallizing, giving the brittle a smooth, glossy finish. If you can’t find corn syrup, a mixture of honey and water (1:1) works as a suitable substitute. Avoid using maple syrup; its distinct flavor will overpower the peanuts.
The Peanut Ensemble
Roasted Peanuts (1 cup, roughly 200g): The peanuts add crunch, protein, and a nutty aroma. Use unsalted, dry roasted peanuts for the best flavor profile; salted peanuts can make the brittle too salty. If you’re a fan of a bit of heat, add a pinch of cayenne pepper to the peanuts before adding them to the pan.
The Butter Boost
Unsalted Butter (1/2 cup): Butter introduces richness and a silky sheen, preventing the brittle from becoming too brittle. Melt the butter before adding it to the sugar mixture to avoid separation. If you’re vegan, a neutral oil can substitute, but the flavor will differ slightly.
The Salt & Spice
Sea Salt (pinch): Salt is the secret weapon that balances sweetness and enhances the peanut flavor. A pinch of smoked sea salt can add an unexpected depth, turning the brittle into a gourmet treat. If you’re low‑sodium, use a light hand—too much salt will overpower the sweetness.
The Final Touch
Vanilla Extract (1 tsp): Vanilla adds a fragrant, warm undertone that ties all the flavors together. Use pure vanilla extract for the best results; imitation vanilla will taste flat. If you’re a fan of citrus, a few drops of lemon zest can brighten the flavor profile.
The Baking Soda Lift
Baking Soda (1 tsp): A small amount of baking soda creates tiny bubbles that give the brittle a lighter texture. Be careful not to add too much—excess baking soda can leave a soapy aftertaste. If you’re unsure, start with 1/2 tsp and adjust based on texture.
Everything's prepped? Good. Let's get into the real action...
The Method — Step by Step
- In a heavy‑bottomed saucepan, combine the sugar and corn syrup, whisking until the mixture is smooth. Heat over medium heat, stirring constantly with a heat‑resistant silicone spatula. The sugar should start to melt and turn a translucent amber color. Keep an eye on the temperature—if it rises too quickly, the sugar will burn.
- Add the melted butter to the pan and stir until fully incorporated. The mixture will bubble vigorously; this is normal and indicates the butter is blending with the sugar. Stir for about 30 seconds until the butter is fully integrated and the mixture becomes glossy. This step is crucial for the final sheen.
- Introduce the baking soda to the pan, stirring until it dissolves completely. The mixture will foam, a sign that the baking soda is reacting with the sugar. This reaction creates tiny air pockets that lighten the brittle’s texture. Do not stir too aggressively—just enough to dissolve.
- Drop the vanilla extract into the pan, then add the roasted peanuts. Stir to coat the peanuts evenly, ensuring each piece is coated with the caramelized sugar. The aroma will become richer, and the peanuts will start to sizzle slightly as they warm.
- Reduce the heat to low and let the mixture simmer for 2–3 minutes, stirring gently. This allows the peanuts to absorb the sugar, giving them a crisp coating. Watch for the mixture to reach a temperature of 300°F (149°C) using a candy thermometer; this is the critical point for achieving the perfect brittle.
- When the mixture reaches the target temperature, remove it from the heat immediately. Pour it onto a parchment‑lined baking sheet, spreading it thin with a spatula. The thinner you spread it, the crispier it will become. Allow the brittle to cool for 5 minutes before cutting.
- Using a pizza cutter or a sharp knife, cut the brittle into bite‑size squares while it is still warm. The edges should snap cleanly; if they’re too soft, give it a few more minutes to cool. This step is the moment of truth—watch the brittle crackle as you cut it.
- Let the brittle cool completely on the sheet, then transfer it to an airtight container. The brittle will harden as it cools, creating a satisfying crunch. Store in a cool, dry place for up to two weeks, or freeze for longer preservation. When you’re ready to enjoy, simply break off a piece and taste the result of your hard work.
That's it — you did it. But hold on, I've got a few more tricks that'll take this to another level...
Insider Tricks for Flawless Results
The Temperature Rule Nobody Follows
Using a candy thermometer is non‑negotiable. The brittle’s texture hinges on reaching exactly 300°F. If the temperature is too low, the brittle will be chewy; too high, and it will be brittle and hard to cut. Keep the thermometer in the side of the pan, not the bottom, to avoid hot spots.
Why Your Nose Knows Best
Smell the sugar as it cooks. A golden, nutty aroma indicates the right stage. If the scent becomes bitter, the sugar is over‑cooked. Trust your nose; it’s a reliable indicator of doneness.
The 5‑Minute Rest That Changes Everything
Let the brittle sit on the parchment for exactly 5 minutes before cutting. This brief rest allows the sugar to set, giving you a cleaner snap. Cutting too early results in a sticky mess.
The Secret to a Glossy Finish
Add a tablespoon of butter at the very end, just before pouring onto the sheet. This creates a glossy sheen and adds a buttery aftertaste. The butter also helps the brittle release from the parchment more easily.
The Perfect Storage Trick
Store the brittle in a single layer to prevent crushing. Use a paper towel between layers if you’re stacking. Keep the container in a cool, dry place to maintain crunch.
Creative Twists and Variations
This recipe is a playground. Here are some of my favorite ways to switch things up:
Chocolate‑Covered Peanut Brittle
After the brittle cools, melt dark chocolate and drizzle it over the squares. Let it set on parchment for a glossy finish. The chocolate adds a rich, bittersweet layer that pairs beautifully with the nutty base.
Spiced Maple Peanut Brittle
Swap the corn syrup for pure maple syrup and add a pinch of cinnamon. The maple adds a deeper sweetness, while cinnamon introduces a warm spice. This version is perfect for autumn gatherings.
Salted Caramel Peanut Brittle
Replace the vanilla with a splash of sea salt and add a drizzle of caramel sauce after cooling. The caramel brings a silky sweetness, and the sea salt amplifies the flavor profile. It’s a crowd‑pleaser for parties.
Almond & Peanut Fusion
Mix equal parts roasted almonds and peanuts for a nutty variety. The almonds add a slightly sweeter flavor and a different crunch. This blend is ideal for those who want a diverse texture.
Coconut Peanut Brittle
Sprinkle toasted shredded coconut over the brittle before it cools. The coconut adds a tropical note and a subtle chew. It’s a great option for summer gatherings.
Storing and Bringing It Back to Life
Fridge Storage
Keep the brittle in an airtight container at room temperature for up to two weeks. If you notice any moisture, add a paper towel to absorb excess dampness. The brittle will stay crisp and ready to eat.
Freezer Friendly
For longer storage, freeze the brittle in a single layer on parchment, then transfer to a freezer bag. It will stay crisp for up to six months. Thaw at room temperature before serving to avoid condensation.
Best Reheating Method
If the brittle has become slightly soft, reheat it in a 250°F oven for 5 minutes. A tiny splash of water before reheating steams the brittle back to perfection. Avoid microwaving—this will make it chewy.