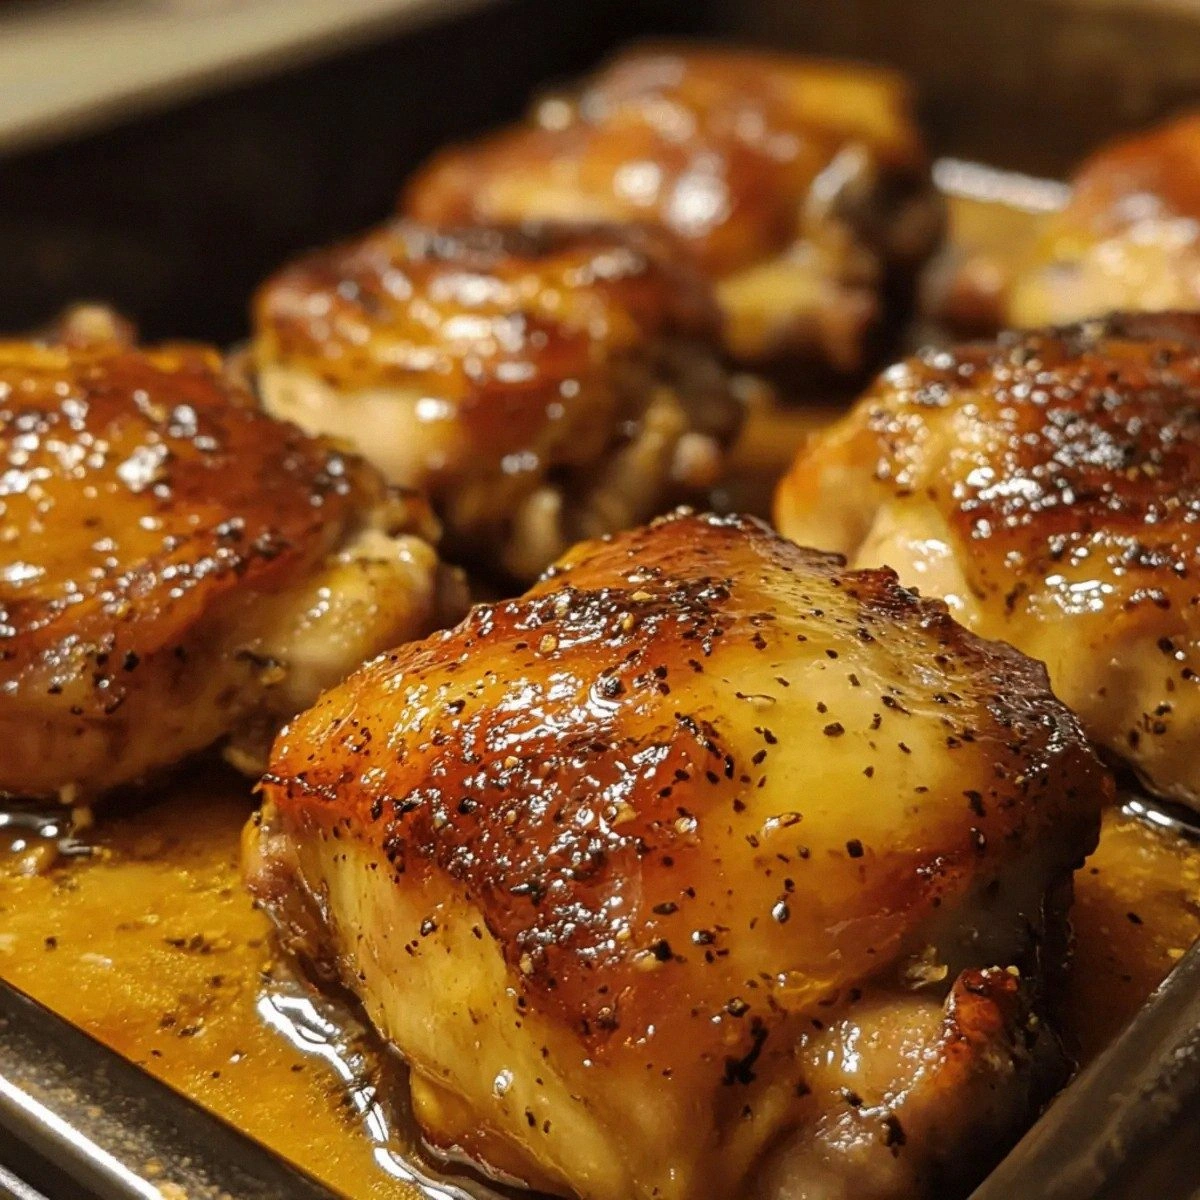
I was in the middle of a frantic weeknight when my kitchen turned into a culinary battlefield. The fridge was a barren desert, the pantry a maze of forgotten jars, and my stomach was screaming for something that would feel like a hug. I grabbed whatever I could find—bone‑in chicken thighs, a splash of maple syrup, a dollop of Dijon mustard—and decided to gamble on a sauce. The result? A glaze that kissed the meat with sweet‑savory velvet, leaving the skin blistering into a caramelized crust that cracked like thin ice. I tasted one bite, and the world tilted—my friends would never again settle for bland.
Picture the scene: the oven preheats to a roaring 400°F, the skillet sizzles as the first chicken pieces hit the pan, and the sweet aroma of maple syrup mingles with the sharp bite of mustard. The kitchen hums with anticipation; the timer buzzes like a tiny metronome. My senses are on high alert—each crackle, each steam puff, each hint of caramelization. It’s a sensory symphony that transforms an ordinary dinner into a headline act.
What makes this version stand out? I’ve stripped away the fluff, honed the technique, and introduced a twist that most recipes miss: a balanced acid that cuts through the sweetness, a touch of garlic for depth, and a final flourish of fresh herbs that lift the whole dish. It’s hands down the best version you’ll ever make at home. I dare you to taste this and not go back for seconds. If you’ve ever struggled with chicken that ends up dry or syrupy, you’re not alone—and I’ve got the fix.
Let me walk you through every single step—by the end, you’ll wonder how you ever made it any other way. The journey from raw thighs to glazed perfection is a masterclass in flavor layering, timing, and a dash of culinary confidence. The sauce coats the chicken like velvet, the skin crisps to a golden crunch, and the finish is a burst of fresh herbs that sings. Ready to turn your kitchen into a stage for this star performance? Let’s dive in.
What Makes This Version Stand Out
- Flavor Depth: The maple‑mustard glaze balances sweetness with a bright mustard bite, creating a complex profile that lingers on the palate. The subtle acidity from apple cider vinegar cuts through the richness, ensuring every bite feels alive.
- Crispy Skin: A high‑heat sear locks in juices and turns the skin into a caramelized, crackling masterpiece that satisfies the craving for texture.
- Time Efficiency: The entire process takes less than an hour, making it perfect for busy weeknights without sacrificing gourmet quality.
- Ingredient Simplicity: With only nine ingredients, you can pull this dish together in a flash, and the pantry staples mean it’s always ready.
- Versatile Appeal: Whether you’re feeding a family or entertaining guests, the bold glaze guarantees crowd approval.
- Make‑Ahead Friendly: The glaze can be prepared in advance, and the chicken can be reheated without losing its juicy interior.
- Seasonal Flexibility: The dish works year‑round, but the maple component adds a comforting fall vibe when paired with roasted root vegetables.
- Balanced Nutrition: Each thigh delivers protein and healthy fats, while the glaze keeps sugar content moderate—ideal for a balanced plate.
Alright, let’s break down exactly what goes into this masterpiece…
Inside the Ingredient List
The Flavor Base
The maple syrup is the heart of this dish, offering a natural sweetness that caramelizes into a glossy glaze. Its thick, amber hue provides visual drama, while its molasses‑like undertones add depth. Skipping maple would leave the sauce thin and lack that signature caramelized finish. If you’re looking for a lower‑sugar alternative, try a splash of honey, but be prepared for a different flavor profile.
The Texture Crew
The Dijon mustard brings a sharp, tangy bite that cuts through the syrup’s sweetness, creating a balanced glaze. Its creamy consistency ensures the sauce clings to every crevice of the chicken. If you’re a fan of extra heat, a pinch of cayenne or a splash of sriracha can replace or supplement the mustard for a spicy kick. The olive oil, meanwhile, lubricates the pan and helps the skin crisp up to a buttery golden brown.
The Unexpected Star
The apple cider vinegar is the secret weapon that prevents the glaze from becoming cloyingly sweet. Its bright acidity brightens the overall flavor, making the dish feel fresh and lively. If you’re in a pinch, a dash of white wine vinegar will do the trick, though it’s slightly milder. This ingredient also helps tenderize the meat, ensuring every bite stays juicy.
The Final Flourish
Fresh thyme or parsley adds a herbaceous note that lifts the glaze, giving it a fresh, aromatic finish. The green burst of color is as pleasing to the eye as it is to the palate. If you prefer a milder herb, basil or oregano can be swapped, though they’ll alter the final flavor profile. A pinch of fresh lemon zest can also brighten the dish, adding a citrusy lift.
Everything's prepped? Good. Let's get into the real action…
The Method — Step by Step
- Start by patting the chicken thighs dry with paper towels; this is crucial for a crispy skin. Sprinkle both sides generously with salt and black pepper, allowing the seasoning to penetrate. Let the thighs rest at room temperature for about 10 minutes while you prepare the glaze, so they cook evenly.
- In a small bowl, whisk together the maple syrup, Dijon mustard, minced garlic, apple cider vinegar, and olive oil until the mixture is smooth and glossy. Taste the sauce; it should have a balanced sweet‑savory profile, with a hint of tang. Set aside; you’ll use it as a glaze later.
- Heat a heavy‑bottom skillet—cast iron is ideal—over medium‑high heat. Add a splash of olive oil, swirl to coat, and then place the chicken thighs skin‑side down. Let them sear untouched for 4–5 minutes until the skin turns a deep amber and releases a satisfying crackle.
- Flip the thighs and pour about a third of the glaze over the meat, letting it pool around the edges. Reduce the heat to medium, cover the pan, and let the chicken cook for 12–15 minutes. The glaze will thicken and coat the thighs, forming a glossy sheen.
- During the last 5 minutes of cooking, increase the heat to medium‑high and drizzle the remaining glaze over the thighs, basting continuously. Watch for the glaze to bubble and caramelize; this is the moment of truth when the sauce turns from syrupy to a thick, glossy glaze. The skin will become irresistibly crisp.
- Watch Out: The glaze can burn if the heat is too high or if you leave it unattended. Keep a close eye on the bubbling sauce; as soon as it thickens, reduce the heat slightly to avoid scorching.
- Once the thighs reach an internal temperature of 165°F, remove them from the skillet and let them rest for 5 minutes. Resting allows the juices to redistribute, ensuring every bite stays moist and flavorful. The glaze will thicken slightly during this time, adding a luscious finish.
- Just before serving, sprinkle fresh thyme or parsley over the thighs, letting the herbs mingle with the warm glaze. The bright green contrast not only looks stunning but also adds a fresh, herbal aroma that elevates the dish. Plate immediately for maximum crispness.
That's it — you did it. But hold on, I've got a few more tricks that'll take this to another level…
Insider Tricks for Flawless Results
The Temperature Rule Nobody Follows
Many cooks start with a high heat and immediately drop the flame. I’ve learned that maintaining a steady medium heat during the sear phase ensures the skin crisps evenly without burning. If you’re using a gas stove, let the flame settle at a medium setting before adding the chicken; this consistency is key to a golden crust.
Why Your Nose Knows Best
Before you even taste the glaze, trust your nose. The aroma of caramelized maple and sharp mustard is a reliable indicator that the sauce is developing the right depth. If it smells too sweet, add a splash more vinegar; if it’s too sharp, a little more maple will balance it. Your olfactory system is a seasoned chef in its own right.
The 5‑Minute Rest That Changes Everything
Resting the chicken for exactly five minutes after cooking is a game changer. During this short pause, the juices redistribute, preventing the meat from drying out when sliced. I’ve seen people skip this step, only to find their thighs come out dry. Make a note in your calendar: 5‑minute rest = moist, flavorful chicken.
Basting Technique for a Glaze That Sticks
When you baste the final glaze, use a wide‑tipped brush to spread the sauce evenly across each thigh. This technique ensures every bite is coated, preventing dry patches. If you’re in a hurry, a spoon works, but a brush gives a more even, professional finish.
Fresh Herbs as the Final Touch
Adding fresh thyme or parsley just before serving gives the dish a burst of color and a fresh lift that counteracts the richness. The herbs also add a subtle aroma that signals to your guests that the meal is ready. If you’re not a fan of herbs, a squeeze of lemon will also brighten the glaze.
Creative Twists and Variations
This recipe is a playground. Here are some of my favorite ways to switch things up:
Smoky Chipotle Maple
Add a teaspoon of chipotle powder to the glaze for a smoky depth. The heat balances the sweetness, creating a complex flavor profile that pairs beautifully with corn on the cob.
Herb‑Infused Citrus Glaze
Replace the apple cider vinegar with orange juice and add a handful of chopped rosemary. The citrus brightens the glaze, making it ideal for a summer dinner with grilled asparagus.
Pineapple & Ginger Fusion
Swap half the maple syrup for pineapple juice and add a teaspoon of grated ginger. The tropical sweetness and zing create a vibrant, island‑inspired dish that’s perfect for a beach‑themed gathering.
Spicy Sriracha Kick
Introduce a tablespoon of sriracha into the glaze for a fiery twist. The heat complements the maple’s sweetness, offering a bold flavor that’s sure to impress adventurous palates.
Herb‑Roasted Vegetables Side
Serve the glazed thighs alongside roasted root vegetables tossed in olive oil, thyme, and a splash of maple syrup. The sweet, caramelized veggies echo the glaze’s flavor while adding a satisfying crunch.
Storing and Bringing It Back to Life
Fridge Storage
Cool the chicken completely before placing it in an airtight container. Store in the refrigerator for up to 3 days. The glaze may thicken slightly, but a quick splash of water during reheating will restore its glossy finish.
Freezer Friendly
Wrap each thigh individually in parchment paper, then place them in a freezer bag. They stay fresh for up to 4 months. When ready to eat, thaw overnight in the fridge before reheating.
Best Reheating Method
Reheat in a 350°F oven for 10–12 minutes, or until the internal temperature reaches 165°F. If the glaze looks dry, add a splash of water or a drizzle of maple syrup before covering with foil to keep it moist.