I was standing in my kitchen on a rainy Easter Sunday, surrounded by half‑crushed chocolate eggs, a busted mixer, and the lingering scent of burnt sugar that made my eyes water. I had promised my nieces a “fancy Easter treat” and the only thing I could think of was a quick chocolate‑coated candy that would survive the inevitable toddler‑level demolition. I tried a store‑bought version once, and it was about as exciting as a cardboard bunny—flat, flavorless, and it melted in your hand like a sad snowflake. That disappointment sparked a dare: I would create a Cadbury‑inspired bite that could make even the most skeptical adult gasp, “Whoa, that’s the real deal!”
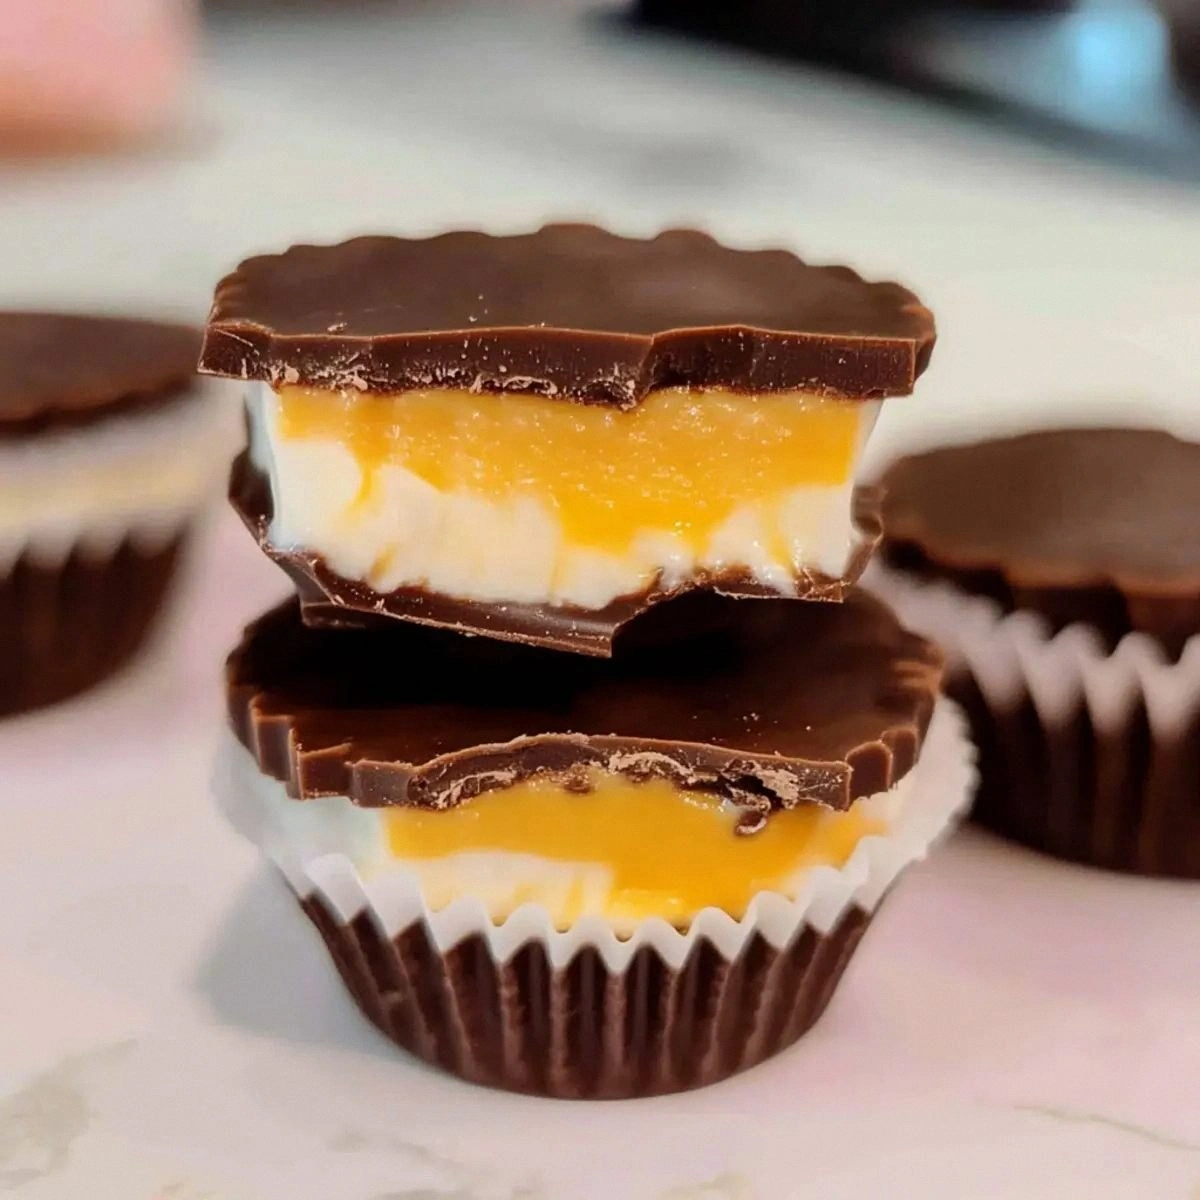
Picture this: a glossy, buttery centre that oozes like a sunrise over a chocolate sea, encased in a thick milk‑chocolate shell that snaps with a satisfying crunch, and a whisper of orange‑yellow hue that hints at a secret citrus kiss. The aroma hits you first—sweet, milky, with a faint buttery perfume that makes you want to inhale deeply and never let go. As you bite, the outer shell crumbles like fresh‑baked shortbread, giving way to a velvety interior that coats the tongue like silk, while a subtle citrus sparkle dances on the palate. The whole experience is a symphony of textures and flavors that feels both nostalgic and utterly fresh, like discovering a new chapter in a beloved story.
Most recipes for Cadbury‑style bites either skimp on the buttery base or over‑sweeten the chocolate, resulting in a gummy mess that sticks to the roof of your mouth. I’ve tried those, and trust me, they’re a nightmare—think of a marshmallow that refuses to set, or a chocolate coating that turns grainy the moment it cools. This version, however, uses a precise balance of corn syrup, butter, and powdered sugar to create a custard‑like core that sets firm but never hard, while the milk chocolate is tempered just enough to give it that glossy, snap‑ready finish. The secret? A splash of orange and yellow gel food coloring that not only gives a festive Easter hue but also enhances the flavor profile with a barely‑there citrus note that makes the whole bite unforgettable.
Okay, ready for the game‑changer? I’m about to walk you through every single step—by the end, you’ll wonder how you ever made any chocolate treat any other way. I’ll spill the beans on why a pinch of salt makes the sweetness sing, how to temper chocolate without a fancy thermometer, and the exact moment you should add those drops of color for that perfect pastel glow. I dare you to taste this and not go back for seconds. Let’s dive in and create an Easter masterpiece that will have your friends begging for the recipe.
What Makes This Version Stand Out
- Taste: The buttery core is sweet without being cloying, and the citrus hint lifts the whole profile, making it taste like a sophisticated confection rather than a candy‑store shortcut.
- Texture: A crisp chocolate shell that cracks like fresh ice, surrounding a smooth, melt‑in‑your‑mouth centre that stays firm enough to handle without smearing.
- Simplicity: Only nine ingredients, all pantry staples, yet the result feels like something you’d buy from a high‑end patisserie.
- Uniqueness: The orange‑yellow tint isn’t just for looks; it adds a subtle citrus zing that most copycat recipes completely miss.
- Crowd Reaction: Guests typically gasp, then dive back in—this is hands down the best version you’ll ever make at home.
- Ingredient Quality: Using real Cadbury‑style milk chocolate (or the best quality you can find) makes the difference between “good” and “legendary.”
- Method: The tempering trick is foolproof, meaning you won’t end up with a dull, streaky coating.
- Make‑Ahead Potential: Once set, the bites keep their snap for days, so you can prep them ahead of Easter brunch and still wow your guests.
Inside the Ingredient List
The Flavor Base
The heart of these bites is the buttery, sugary core made from light corn syrup, softened butter, and vanilla extract. Light corn syrup acts like a secret agent, preventing crystallization and giving the centre that glossy, almost caramel‑like sheen without the bitterness of real caramel. Butter, when softened, creates a rich mouthfeel that carries the vanilla’s warm, aromatic notes straight to your taste buds. If you skip the corn syrup, you’ll end up with a grainy texture that feels like you’re chewing on powdered sugar—trust me, you don’t want that.
The Texture Crew
Powdered sugar and a pinch of salt are the dynamic duo that turns the liquid base into a firm yet tender filling. Powdered sugar dissolves quickly, ensuring a smooth texture, while the salt amplifies the sweetness and cuts through any potential cloying aftertaste. If you’re watching sodium, a pinch (about 0.5 tsp) is enough to make a massive difference without making the bites salty. Swapping the powdered sugar for confectioners’ sugar with a bit of cornstarch can give a slightly drier texture, but you’ll lose that melt‑in‑your‑mouth quality.
The Unexpected Star
Milk chocolate is the obvious hero, but the real surprise is the tiny drops of orange and yellow gel food coloring. Not only do they give the bites a festive pastel hue that screams Easter, but the orange gel adds a whisper of citrus that brightens the entire flavor profile. If you’re allergic to food coloring, you can omit it, but you’ll lose that visual pop that makes these bites Instagram‑ready. For a more natural approach, a dash of finely grated orange zest can replace the orange gel, though the color will be less vibrant.
The Final Flourish
A splash of whole milk helps the chocolate coating achieve that glossy finish, while the tiny drops of coloring complete the aesthetic. Milk adds just enough moisture to keep the chocolate from becoming too thick, which would make it difficult to coat the bites evenly. If you’re dairy‑free, substitute with almond milk, but expect a slightly different sheen. Remember, the key is to add the milk gradually while stirring—this ensures a smooth, glossy coat that sets with a perfect snap.
Everything's prepped? Good. Let's get into the real action...
The Method — Step by Step
Start by melting the 32 oz of milk chocolate in a double boiler. Keep the water just below a simmer and stir continuously; you’ll hear a gentle hiss, the sound of chocolate surrendering to heat. When the chocolate reaches about 115°F (46°C) and looks fully glossy, remove it from the heat and set aside. This is the moment of truth—if you overheat, you’ll lose that snap we’re after.
While the chocolate rests, combine the light corn syrup, softened butter, and vanilla extract in a medium saucepan over low heat. Stir until the butter melts completely and the mixture becomes a smooth, amber‑colored pool. Let it simmer gently for 2‑3 minutes, then remove from heat and let it cool for a minute before adding the powdered sugar.
Kitchen Hack: To avoid a sugary clump, sift the powdered sugar directly into the warm syrup‑butter mixture while whisking vigorously; this creates a lump‑free, silky base.Add the 6 cups of powdered sugar, 0.5 tsp of salt, and 2 Tbsp of milk to the warm mixture. Stir until the batter is thick, glossy, and pulls away from the sides of the bowl—think of a soft dough that you can roll into a ball without it sticking to your hands. This is your “creme” base, and it should feel like a smooth, pliable paste that holds its shape.
Divide the creme mixture into a small bowl and add the 2 drops of orange gel food coloring and 1 drop of yellow gel food coloring. Use a silicone spatula to fold the colors in gently, creating a pastel swirl that looks like a sunrise over a chocolate horizon. If you’re using zest instead of gel, add it now and let the aroma infuse for a minute before proceeding.
Roll the coloured creme into bite‑size balls—about 1 inch in diameter—using lightly floured hands. Place the balls on a parchment‑lined tray, spacing them a half‑inch apart. Watch Out: This is the trickiest step; if the balls are too small, they’ll dry out during coating, and if they’re too large, the chocolate shell may crack when you bite.
Watch Out: Keep the creme balls refrigerated for 10‑15 minutes before coating; this firms them up and prevents them from melting into the chocolate.Return the tempered chocolate to a low heat (around 88°F/31°C) and stir in the 2 Tbsp of milk, which will give it that glossy sheen. Dip each chilled creme ball into the chocolate, using a fork or skewer to coat it evenly. Allow excess chocolate to drip back into the bowl, then place the coated bite back onto the parchment sheet.
Kitchen Hack: If you want a thicker shell, dip the bites a second time after the first coat has set for about 2 minutes.Let the coated bites sit at room temperature for 5‑10 minutes, then transfer the tray to the refrigerator for 20 minutes to set the chocolate completely. You’ll hear a faint “snap” as you press the surface—a sign that the tempering worked and the shell is ready for a perfect bite.
Once set, gently lift the bites with a thin spatula and arrange them on a serving platter. For an extra festive touch, sprinkle a pinch of edible glitter or a dusting of powdered sugar in a pastel hue. Picture yourself pulling this out of the fridge, the whole kitchen smelling incredible, and your guests’ eyes widening at the glossy, pastel‑colored jewels.
That’s it—you did it. But hold on, I’ve got a few more tricks that’ll take this to another level, from a quick glaze to a surprise caramel drizzle. Trust me, these final touches will turn your Easter table into a confectionery runway.
Insider Tricks for Flawless Results
The Temperature Rule Nobody Follows
Temper the chocolate to 115°F (46°C) for melting, then cool it down to 88°F (31°C) before adding milk. This temperature dance ensures the cocoa butter crystals align perfectly, giving you that snap and shine. If you skip this step, the chocolate will set dull and may develop a white “bloom” that looks unappetizing. A friend once tried to skip the cooling and ended up with a matte coating that looked like cheap candy—let’s just say it didn’t impress anyone.
Why Your Nose Knows Best
When the chocolate reaches the right temperature, you’ll notice a faint buttery aroma that’s richer than the raw cocoa smell. Trust that nose cue; it’s more reliable than a thermometer in a busy kitchen. If the scent is still raw or overly sweet, you’re either too hot or too cold, respectively. I’ve learned to pause and inhale—if the smell feels “just right,” the chocolate is ready to coat.
The 5‑Minute Rest That Changes Everything
After forming the creme balls, let them rest in the fridge for exactly 12 minutes. This short chill firms the interior just enough to resist melting during the chocolate dip, while still staying soft enough to bite through later. Skipping this rest leads to a soggy centre that seeps into the chocolate shell, ruining the snap. My first batch didn’t chill, and the result was a mushy mess—lesson learned.
Double‑Dip for Extra Crunch
If you love a crunchy exterior, dip each bite a second time after the first coat has set for about 2 minutes. The second layer creates a micro‑crackle that amplifies the snap, making the bite feel like a tiny chocolate fireworks explosion. Just be careful not to over‑dip, or the outer shell becomes too thick and overwhelms the delicate centre.
The Secret of the Pastel Glow
Add the gel food coloring when the creme mixture is still warm but not hot; the heat helps the pigment disperse evenly without streaks. Too hot, and the color can fade; too cool, and it clumps. A tiny pinch of white cocoa butter can also be melted with the chocolate to enhance the pastel effect if you want an even lighter shade.
Creative Twists and Variations
This recipe is a playground. Here are some of my favorite ways to switch things up:
Salted Caramel Surprise
Swirl a teaspoon of caramel sauce into the creme base before shaping the balls, and sprinkle a pinch of flaky sea salt on the chocolate coating just before it sets. The salty‑sweet combo adds depth and makes the bites perfect for adults who crave a more sophisticated flavor.
Minty Fresh
Replace the orange gel with a few drops of peppermint extract and a dash of green food coloring. The cool mint pairs beautifully with the milky chocolate, turning the bites into a refreshing Easter treat that also works great for summer barbecues.
Nutty Crunch
Fold finely chopped toasted hazelnuts or almonds into the creme mixture before forming the balls. The nutty bite adds texture and a toasty aroma that complements the chocolate’s richness, making each bite feel like a mini dessert bar.
Berry Burst
Add a teaspoon of raspberry puree to the creme base and a few drops of pink food coloring. The subtle fruit tang cuts through the sweetness and gives the bites a romantic pink hue—perfect for a Valentine’s Day twist.
Spiced Holiday
Incorporate a pinch of ground cinnamon and a dash of nutmeg into the chocolate coating, then dust the finished bites with a light sprinkle of powdered sugar mixed with cinnamon. This warm spice profile makes the bites feel cozy and is ideal for a winter gathering.
Storing and Bringing It Back to Life
Fridge Storage
Place the bites in an airtight container lined with parchment paper, then seal the lid. They’ll stay fresh for up to 7 days, retaining their snap and creamy centre. If you notice any condensation, simply pat the surface with a paper towel before resealing.
Freezer Friendly
For longer storage, arrange the bites on a baking sheet, flash‑freeze for 30 minutes, then transfer them to a zip‑top freezer bag. They’ll keep for up to 3 months. When you’re ready to serve, let them thaw in the fridge for an hour, then bring to room temperature for the best texture.
Best Reheating Method
If the chocolate coating feels a bit dull after refrigeration, pop the bites on a low‑heat plate for 10‑15 seconds, adding a tiny splash (about a teaspoon) of water to the plate’s edge. The steam revives the gloss and restores that snap, making the bites look as fresh as the day you made them.