I was halfway through a week of bland dinners when my phone buzzed with a text from Maya: “Need a quick dinner that actually tastes good.” I stared at my empty fridge, then at the stack of frozen vegetables, and realized the only thing I could whip up was a sad bowl of rice. But that night I decided to turn the ordinary into the extraordinary, because why should a simple bowl of rice be boring? I grabbed a handful of ground turkey, a splash of sesame oil, and a handful of garlic, and the kitchen started to smell like a sushi bar. If you’re still wondering why this recipe is the best thing you’ll make tonight, read on.
The first sizzle of the turkey in the pan was a promise of adventure; the aroma of garlic and ginger dancing together made my stomach do a happy little jig. I could hear the clatter of the skillet, the hiss of oil, and the faint pop of onions as they softened. The sound of the vegetables turning bright green was a visual cue that everything was falling into place. My eyes were glued to the pan, watching the turkey brown into a caramelized crust that looked almost too good to eat. The texture was already hinting at a satisfying bite—crisp edges that crackle like thin ice under a gentle tap.
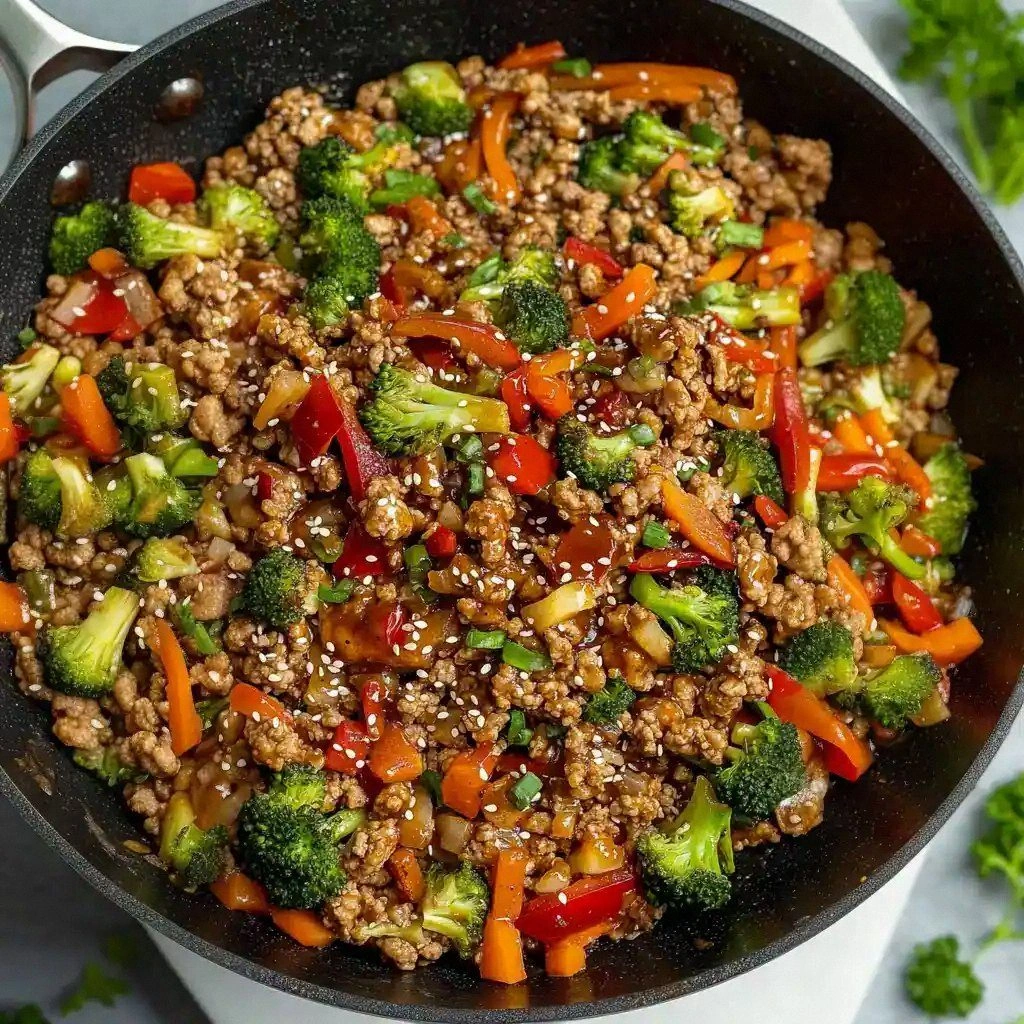
When the sauce started to bubble, it coated the turkey like velvet, turning a plain protein into a glossy, savory masterpiece. The sweet honey mingled with the salty soy to create a glaze that would make any bland meal jealous. I dared you to taste this and not go back for seconds—once you’ve had a bite, the craving will vanish. I’ll be honest, I ate half the batch before anyone else even had a chance to try it, and it was pure, unadulterated joy. The moment the finished bowl was plated, the kitchen smelled like a summer garden in full bloom.
Most recipes get this completely wrong by overcooking the veggies or under-seasoning the sauce, but I’ve cracked the code to keep everything balanced. The secret lies in the timing of the stir‑fry and the precise balance of sweet, salty, and umami. Picture yourself pulling this out of the pan, the whole kitchen smelling incredible, and a plate that looks as good as it tastes. I dare you to imagine the first bite—crisp veggies, tender turkey, and a sauce that clings to every grain of rice. Let me walk you through every single step — by the end, you’ll wonder how you ever made it any other way.
What Makes This Version Stand Out
- Taste: This bowl is a flavor explosion, with a sweet‑salty glaze that lingers on the palate. The combination of honey and soy creates a caramelized coating that is both comforting and sophisticated. The subtle heat from the red pepper flakes adds a gentle kick that doesn’t overpower the other flavors. It’s the kind of dish that makes you reach for a second spoon without even realizing it. The finished result is a harmonious blend that satisfies both sweet and savory cravings.
- Texture: The turkey stays juicy while the veggies remain crisp, creating a delightful contrast in every bite. The rice absorbs the sauce without becoming mushy, maintaining a satisfying bite. The sesame seeds add a subtle crunch that punctuates the dish. The overall mouthfeel feels balanced, neither too dry nor too soggy. It’s the kind of texture profile that keeps diners coming back for more.
- Simplicity: All the steps can be done in one pan, saving you from the kitchen chaos. No need for separate bowls or complicated prep work. The ingredients are pantry staples that you probably already have. The method is straightforward, with clear cues that let you know exactly when to move to the next step. Even a novice cook can follow along and feel confident.
- Uniqueness: The combination of sesame oil, ginger, and red pepper flakes gives it a subtle heat you won’t find in standard teriyaki. The use of both honey and maple syrup adds depth to the glaze. The final splash of rice vinegar brightens the dish with a citrusy lift. The result is a bowl that feels both familiar and fresh. It’s a recipe that stands out from the crowd.
- Crowd Reaction: Friends rave about how the sauce coats the rice like velvet, and they’re left asking for the recipe. The dish is a conversation starter at dinner parties. The vibrant colors make it Instagram‑ready. The flavor profile is a crowd‑pleaser that works for both meat lovers and those who prefer lighter fare. It’s the kind of dish that people will brag about making.
- Ingredient Quality: Using low‑sodium soy sauce and fresh ginger keeps the dish healthy without sacrificing flavor. The ground turkey is lean, providing protein without excess fat. The fresh garlic and ginger bring bright, aromatic notes that elevate the sauce. The use of sesame seeds adds a nutty finish. The overall ingredient list is clean, simple, and nutritious.
- Make‑Ahead Potential: The flavors deepen overnight, making this a perfect meal prep option. The sauce continues to thicken slightly as it rests, adding another layer of taste. The dish can be reheated without losing its integrity. The rice remains fluffy and the veggies keep their crunch. It’s an ideal recipe for busy schedules.
Alright, let’s break down exactly what goes into this masterpiece…
Inside the Ingredient List
The Flavor Base
Ground turkey is the star of this bowl, delivering a lean protein that takes on the sauce’s sweet and salty profile. The turkey’s natural fat content keeps it moist and flavorful, even after a quick stir‑fry. If you skip the turkey, the dish loses its heart, becoming just a rice and vegetable mix. A good quality turkey, preferably with a bit of dark meat, will add depth to the overall taste. The ground turkey also absorbs the sauce, ensuring every bite is packed with flavor.
Sesame oil is used twice in this recipe—once for cooking the meat and once for finishing the sauce. The oil’s nutty aroma adds an extra layer of complexity that sets this dish apart from standard teriyaki. Using a light sesame oil keeps the dish from becoming overly greasy. The first tablespoon is heated until it shimmers, then the turkey is added. The second tablespoon is added later, just before serving, to lock in the fragrance.
The Texture Crew
Fresh garlic and grated ginger bring bright, aromatic notes that cut through the richness of the sauce. The garlic is minced finely so it releases its flavor quickly, while the ginger’s subtle heat balances the sweetness. Together they create a foundational layer that is both fragrant and flavorful. If you prefer a milder taste, reduce the ginger slightly, but be careful not to lose its essential zing. The garlic and ginger pair is a classic in Asian-inspired dishes, and this recipe uses it to full effect.
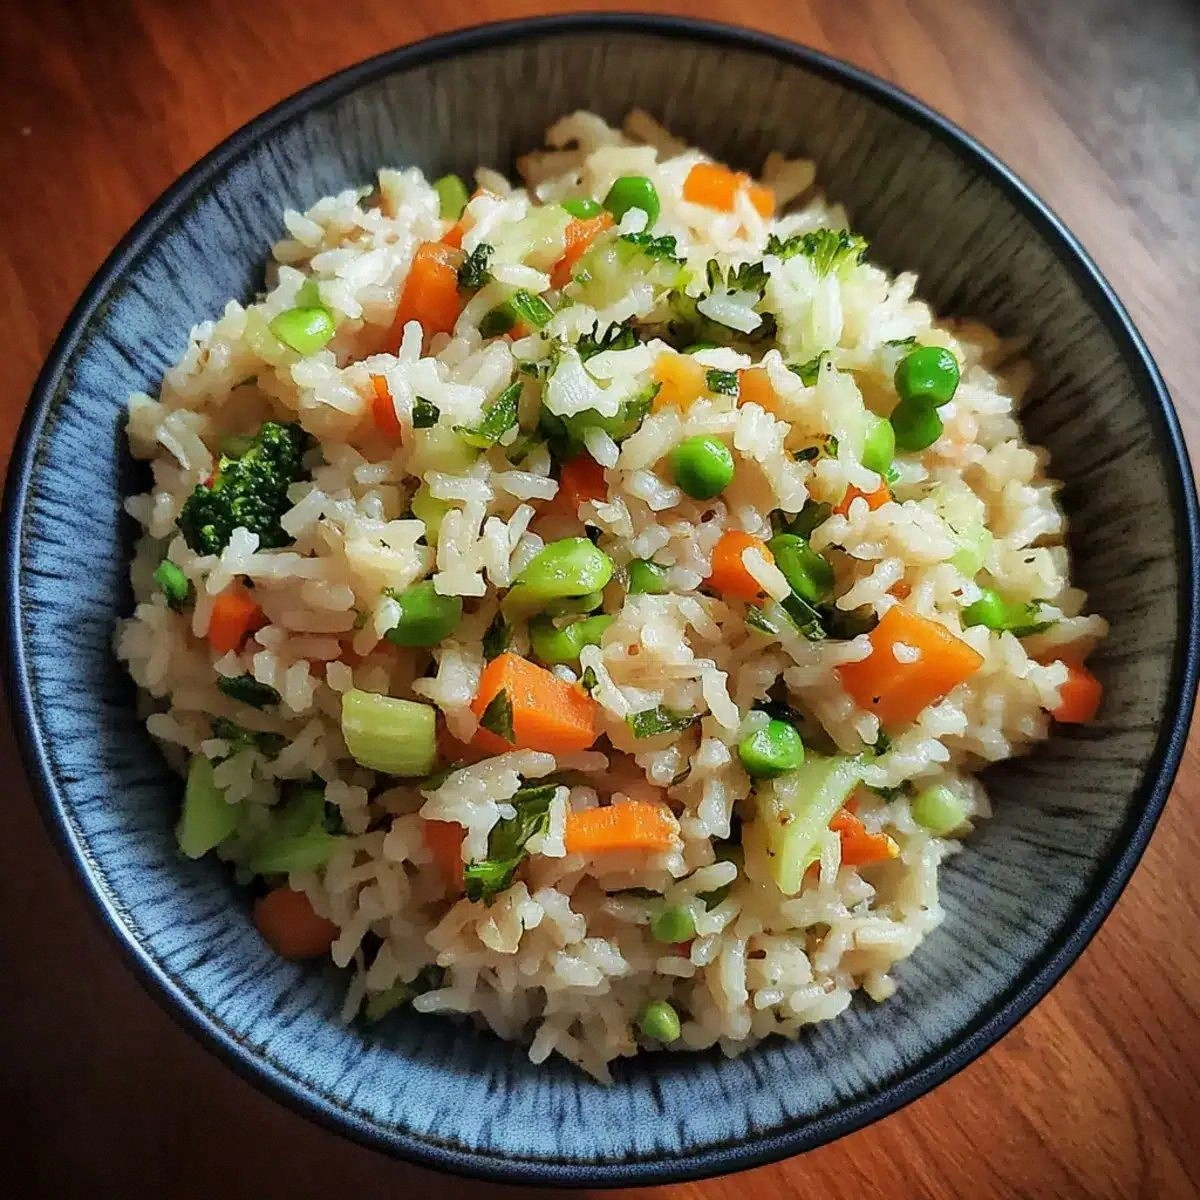
Mixed vegetables—think broccoli, carrots, bell pepper, and snap peas—provide color, crunch, and nutrition. The vegetables are tossed into the pan just before the sauce thickens, ensuring they stay crisp. The natural sugars in the veggies caramelize slightly, adding a touch of sweetness that complements the glaze. If you’re a fan of extra crunch, add a handful of sliced cabbage or water chestnuts at the end. The vegetables also help balance the dish’s protein content, making it a well-rounded meal.
The Unexpected Star
Sesame seeds and green onions finish the dish with a burst of freshness and a subtle nutty crunch. The seeds add a satisfying texture and a slightly toasted flavor that elevates the sauce. The green onions bring a bright, oniony note that cuts through the richness. Together they create a finishing touch that is both visually appealing and palate‑pleasing. If you’re vegan, you can omit the seeds or replace them with crushed almonds for a different twist.
The red pepper flakes give the dish a gentle heat that’s not overpowering. They’re measured carefully so that the dish remains approachable for most palates. The flakes also add a pop of color, giving the bowl a vibrant look. If you prefer a spicier version, double the amount or add a splash of sriracha later in the cooking process. The heat level is adjustable, allowing you to tailor the dish to your taste.
The Final Flourish
Low‑sodium soy sauce is the backbone of the teriyaki glaze, providing umami without the excess salt. It balances the sweetness of honey or maple syrup, creating a harmonious sauce that clings to every grain of rice. The rice vinegar adds a bright, citrusy lift that cuts through the richness. Together, these liquids create a sauce that is both deep and bright. If you’re watching sodium, look for a low‑sodium or tamari alternative.
The cornstarch and water mixture is a classic thickening agent that gives the sauce its glossy finish. It’s whisked together until smooth, then added to the pan to thicken the glaze. The cornstarch also helps the sauce adhere to the turkey and vegetables. The water ensures the mixture is not too thick before it hits the heat. A smooth, glossy sauce is the hallmark of a well‑executed teriyaki dish.
Everything’s prepped? Good. Let’s get into the real action…
The Method — Step by Step
- Heat the pan. Pour one tablespoon of sesame oil into a large skillet over medium heat until it shimmers. Add the ground turkey, breaking it up with a spatula. Cook until browned and no longer pink, about 5 to 7 minutes. Stir occasionally to prevent sticking. Once the turkey is cooked, set it aside on a plate.
- Introduce the aromatics. In the same pan, add the minced garlic and grated ginger. Sauté for 30 seconds until fragrant, being careful not to burn the garlic. The aroma should fill the kitchen, signaling that the base is ready. If the mixture starts to brown too quickly, lower the heat slightly. This step builds the flavor foundation for the sauce.
- Heat the heat. Sprinkle the red pepper flakes over the aromatics and give it a quick stir. The flakes should release their oils, creating a subtle haze in the pan. Add a splash of water to keep the oil from smoking. This trick keeps the heat from searing the garlic and preserves the delicate flavors. The sauce will begin to thicken as the spices mingle.
- Build the glaze. Pour the low‑sodium soy sauce, honey or maple syrup, and rice vinegar into the pan. Stir to combine, ensuring the sugars dissolve into the liquid. Bring the mixture to a gentle simmer for 2 minutes, allowing the flavors to meld. The sauce should thicken slightly, creating a glossy sheen. Keep an eye on it; it should not boil aggressively.
- Introduce the veggies. Add the mixed vegetables to the pan, tossing them in the glaze. Cook for 3 to 4 minutes, just until they’re bright green and slightly tender. The vegetables should maintain a firm bite, not become mushy. Stir frequently to keep them evenly coated. This step ensures the veggies stay colorful and crunchy.
- Thicken the sauce. In a small bowl, whisk together the cornstarch and water until smooth. Pour the slurry into the pan, stirring constantly. The sauce will thicken within a minute, taking on a silky texture. Let it simmer for another minute, then remove from heat. This thickening step locks the glaze to the turkey and veggies.
- Reunite with rice. Add the cooked rice to the pan, stirring to combine. Make sure each grain is coated with the glossy sauce. The rice should absorb the glaze without becoming soggy. If clumps form, use a spatula to break them apart. This step transforms the dish into a complete bowl.
- Finish with flair. Sprinkle the green onions and sesame seeds over the top. Toss lightly to distribute the garnishes evenly. The seeds add a nutty crunch, while the onions bring a fresh, sharp note. Serve immediately, ensuring the dish is hot and vibrant. The final presentation should be colorful and inviting.
- Serve and enjoy. Spoon the bowl into a plate or bowl, letting the steam rise. If desired, drizzle a little extra soy sauce or sesame oil for added depth. Pair with a side of miso soup or a crisp salad for a balanced meal. Take a moment to inhale the aroma before taking your first bite. The experience should be both comforting and exhilarating.
That’s it — you did it. But hold on, I’ve got a few more tricks that’ll take this to another level…
Insider Tricks for Flawless Results
The Temperature Rule Nobody Follows
Cooking turkey at too high a temperature can dry it out, while too low a temperature can leave it undercooked. Start with medium heat and adjust as needed, keeping the pan from smoking. The goal is a gentle, steady sizzle that allows the meat to brown evenly. Use a thermometer if you’re unsure; 165°F is the safe internal temperature. This trick ensures your turkey stays juicy and flavorful.
Why Your Nose Knows Best
The scent of garlic and ginger is a reliable indicator of readiness. If you can’t smell the aroma, the aromatics haven’t released their oils yet. Once the garlic starts to turn golden, it’s time to move on to the next step. Trusting your nose saves you from overcooking the aromatics. It’s a simple but powerful sensory cue.
The 5-Minute Rest That Changes Everything
Letting the dish rest for five minutes after removing it from the heat allows the flavors to meld. During this short pause, the sauce thickens slightly and the rice settles. The rest also lets the heat redistribute evenly across the bowl. Skip this step and you may end up with uneven seasoning. It’s a small time investment for a big payoff.
Don’t Overcrowd the Pan
Adding too much turkey or vegetables at once can lower the pan’s temperature, causing steaming rather than searing. Work in batches if necessary, especially if you’re cooking for a larger group. This keeps the surface dry, which is essential for a good sear. Overcrowding also leads to uneven cooking and loss of flavor.
Keep the Sauce Shining
A glossy sauce is a sign that the cornstarch slurry worked correctly. If the sauce looks dull, it may need a quick whisk or a splash of water to bring it back to life. Adding a touch of rice vinegar at the end can also brighten the glaze. A shiny sauce enhances the visual appeal of the dish. It also helps the sauce cling to the rice and meat.
Use a Splatter Guard
When the sauce starts to bubble, it can splatter and create a mess. A splatter guard keeps the kitchen clean and prevents hot oil from splattering onto your skin. It also keeps the heat from escaping, ensuring the sauce thickens evenly. A splatter guard is a small but essential tool for any stir‑fry.
Creative Twists and Variations
Coconut Curry Twist
Replace the rice vinegar with coconut milk for a creamy, tropical flavor. Add a pinch of curry powder to the aromatics for an extra layer of warmth. The coconut milk also thickens the sauce slightly, creating a richer texture. This version pairs wonderfully with a side of naan or a fresh cucumber salad. It’s a bold, exotic take on the original.
Spicy Sriracha Kick
Swap the red pepper flakes for a spoonful of sriracha to amp up the heat. Add a splash of lime juice to cut through the sweetness. The sriracha’s smoky flavor complements the sesame oil beautifully. This version is perfect for those who love a fiery kick. The dish remains balanced with a bright, citrusy finish.
Mediterranean Flair
Use a mix of diced tomatoes and olives instead of mixed vegetables. Add a pinch of oregano and a drizzle of olive oil for a Mediterranean touch. The tomatoes add acidity, while the olives bring briny depth. Serve over quinoa or couscous for a different grain base. This version feels like a sunny, coastal lunch.
Low-Carb Version
Swap the cooked rice for cauliflower rice or spiralized zucchini. Use a sugar‑free honey substitute, like stevia or erythritol. The low‑carb grains keep the dish light without sacrificing flavor. This version is ideal for keto or low‑carb dieters. The texture remains satisfying and the sauce still coats everything beautifully.
Vegan Swap
Replace the ground turkey with crumbled tofu or tempeh. Use tamari instead of soy sauce for a gluten‑free option. Add a splash of maple syrup for sweetness. The tofu absorbs the sauce, creating a hearty, plant‑based bowl. This version keeps all the flavor while being entirely vegan.
Breakfast Bowl
Serve the dish over a bed of scrambled eggs for a protein‑packed breakfast. Add a sprinkle of cheese or a dollop of Greek yogurt for extra richness. The savory sauce pairs wonderfully with the eggs. This version turns the dinner bowl into a satisfying morning meal. It’s a great way to start the day with a burst of flavor.
Storing and Bringing It Back to Life
Fridge Storage
Cool the dish completely before refrigerating to prevent condensation. Store in an airtight container for up to 3 days. The sauce may thicken slightly in the fridge; a quick stir will restore its glaze. Keep the rice separate if you prefer a fluffier texture. When ready to eat, reheat on the stove or in the microwave.
Freezer Friendly
Freeze the bowl in a freezer‑safe container for up to 2 weeks. The sauce will set in the freezer, so thawing in the refrigerator overnight is ideal. Reheat gently on the stove, stirring frequently, to revive the sauce’s glossy texture. Avoid microwaving the entire bowl; heat the rice separately if needed. The dish remains flavorful after freezing.
Best Reheating Method
Reheat the dish on a low‑to‑medium heat, stirring occasionally. Add a splash of water or broth to loosen the sauce if it has thickened. Heat until steaming hot, about 5 minutes. The rice should be fluffy, not mushy. Finish with a drizzle of sesame oil for extra aroma.