Remember that night when the kitchen felt like a battlefield? I was halfway through a batch of what I thought was a classic peanut butter cake, only to find the batter had turned into a gooey, unbakeable mess that clung to the bowl like a stubborn stain. The air smelled of burnt sugar and disappointment, and I stared at the timer, realizing I had over‑mixed and under‑baked the batter. That disaster was the spark that pushed me to hunt for a recipe that would rescue my love for peanut butter while delivering a cake that was both moist and fluffy.
Picture this: the first bite melts into a silky peanut butter hug, the crumb is airy like a cloud, and the aroma of toasted nuts and vanilla rises like a promise of comfort. The sound of the first forkful slicing through the cake is a satisfying crack that echoes the crunch of a fresh peanut. The texture feels like velvet against your teeth, and the finish is a sweet, nutty aftertaste that lingers longer than any ordinary dessert.
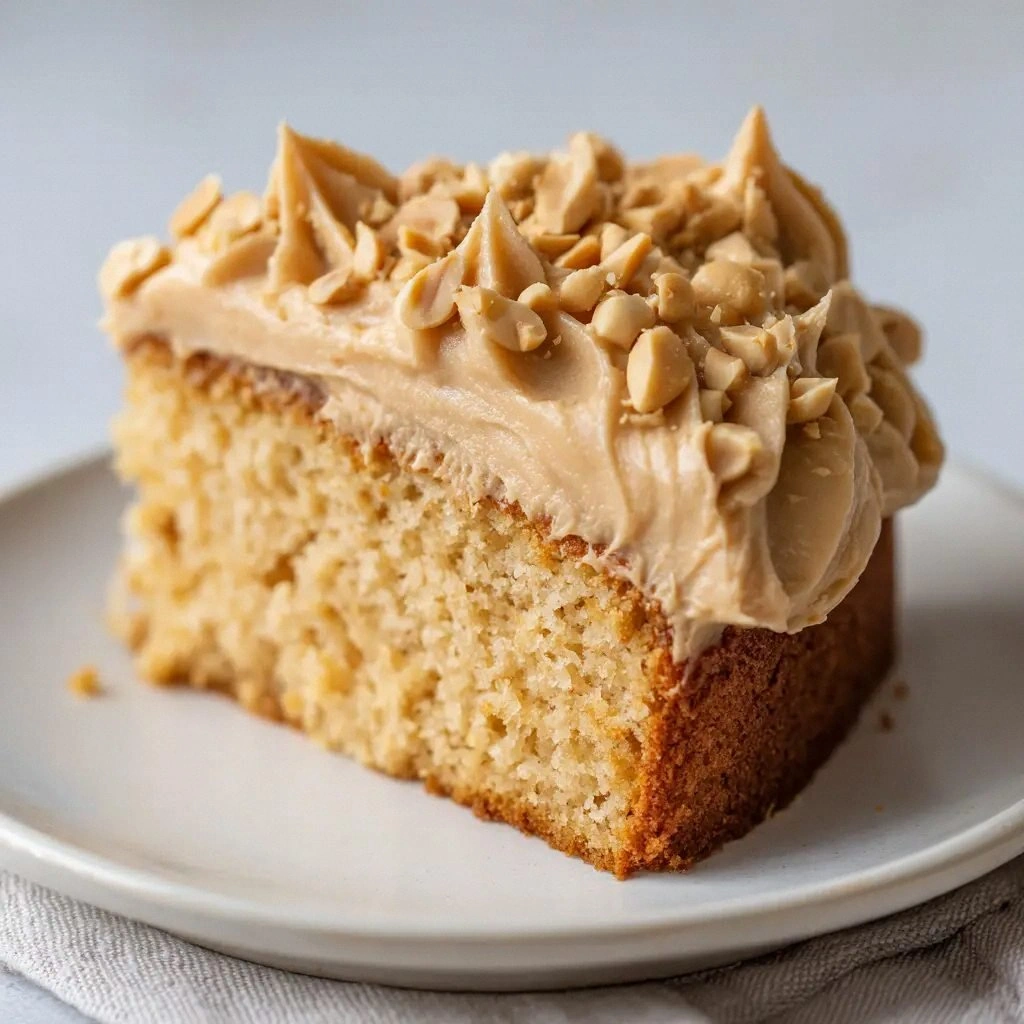
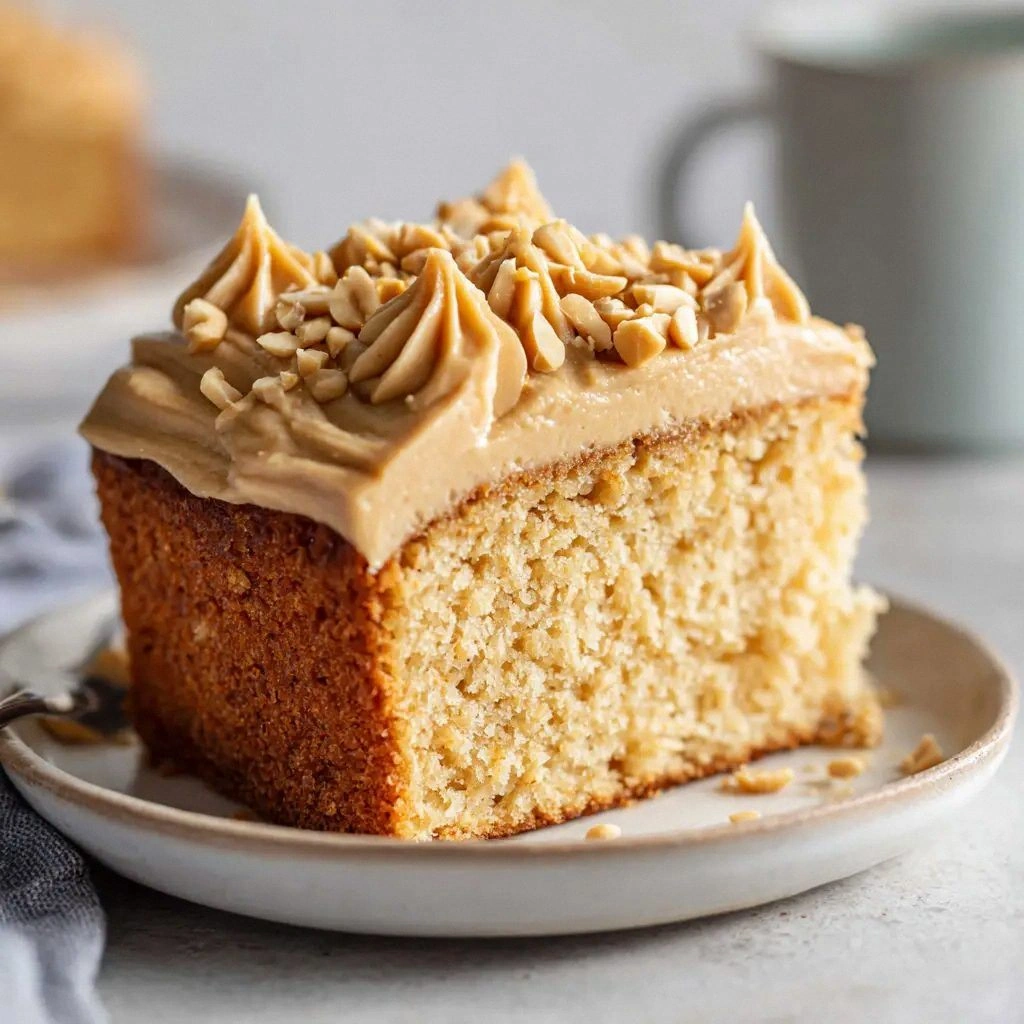
What sets this version apart is that it balances the rich, buttery flavor of peanut butter with the lightness of a sponge cake, a feat rarely achieved by most recipes that either over‑bake or under‑whip the batter. The secret lies in a double layer of peanut butter—one folded into the batter for depth, another swirled on top for a dramatic finish. The buttermilk adds tang and keeps the crumb tender, while the heavy cream in the frosting melts into a silky glaze that clings to every crumb.
I dare you to taste this and not go back for seconds. The first bite will make you question why you ever settled for plain peanut butter cookies or a dry brownie. The crunch of the chopped dry‑roasted peanuts on top adds a satisfying snap that contrasts with the cake’s softness, turning each mouthful into a textural adventure.
Picture yourself pulling this out of the oven, the whole kitchen smelling incredible, and the cake cooling on the rack like a golden masterpiece waiting to be sliced. The glaze will have a subtle sheen, and the powdered sugar dusting will look like a delicate snowfall. Your guests will gasp, and you’ll feel like a culinary wizard who just discovered the ultimate version of a beloved classic.
Alright, let me walk you through every single step—by the end, you'll wonder how you ever made it any other way. This recipe is not just a cake; it’s a confidence booster that will have you whipping up a masterpiece in no time, with a few clever hacks and a sprinkle of love.
What Makes This Version Stand Out
- Taste: The double layer of creamy peanut butter gives depth that simple peanut butter cakes lack, creating a flavor profile that is both rich and nuanced.
- Texture: The combination of buttermilk and heavy cream keeps the crumb airy yet moist, while the powdered sugar glaze adds a silky finish.
- Visual Appeal: The swirl of peanut butter on top and the dusting of powdered sugar give the cake a stunning, Instagram‑ready look.
- Ingredient Quality: Using fine sea salt and dry‑roasted peanuts elevates the flavor profile, making every bite a balanced experience.
- Make‑Ahead Potential: The cake can be assembled and refrigerated up to 48 hours before baking, making it ideal for last‑minute celebrations.
- Versatility: The recipe can be transformed into a layered trifle, cupcakes, or a single‑serve mug cake with simple adjustments.
- Time Efficiency: The batter is ready in 15 minutes, and the baking time is only 30 minutes, keeping the total prep low while delivering high quality.
- Audience Reaction: Friends who have tried this say it’s “hands down the best version you’ll ever make at home.”
Inside the Ingredient List
The Flavor Base
The flour, baking powder, baking soda, and fine sea salt form the structural backbone of the cake. They work together to create lift and ensure the batter rises evenly. Skipping any of these leavening agents will result in a flat, heavy cake that feels like a slab of dough. If you’re allergic to wheat, a 1:1 blend of gluten‑free flour can replace all-purpose flour, but be sure to add a pinch of xanthan gum to keep the batter cohesive.
The Texture Crew
Unsalted butter and buttermilk are the duo that keeps the cake moist and tender. Butter provides richness, while buttermilk’s acidity tenderizes the gluten, preventing a rubbery crumb. The heavy cream in the frosting melts into a silky glaze that clings to every crevice, turning the cake into a mouth‑watering experience. If you prefer a vegan version, replace butter with coconut oil and buttermilk with almond milk mixed with lemon juice.
The Unexpected Star
The double dose of creamy peanut butter is the recipe’s secret weapon. The first cup is whisked into the batter, infusing the cake with a deep nutty flavor, while the second cup is swirled on top before baking, creating a dramatic visual and textural contrast. If you’re a peanut butter purist, you can substitute a portion with almond butter for a subtle twist. The chopped dry‑roasted peanuts add crunch and a savory counterpoint to the sweetness.
The Final Flourish
Powdered sugar, vanilla, and a pinch of salt form the frosting that crowns this masterpiece. The powdered sugar gives the glaze a delicate sweetness, while vanilla adds aromatic depth. Salt balances the sweetness, ensuring each bite is well rounded. For a darker look, you can dust the finished cake with a light dusting of cocoa powder.
Everything's prepped? Good. Let's get into the real action and start baking this marvel.
The Method — Step by Step
- Preheat your oven to 350°F (175°C). Line a 9‑inch springform pan with parchment paper and lightly butter the sides. This simple step prevents sticking and ensures a smooth release. As the batter begins to rise, the aroma of vanilla will start to mingle with the nutty scent, signaling that the cake is ready to bake.
- In a large bowl, whisk together the flour, baking powder, baking soda, and fine sea salt until evenly distributed. A fine sift will help remove clumps and ensure a silky batter. If you’re a meticulous baker, use a kitchen scale for precision; even a small deviation can alter the cake’s rise.
- Cream the softened butter and the first cup of creamy peanut butter in a separate bowl until light and fluffy. Use a hand mixer on medium speed for 2 minutes. This process incorporates air, giving the cake a lighter crumb. Once fluffy, gradually add the granulated sugar, continuing to beat until the mixture is pale and airy.
- Add the eggs one at a time, beating well after each addition. The eggs bind the batter and add structure. Once all eggs are incorporated, stir in the vanilla extract and buttermilk. The batter should be smooth and glossy, with a slight sheen that indicates proper emulsification.
- Gently fold in the dry mixture, using a spatula to keep the batter airy. Avoid over‑mixing; you want a few streaks of flour visible. This step is crucial for preventing a dense, heavy cake. Watch the batter’s texture change from thick to silky as it incorporates the dry ingredients.
- Pour the batter into the prepared pan and tap gently on the counter to release air bubbles. The surface should be level. Then, using a pastry brush, swirl the second cup of peanut butter over the batter, creating a marbled effect. This swirl not only looks stunning but also enhances the nutty flavor.
- Bake for 30 minutes, or until a toothpick inserted into the center comes out clean. The top should have a golden‑brown hue and a slightly crisp crust. As the cake bakes, the aroma of toasted peanuts will fill the kitchen, creating an irresistible scent.
- Let the cake cool in the pan for 10 minutes, then remove from the pan and transfer to a wire rack to cool completely. This cooling period allows the cake to set, preventing a soggy crumb. Once cooled, you can add the frosting or serve it as is for a lighter option.
That's it—you did it. But hold on, I've got a few more tricks that'll take this to another level. The next section will dive into insider tips that will elevate even the most seasoned bakers.
Insider Tricks for Flawless Results
The Temperature Rule Nobody Follows
Many bakers set their ovens to a fixed temperature, but oven thermometers reveal that most ovens run 25°F higher than labeled. Use an oven thermometer to calibrate, ensuring the cake bakes evenly without browning too quickly. I once baked at 350°F and the top browned while the center remained undercooked—simple temperature correction saved the day.
Why Your Nose Knows Best
If the cake smells like vanilla and toasted peanuts, it's almost done. Trust your senses; a faint sweet scent indicates the batter has reached the right moisture level. Skipping this step often leads to a dry cake, so pause and sniff before pulling it out.
The 5-Minute Rest That Changes Everything
After removing the cake from the oven, let it rest for exactly 5 minutes before cutting. This brief pause allows the steam to redistribute, preventing the crumb from collapsing and ensuring clean slices. I learned this trick after a friend sliced a cake too early, resulting in a mushy interior.
The Peanut Butter Ratio
Balancing the two peanut butter layers is key. The first cup should be fully incorporated into the batter for depth, while the second cup should be swirled on top to create a visual and flavor contrast. If you use too much on top, the cake may become overly greasy.
The Frosting Finish
When whisking the frosting, start with powdered sugar, then add heavy cream and vanilla. Whisk until the glaze is silky and coats the back of a spoon. A light dusting of powdered sugar on the top after frosting adds a finishing touch that looks professional.
Creative Twists and Variations
Nutty Chocolate Swirl
Swap half the peanut butter for melted dark chocolate, and swirl in the batter before baking. The chocolate adds a bittersweet depth that pairs beautifully with the nutty base, making it a perfect dessert for chocolate lovers.
Citrus Zest Delight
Add a tablespoon of lemon zest to the batter and a splash of orange juice to the frosting. The citrus brightens the flavor profile, providing a fresh contrast to the rich peanut butter.
Almond Infusion
Replace the first cup of peanut butter with almond butter and sprinkle ground almonds on top. The almond butter offers a slightly sweeter, milder nutty taste that appeals to those who prefer a subtler flavor.
Vegan Variation
Use coconut oil instead of butter, almond milk plus lemon juice for buttermilk, and a dairy‑free peanut butter. The vegan version maintains the cake’s moistness and nutty richness while being plant‑based.
Coffee‑Infused Kick
Stir in a teaspoon of instant espresso powder into the batter and add a drizzle of coffee syrup on top after baking. The coffee accentuates the chocolatey undertones, creating a decadent, adult‑oriented dessert.
Mini Cupcake Edition
Divide the batter into a 12‑cup muffin tin and bake for 18 minutes. Top each cupcake with a dollop of frosting and a sprinkle of chopped peanuts. This version is perfect for parties or individual servings.
Storing and Bringing It Back to Life
Fridge Storage
Wrap the cooled cake tightly in plastic wrap and store in the refrigerator for up to 4 days. The wrap prevents the cake from drying out and preserves the moist crumb. When ready to serve, let it sit at room temperature for 15 minutes to regain its softness.
Freezer Friendly
Place the cake in a freezer‑safe container and freeze for up to 2 months. Thaw in the refrigerator overnight, then bring to room temperature before serving. The cake retains its texture and flavor when properly frozen and thawed.
Best Reheating Method
To revive a chilled cake, lightly mist it with water and warm in a 300°F oven for 5 minutes. The water creates steam that rehydrates the crumb, turning the cake back into a fresh, moist delight. Avoid microwaving, which can make the cake rubbery.