I was halfway through a disastrous pancake breakfast when my neighbor called, “Can you make something sweet and cheesy that’s actually edible?” I stared at the soggy batter, the melted butter, and the melted cheese, and my brain lit up with a wild idea. I imagined a waffle that’s crisp on the outside, soft inside, and then layered with gooey cheese that melts like buttered popcorn. That moment was a culinary epiphany, and I dared myself to create a Sweet Waffle Grilled Cheese that would blow everyone’s taste buds into orbit. This isn’t just a sandwich; it’s a love letter to breakfast, a paradox of sweet and savory that will keep you coming back for seconds, and a challenge to anyone who thinks waffle and cheese can’t coexist. Let me walk you through every single step — by the end, you’ll wonder how you ever made it any other way.
What Makes This Version Stand Out
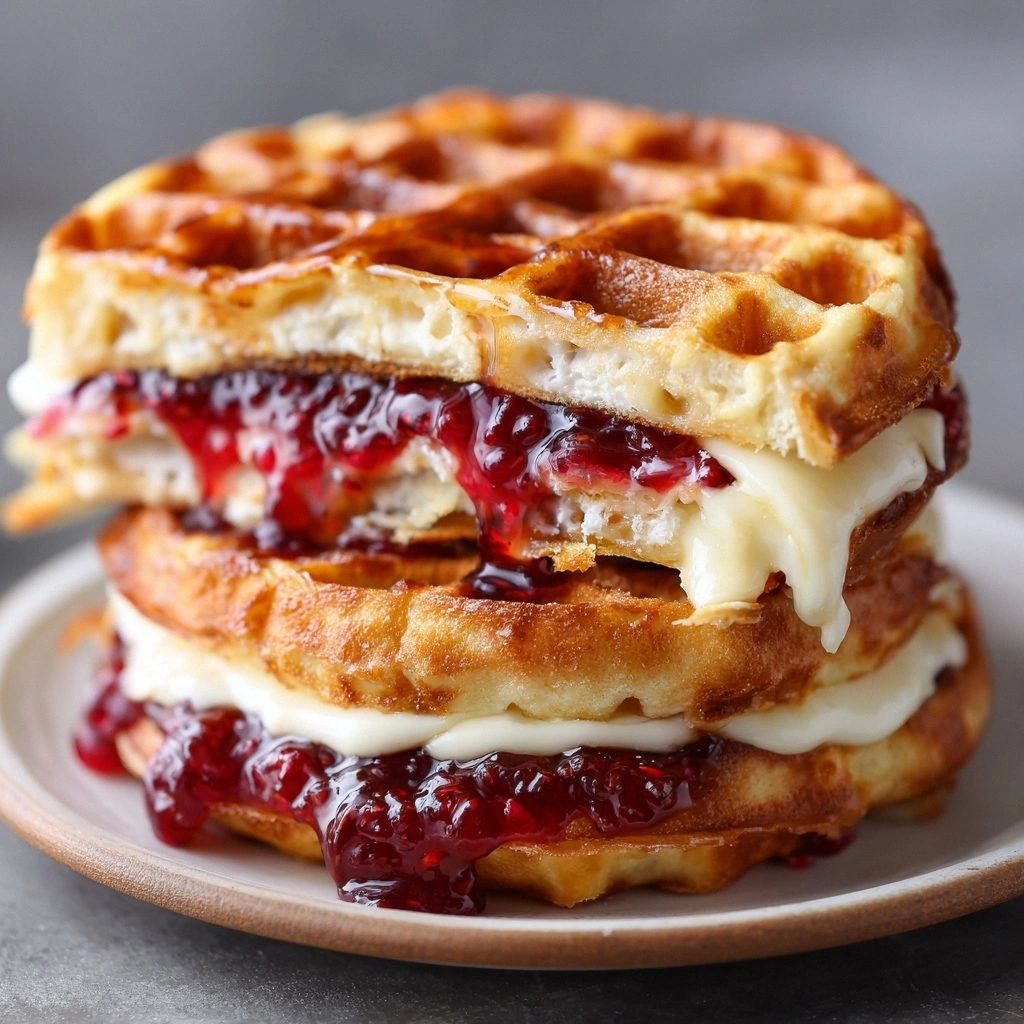
- Flavor Fusion: The subtle sweetness of the batter is balanced by sharp cheddar, creating a taste that feels both comforting and adventurous. The caramelized edges give a slight crunch that contrasts beautifully with the molten cheese inside. This harmony of flavors is what makes the dish unforgettable.
- Texture Mastery: The waffle’s interior is airy and fluffy, while the outside is golden and crisp, like a well‑tossed pancake. When you bite into it, the cheese oozes out in a silky ribbon that coats your tongue. The result is a mouthfeel that feels like a breakfast hug.
- Visual Appeal: The golden waffle, the melted cheese, and the glossy glaze of honey or fruit compote create a plate that looks as good as it tastes. The contrast of colors makes it Instagram‑ready without the need for a filter. It’s a feast for both the eyes and the palate.
- Simplicity Meets Sophistication: All you need is a waffle iron, a skillet, and a few pantry staples. No fancy gadgets or exotic ingredients required, yet the final product feels gourmet. This balance invites cooks of all skill levels to try it.
- Make‑Ahead Potential: The waffles can be baked in advance and frozen, while the cheese can be pre‑grilled and stored. When you’re ready to serve, you only need a quick reheat. This flexibility makes it perfect for brunch parties or lazy weekends.
- Kid‑Friendly Twist: By swapping cheddar for mozzarella or adding a splash of maple syrup, even the pickiest eaters will devour it. The sweet element tames the cheese, making it approachable for all ages. It’s a crowd‑pleaser for both adults and children.
Alright, let’s break down exactly what goes into this masterpiece. The next section will walk you through each ingredient, why it matters, and what happens if you skip it.
Inside the Ingredient List
The Flavor Base
The batter is the soul of this dish. Flour gives structure, while baking powder ensures a light rise. Milk adds moisture and a subtle richness that carries the sweetness. Without the batter, you’re left with nothing but cheese. Each component must be measured precisely to maintain the perfect balance of sweet and savory.
Sugar is the sweetener that caramelizes on the waffle’s surface. It creates a glossy finish and a hint of crunch. If you skip sugar, the waffles will taste flat and the cheese will dominate too heavily. A pinch of salt is essential; it amplifies the flavor of every ingredient. Salt is a flavor enhancer that makes the cheese melt more smoothly.
Eggs bind the batter and add richness. They also help the waffle develop a golden crust. If you’re avoiding eggs, use a flaxseed or chia egg as a vegan alternative. The egg’s protein content gives the waffle a firm yet tender bite. It’s the glue that holds everything together.
The Texture Crew
Butter is the secret to a crispy exterior. Melted butter coats the waffle iron and prevents sticking. It also contributes a buttery aroma that lures you in. A small amount of butter on the skillet for grilling adds a caramelized edge to the cheese. The combination of butter in both places creates a double‑layered crunch.
Cheese is the star. I use sharp cheddar for its tangy depth, but mozzarella or Gruyère can work too. The cheese’s melting point is key; it should ooze without becoming greasy. A high‑fat cheese adds creaminess. If you use a low‑fat cheese, the texture will feel dry.
Honey or fruit compote adds a glossy glaze that coats the waffle’s surface. It’s the sweet counterpoint that balances the cheese’s saltiness. If you prefer a tart finish, a drizzle of raspberry jam works wonders. The glaze also adds a subtle caramel note that lingers on the palate. This final touch transforms the dish from simple to extraordinary.
The Unexpected Star
Fresh fruit, such as sliced strawberries or blueberries, is optional but highly recommended. They introduce a burst of acidity that cuts through the richness. The fruit’s juiciness also creates a mini sauce when melted. If you’re vegan, replace fruit with a drizzle of maple syrup. Either way, the fruit adds a vibrant pop of color.
A splash of vanilla extract elevates the batter’s flavor profile. It adds warmth and depth that pairs with both sweet and savory elements. Vanilla also softens the bitterness of the baking powder. If you’re allergic, a pinch of almond extract can substitute. The aromatic note is subtle yet essential.
The Final Flourish
Bread slices are optional, but they add a crunchy, toasted layer that contrasts with the waffle’s softness. Use a sturdy bread like sourdough for a chewy bite. Toast the bread before adding cheese to prevent sogginess. If you skip bread, the dish becomes a pure waffle‑cheese combo. Either way, the bread layer is a delightful textural addition.
I always keep a small bowl of melted butter nearby for the skillet. It ensures that the cheese grinds into a silky sauce. The butter also prevents the cheese from sticking to the pan. If you’re in a hurry, a non‑stick spray works as a quick alternative. The result is a perfectly smooth melt.
Everything’s prepped? Good. Let’s get into the real action.
The Method — Step by Step
- First, whisk together flour, baking powder, salt, and sugar in a large bowl. The dry mix should be smooth, with no lumps. This step ensures an even rise in the waffle. Feel the texture of the batter; it should be thick but pourable. If it’s too thick, add a splash of milk.
- In a separate bowl, beat the eggs and then add milk, melted butter, and vanilla. Mix until the ingredients are fully incorporated. The wet mix should feel silky to the touch. Pour the wet mix into the dry mix, stirring until just combined. Over‑mixing can make the waffles tough.
- Heat your waffle iron to medium‑high. Lightly grease it with a brush of melted butter or a non‑stick spray. This step prevents sticking and gives a crisp crust. Let the iron preheat for a minute or two. When it’s hot, you’ll hear a faint hiss.
- Pour a ladleful of batter onto the center of the iron. Close the lid and cook until the waffle is golden and the edges look crisp. Flip the waffle once in the middle to ensure even browning. The waffle should smell like toasted sugar. Remove it and let it cool slightly.
- While the waffles are cooking, heat a skillet over medium heat. Add a knob of butter and let it melt. This skillet will be used to grill the cheese. When the butter is foamy, add a slice of cheese on top of a waffle. The cheese should start to melt within 30 seconds.
- Cover the skillet with a lid to trap heat and speed up the melting process. The cheese will become gooey and start to pull at the edges. Watch the cheese carefully; once it’s bubbly, it’s ready. This step is the moment of truth.
- If you’re adding fruit, sprinkle it on top of the cheese now. The fruit will release juices that mingle with the cheese. The combination will create a luscious sauce. The fruit also adds a pop of color. Make sure the fruit is fresh for the best flavor.
- Drizzle honey or maple syrup over the top. The glaze should coat the waffle and cheese, giving a glossy finish. Let the syrup settle for a few seconds so it doesn’t run off. The glaze adds a caramelized sweetness. It also gives a slight crunch when bitten into.
- If you’re using bread, toast it lightly before placing it on the waffle. Spread a thin layer of butter on the bread. The toasted bread adds crunch and depth. It also prevents the waffle from becoming soggy. This extra layer is optional but highly recommended.
- Serve immediately while the waffle is still warm and the cheese is molten. Pair it with a glass of cold milk or a fresh cup of coffee. The combination of sweet, salty, and creamy is a breakfast revelation. Enjoy the first bite with a smile. This is the moment you’ll tell everyone about.
That’s it — you did it. But hold on, I’ve got a few more tricks that will take this to another level. The next section will reveal insider secrets that even seasoned cooks might not know.
Insider Tricks for Flawless Results
The Temperature Rule Nobody Follows
The key to a perfect waffle is the right temperature. Too hot, and the outside burns while the inside remains raw. Too cool, and the waffle becomes soggy. I recommend setting the waffle iron to 375°F, then allowing it to heat for a full minute. This ensures an even, golden crust.
Why Your Nose Knows Best
The aroma of a waffle is a natural indicator of doneness. When you smell a sweet, buttery scent, the waffle is ready to flip. If you smell burnt sugar, lower the heat. Your nose is a reliable tool for timing, so trust it. A quick sniff is worth the extra minute.
The 5‑Minute Rest That Changes Everything
After the waffle is done, let it rest on a wire rack for 5 minutes. This allows the steam to escape, preventing sogginess. The rest also lets the cheese set slightly, making it easier to slice. If you cut too soon, the cheese will ooze everywhere. The rest is a small step that makes a big difference.
Cheese Spread Technique
Spread a thin layer of cheese on the waffle before grilling. This ensures even melting and a smoother texture. A thick layer can cause uneven melt and a greasy bite. The spread technique also helps the cheese cling to the waffle. The result is a uniform, luscious melt.
Butter Brush for Extra Crunch
Brush the outside of the waffle with melted butter before placing it in the skillet. This creates a golden, crunchy shell that holds the cheese in place. The butter also adds a rich flavor that complements the honey glaze. Use a pastry brush for an even coat. The extra crunch is a game‑changer.
Creative Twists and Variations
This recipe is a playground. Here are some of my favorite ways to switch things up:
Maple‑Glazed Waffle Grilled Cheese
Swap honey for pure maple syrup for a deeper, caramel flavor. The syrup caramelizes on the waffle, creating a sweet crust. Pair it with smoked gouda for a smoky twist. The maple glaze also adds a sticky, delightful texture. This version is perfect for a cozy Sunday brunch.
Berry‑Burst Waffle Grilled Cheese
Add fresh blueberries or raspberries to the batter. The berries burst during cooking, releasing juices that mingle with the cheese. Use a light cheese like brie to let the fruit shine. The result is a sweet‑savory explosion. It’s a colorful, Instagram‑worthy dish.
Savory Herb Waffle Grilled Cheese
Omit the sugar and add chopped fresh herbs like thyme or rosemary. The herbs infuse the batter with aromatic flavors. Pair with sharp cheddar and a drizzle of olive oil. The result is a savory waffle that’s great for lunch. It’s a quick, herb‑filled comfort meal.
Vegan Waffle Grilled Cheese
Use a plant‑based milk and a flaxseed egg to replace dairy and eggs. Choose a vegan cheese that melts well, like a mozzarella‑style alternative. Add a splash of nutritional yeast for a cheesy flavor boost. The vegan version maintains the same texture and taste. It’s a guilt‑free breakfast that satisfies.
Spicy Jalapeño Waffle Grilled Cheese
Dice fresh jalapeños and mix them into the batter. The heat will caramelize during cooking, adding a subtle kick. Combine with pepper jack cheese for extra spice. The spicy glaze from the jalapeños adds a smoky depth. This version is for those who like a fiery breakfast.
Storing and Bringing It Back to Life
Fridge Storage
Store cooked waffles and grilled cheese in an airtight container in the fridge for up to 3 days. Keep the cheese layer separate until ready to reheat. This prevents moisture from making the waffle soggy. When you’re ready, reheat in a skillet with a splash of butter. The result is a fresh, crispy waffle with gooey cheese.
Freezer Friendly
Freeze individual waffles in a zip‑lock bag for up to 2 months. Thaw overnight in the fridge before reheating. For grilled cheese, wrap the assembled sandwich in foil before freezing. Reheat in a pre‑heated oven at 350°F for 10 minutes. The texture remains close to freshly made.
Best Reheating Method
Reheat in a skillet over medium heat to preserve crispness. Add a splash of water to the pan, cover, and let steam for 2 minutes. This technique keeps the cheese from drying out. Flip once for even heating. The final bite will feel like a brand‑new waffle.