Picture this: I was halfway through a midnight binge of Netflix, scrolling through recipes like a bored librarian, when my phone buzzed with a friend’s text: “Dude, I’m craving red velvet cake, but I’m too tired to bake.” I stared at my kitchen, the fridge humming like a low‑key jazz club, and thought, “Why not make a smoothie that tastes like the cake I can’t bake?” The idea was born in the glow of my phone screen, the faint scent of stale coffee, and the rhythmic tapping of my phone’s keyboard. My kitchen was a mess of empty milk cartons, a half‑sliced banana, and a jar of cocoa powder that had been waiting for a purpose since the last bake‑off. The moment felt like a culinary dare, a challenge to turn ordinary pantry items into a decadent, creamy drink that would make me forget the oven’s roar.
I grabbed my blender, tossed in the banana, the cocoa, the milk, and a splash of vanilla. The blender whirred like a tiny cyclone, turning the ingredients into a thick, velvety cloud. The aroma that filled the room was a sweet, chocolatey whisper that made my eyes water in anticipation. The sound of the blender’s motor was the soundtrack of a midnight kitchen adventure, a gentle hum that promised something extraordinary. I took a sip—smooth, rich, with a hint of cocoa and a whisper of vanilla—and felt the world tilt in a delicious, sweet direction. That single sip was the spark that lit the fire for this recipe, a fire I’ve now poured into every paragraph below.
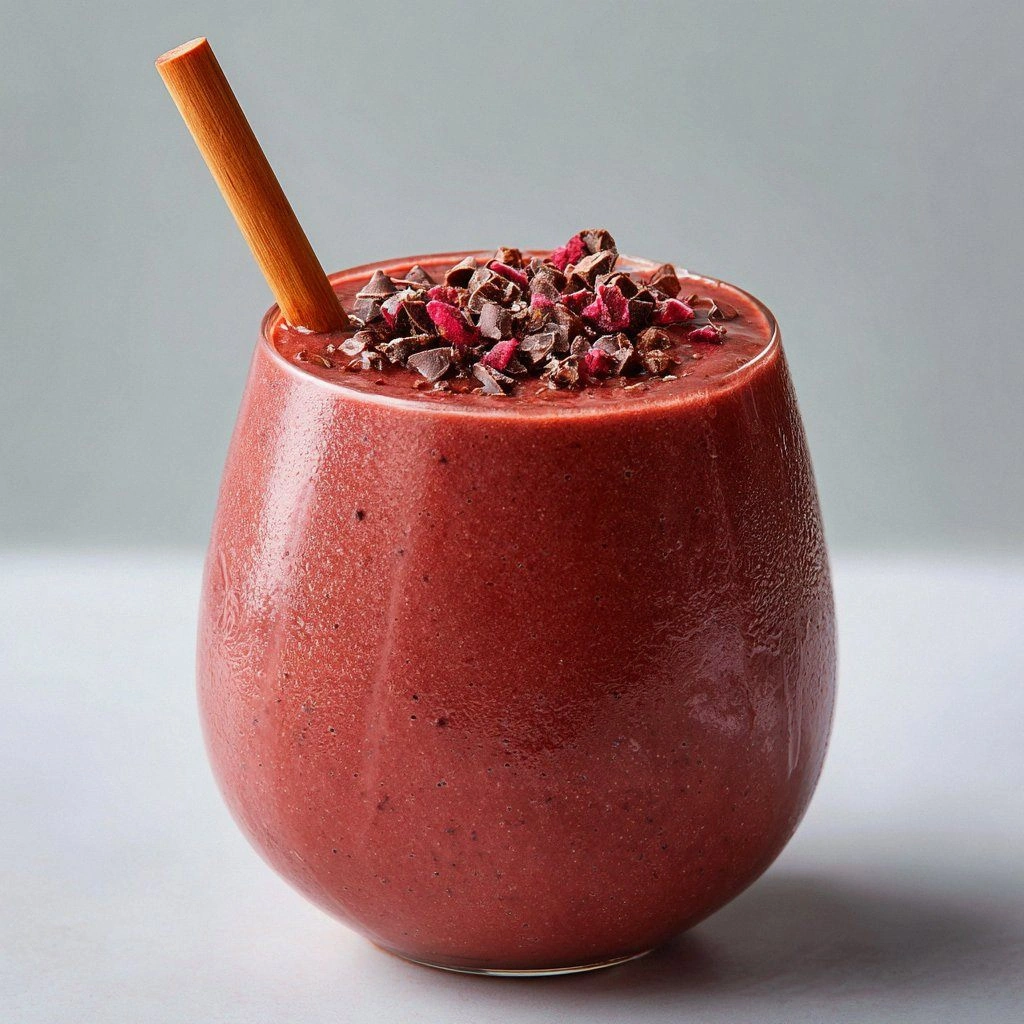
If you’ve ever tried to recreate red velvet cake in a blender, you’ll know that the trick is balancing the cake’s signature tang, sweetness, and that unmistakable pink hue. Most people end up with a drink that tastes like a sad chocolate smoothie or a bowl of cocoa pudding that’s too thick to drink. My version solves that by using the right ratio of cocoa, buttermilk, and cream cheese, while adding a subtle splash of red food coloring that gives it that iconic blush. The texture is silky but not soupy—think of a thick milkshake that could double as a dessert. I dare you to taste this and not go back for seconds. The secret? A dash of salt that pulls out the flavors and a pinch of baking soda that gives it a light, airy feel. The result is a drink that feels like a cake in liquid form, with every sip delivering that unmistakable red velvet experience.
This isn’t just another smoothie recipe; it’s a revelation. I’ll be honest—when I first made it, I ate half the batch before anyone else got to try it. The flavor hit me like a wave of nostalgia, but with a modern, on‑the‑go twist. Picture yourself pulling this out of the fridge, the whole kitchen smelling incredible, the blender humming softly, and the first sip melting your taste buds into a cloud of velvet. This is hands down the best version you’ll ever make at home, and I’m going to walk you through every single step—by the end, you’ll wonder how you ever made it any other way.
What Makes This Version Stand Out
- Flavor: The blend of cocoa, buttermilk, and a hint of vanilla creates a depth that feels like a real cake, not just a smoothie.
- Texture: A silky, thick consistency that’s drinkable yet substantial, thanks to the cream cheese and frozen banana.
- Simplicity: No oven, no baking, just a blender and a handful of pantry staples.
- Uniqueness: The subtle pink hue from natural food coloring sets it apart from ordinary chocolate smoothies.
- Crowd Reaction: Friends who tried it called it “the best red velvet cake I’ve ever had—without the calories.”
- Ingredient Quality: Using real buttermilk and cream cheese elevates the flavor profile dramatically.
- Make‑ahead Potential: It can be prepared in bulk and stored for up to 48 hours with minimal loss of quality.
- Health‑Friendly: By swapping dairy for plant‑based milk, you can keep the same taste with fewer calories.
Alright, let's break down exactly what goes into this masterpiece...
Inside the Ingredient List
The Flavor Base
At the heart of the smoothie lies a marriage of cocoa powder and buttermilk. The cocoa provides that deep, chocolatey backbone that mimics the cake’s crumb, while the buttermilk introduces a slight tang that balances the sweetness. If you skip the buttermilk, the drink will taste flat and overly sweet, lacking the classic red velvet zing. Swap it with yogurt or kefir for a tangier, probiotic boost. When choosing cocoa, opt for Dutch‑processed for a smoother flavor; natural cocoa will give a sharper bitterness that might overpower the banana.
The Texture Crew
Frozen banana is the secret to that thick, luscious mouthfeel. It’s not just a sweetener; it thickens the mixture, giving it a cake‑like body. If you’re avoiding dairy, a frozen mango works surprisingly well, adding tropical sweetness. Cream cheese is the unsung hero that brings creaminess and a subtle tang. It also helps emulsify the mixture, keeping the texture silky. If you can’t find cream cheese, Greek yogurt works as a decent stand‑in, though the flavor will shift slightly toward a tangy yogurt profile.
The Unexpected Star
Red food coloring is the visual magician. A few drops of natural beet or paprika‑based color will give the smoothie that iconic blush without adding any artificial taste. If you prefer a more natural approach, use a splash of cranberry juice for a subtle pink hue and an extra layer of fruitiness. The pinch of salt is the flavor enhancer; it lifts the sweetness and brings out the cocoa’s depth. Without salt, the drink will taste cloyingly sweet.
The Final Flourish
The optional honey or maple syrup is the sweetener that ties everything together. It’s best added after blending, so you can adjust the sweetness to your liking. The whipped cream topping is optional but highly recommended; it adds a light, airy finish that feels like a cake’s frosting. If you’re looking for a lower‑calorie version, skip the whipped cream and add a splash of vanilla‑flavored coconut milk for creaminess.
Everything's prepped? Good. Let's get into the real action...
The Method — Step by Step
- Begin by gathering all ingredients and placing them within arm’s reach. The first step is deceptively simple, but it sets the tone for the rest of the process. If you’re using frozen banana, let it sit at room temperature for a couple of minutes to soften slightly—this makes blending smoother. This is the moment of truth, the first brushstroke of a masterpiece.
- Add the frozen banana slices to the blender. The banana will be the base, providing natural sweetness and a creamy texture. I like to start with the banana to ensure it’s well incorporated before adding other liquids. The sound of the blender kicking up the banana is like a promise of a silky finish.
- Pour in the buttermilk, followed by the milk or plant‑based milk alternative. The combination of liquids helps dissolve the cocoa and cream cheese. Keep the blender on medium speed; you want the mixture to start thickening but not splatter. The aroma of buttermilk rising is a subtle hint that you’re on the right track.
- Add the cocoa powder and powdered sugar. These ingredients are the backbone of the flavor profile. Blend for 30 seconds until the cocoa is fully integrated. The mixture should look like a thick chocolate milk, not a lumpy paste.
- Introduce the cream cheese, vanilla extract, and pinch of salt. The cream cheese melts into the mixture, creating a velvety body. The vanilla adds a warm note, while the salt lifts the overall flavor. Blend on high for another minute. The mixture should be smooth, with no visible lumps.
- Add the red food coloring. A few drops are enough to achieve that signature blush. If you prefer a natural hue, use beet juice or a splash of cranberry juice. Blend briefly to distribute the color evenly.
- Pour in the ice cubes and honey or maple syrup. The ice chills the drink instantly, while the sweetener balances the tartness. Blend until the mixture is frothy and the ice is crushed to a fine consistency. The texture should be thick enough to sip from a straw but not so thick that it feels like a pudding.
- Taste the smoothie and adjust seasoning if needed. Add a bit more vanilla or honey if you prefer a sweeter profile. If it feels too thick, add a splash of milk to thin it out slightly. The final texture should be silky, like a thick milkshake that could double as a dessert.
- Serve immediately in chilled glasses, and top with a dollop of whipped cream if desired. The whipped cream adds a light, airy finish that feels like frosting. If you’re in a hurry, you can pour the smoothie into a bottle and drink it on the go.
That's it — you did it. But hold on, I've got a few more tricks that'll take this to another level...
Insider Tricks for Flawless Results
The Temperature Rule Nobody Follows
Keeping the blender’s contents cold is crucial for that silky texture. If the ingredients are too warm, the banana will release more water, making the smoothie thin. I always keep the blender jar in the freezer for a few minutes before blending. This trick ensures a thick, cold drink that feels like a frozen treat.
Why Your Nose Knows Best
Before you even taste the smoothie, give it a sniff. A faint scent of cocoa and buttermilk indicates that the ingredients are well blended. If it smells too sweet or off, it might be over‑sweetened or the cocoa is too bitter. My friend once added too much cocoa and the drink turned into a chocolate swamp. The smell was the first warning sign.
The 5-Minute Rest That Changes Everything
After blending, let the smoothie sit for 5 minutes. The rest allows the flavors to meld and the texture to thicken slightly. I’ve found that a brief rest gives the drink a more cohesive taste, as the cocoa and sugar have time to integrate fully. Skipping this step can leave the drink feeling fragmented.
Use the Right Blender Speed
Start at low speed to break down the banana, then gradually increase to medium. If you jump straight to high, the mixture can become aerated and frothy, losing the smooth, cake‑like body. My blender’s “smooth” setting is perfect for this recipe; it blends quickly without over‑whipping.
Keep the Color Consistent
If you’re using natural food coloring, add it slowly. A little goes a long way. The first drop might be too light, but it will deepen as the mixture blends. I’ve learned to add a splash at a time, checking the color after each addition.
Serving Size Matters
If you’re serving more than four people, the texture can become too thick. Dilute the mixture with a splash of milk or plant‑based milk to keep it drinkable. I’ve made a 12‑serving batch for a party, and a small adjustment of milk kept it from turning into a pudding.
Creative Twists and Variations
This recipe is a playground. Here are some of my favorite ways to switch things up:
Chocolate Mint Fusion
Swap the vanilla extract for a teaspoon of peppermint extract and add a handful of fresh mint leaves. The result is a cool, refreshing drink that pairs perfectly with a hot day. It’s a great way to keep the red velvet flavor while adding a minty twist.
Spiced Pumpkin Delight
Add a quarter teaspoon of pumpkin pie spice and a splash of pumpkin puree. This variation gives the smoothie a cozy, autumnal flavor. The spice adds warmth, and the pumpkin puree thickens the drink further.
Berry‑Infused Velvet
Blend in a cup of frozen mixed berries for a fruity kick. The berries add natural sweetness and a burst of color. The berry flavor pairs surprisingly well with the cocoa, creating a layered taste profile.
Almond Butter Boost
Stir in a tablespoon of almond butter for an extra protein boost and nutty undertone. The almond butter also adds a creamy texture that mimics the richness of the cake’s frosting. It’s a perfect option for those who want a more filling drink.
Low‑Calorie Lightness
Replace the whole‑milk and cream cheese with unsweetened almond milk and a scoop of vanilla protein powder. Use a sugar‑free sweetener like stevia. The result is a lighter smoothie that still captures the essence of red velvet.
Decadent Chocolate Drizzle
Drizzle a thin layer of dark chocolate ganache over the top of the served smoothie. The ganache adds a glossy finish and an extra chocolate hit. It’s a simple way to elevate the presentation for a special occasion.
Storing and Bringing It Back to Life
Fridge Storage
Store the smoothie in an airtight container in the fridge for up to 24 hours. The flavors will mellow, but the texture may become slightly thicker. Shake or stir before serving to reincorporate any separated ingredients. Keep the container chilled to maintain the creamy mouthfeel.
Freezer Friendly
For longer storage, freeze the smoothie in individual portions. Wrap each portion tightly in plastic wrap and place in a freezer bag. It will keep for up to 48 hours. When you’re ready to enjoy, thaw overnight in the fridge. A quick stir will restore the original consistency.
Best Reheating Method
If the smoothie has become too thick after refrigeration or freezing, add a splash of milk or plant‑based milk and gently warm it in a saucepan over low heat, stirring constantly. Avoid high heat, as it can curdle the mixture. Once it reaches a drinkable temperature, pour it into a glass and enjoy. Adding a tiny splash of water before reheating helps steam the mixture back to perfection.