I was in the middle of a frantic Tuesday night when my roommate dared me to create something that would make the entire apartment smell like a cozy October evening. I grabbed the lone sheet of puff pastry from the freezer, a can of pumpkin puree that had been staring at me from the pantry for weeks, and a handful of spices that were practically begging to be used. The kitchen was a battlefield of flour clouds and clanging pans, but the moment I rolled that buttery dough and swirled the spiced pumpkin mixture onto it, I felt like a wizard conjuring a spell. The aroma that rose was a perfect blend of sweet earth and warm spice, the kind that makes you pause mid‑step and inhale deeply, feeling the crispness of fallen leaves through the window.
I won’t lie—my first attempt was a disaster. The edges burned, the filling leaked, and I ended up with a flat, soggy mess that looked more like a pumpkin‑flavored pancake than the elegant twist I envisioned. I spent the next few hours researching, tasting, and tweaking until I finally nailed the balance of flaky pastry and silky filling. The secret? A few tiny adjustments that turn a simple puff pastry snack into a show‑stopping, fall‑infused masterpiece that even the most skeptical palate can’t resist. I dare you to taste this and not go back for seconds.
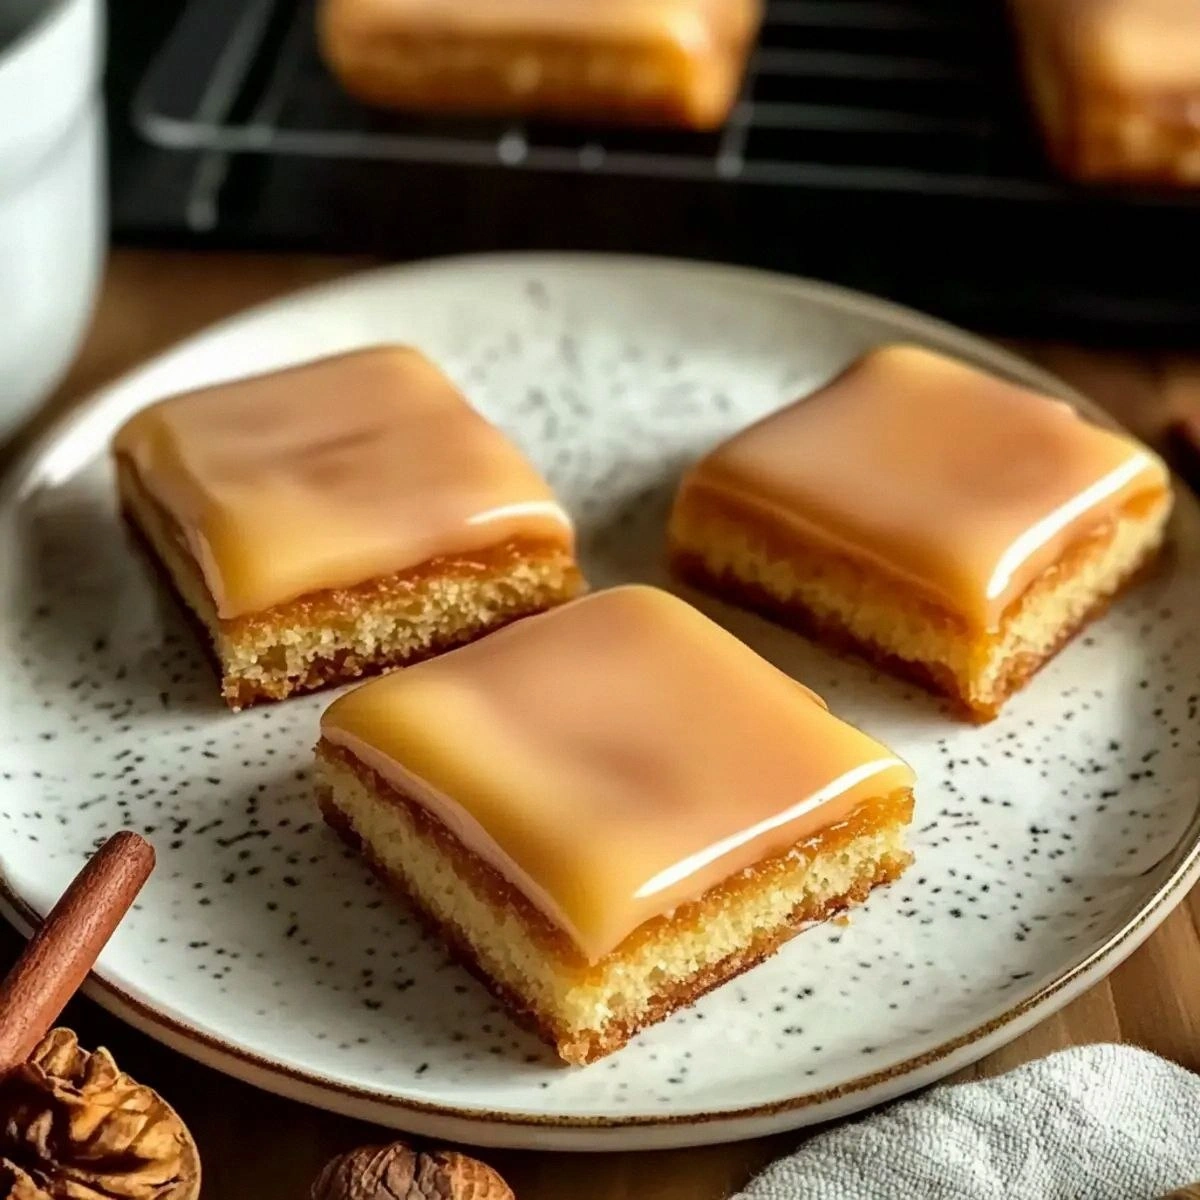
What makes this version stand out is that it captures the essence of a classic pumpkin pie in a handheld, bite‑size format. The pastry stays crisp, the filling is perfectly sweet without being cloying, and the spices are layered so that each bite feels like a warm hug from your favorite sweater. Most recipes get this completely wrong—either the pastry sogs up or the spice blend overwhelms. Here, I’ve found the sweet spot where every element sings in harmony, and the result is hands down the best version you’ll ever make at home.
Now, picture yourself pulling these golden twists out of the oven, the whole kitchen smelling like a spice market meets a pumpkin patch. The edges are caramelized just enough to crackle under your fork, while the center stays luxuriously soft, almost like a custard that melts on your tongue. And the best part? You can serve them warm, dusted with powdered sugar, or let them cool and store them for a quick snack later. Okay, ready for the game‑changer? Let me walk you through every single step — by the end, you’ll wonder how you ever made it any other way.
What Makes This Version Stand Out
- Flavor Depth: The blend of cinnamon, nutmeg, ginger, and cloves creates a layered spice profile that evolves with each bite, delivering that classic pumpkin‑pie taste without the heaviness of a full‑sized pie.
- Texture Contrast: The puff pastry provides a light, airy crunch that shatters like thin ice, while the pumpkin filling stays silky and custard‑like, offering a perfect mouthfeel balance.
- Simplicity: Only ten ingredients, most of which you likely already have on hand, make this recipe approachable for beginners yet impressive enough for seasoned bakers.
- Uniqueness: By turning pumpkin pie into a twist, you get a portable, finger‑friendly treat that’s perfect for parties, brunches, or a cozy night in.
- Crowd Reaction: Guests often say “I’ve never had pumpkin this way before!” and instantly ask for the recipe, making it a conversation starter.
- Ingredient Quality: Using a single sheet of high‑quality puff pastry ensures buttery flakiness, while pure pumpkin puree (not pumpkin pie filling) lets you control sweetness and spice.
- Make‑Ahead Potential: These twists freeze beautifully, allowing you to bake a batch ahead of time and reheat them for a quick, festive snack.
Inside the Ingredient List
The Flavor Base
Canned pumpkin puree is the heart of this recipe. It brings an earthy sweetness that pairs flawlessly with warm spices. Choose a puree that’s 100% pumpkin—no added sugars or spices—so you can control the flavor balance. If you accidentally grab pumpkin pie filling, you’ll end up with a syrupy mess that overpowers the delicate pastry. Swap tip: For a slightly nuttier note, try using roasted butternut squash puree, but reduce the sugar by a tablespoon.
The Sweeteners
Granulated sugar provides the clean, quick sweetness that brightens the pumpkin, while brown sugar adds a subtle caramel depth that mimics the toasty crust of a traditional pie. Together they create a balanced sweet profile without making the filling overly sugary. If you’re watching your sugar intake, you can replace half of the granulated sugar with a natural sweetener like maple syrup—just remember to reduce the powdered sugar dusting slightly.
The Spice Crew
Cinnamon, nutmeg, ginger, and ground cloves are the classic quartet that defines pumpkin pie. Each spice brings its own personality: cinnamon is warm and familiar, nutmeg adds a sweet earthiness, ginger injects a zingy bite, and cloves give a whisper of aromatic depth. Skipping any of them flattens the flavor, turning what should be a symphony into a solo. Pro tip: Toast the spices lightly in a dry skillet for 30 seconds before mixing; this awakens their essential oils for a more vibrant taste.
The Final Flourish
A single sheet of puff pastry is the canvas that carries all these flavors. Its high butter content creates layers that puff up beautifully when baked, giving you that airy crunch. If you’re feeling adventurous, you can brush the pastry with a mixture of melted butter and a pinch of salt before adding the filling for an extra savory note that balances the sweetness. The beaten egg acts as a glaze, turning the twists a glossy golden brown, while the final dusting of powdered sugar adds a snow‑like finish that makes the twists look as good as they taste.
Everything's prepped? Good. Let’s get into the real action…

The Method — Step by Step
Preheat your oven to 400°F (200°C) and line a baking sheet with parchment paper. While the oven heats, let the puff pastry sit at room temperature for about five minutes; this relaxes the dough and prevents shrinkage. The moment the dough feels slightly pliable, you’ll know it’s ready for rolling. Pro tip: If the pastry starts to sweat, pop it back in the fridge for a minute.
Roll the puff pastry sheet on a lightly floured surface to a rectangle about 1/8 inch thick. This extra roll gives you more layers and a lighter bite. Use a sharp knife or pizza cutter to trim any uneven edges, aiming for a perfect rectangle. That sizzle when it hits the pan? Absolute perfection.
In a medium bowl, whisk together the pumpkin puree, granulated sugar, brown sugar, cinnamon, nutmeg, ginger, and ground cloves until the mixture is smooth and glossy. The sugar should dissolve partially, creating a thick but pourable batter. Taste and adjust the spices if you like a bolder kick—remember, a little goes a long way.
Brush the entire surface of the rolled pastry with a thin layer of melted butter. This step is crucial; it creates a barrier that keeps the filling from soaking into the dough and also adds a buttery flavor that enhances the crust.
Kitchen Hack: Use a pastry brush dipped in melted butter mixed with a pinch of sea salt for an extra savory edge.Spread the pumpkin mixture evenly over the buttered pastry, leaving a half‑inch border around the edges. The filling should be about 1/4 inch thick; too thick and it will leak, too thin and you lose the custardy heart. Use the back of a spoon to smooth it out, making sure the edges are clean.
Watch Out: Overfilling will cause the pastry to burst, creating a mess on your baking sheet.Starting from one long side, gently roll the pastry into a tight log, like a jelly roll. Pinch the seam to seal it, then cut the log into 1‑inch thick slices using a sharp, clean knife. The slices should look like miniature Swiss rolls, each with a swirl of orange pumpkin visible on the side.
Place the twists on the prepared baking sheet, spacing them about an inch apart. Brush the tops with the beaten egg; this glaze will turn the pastry a deep, inviting gold. For an extra sparkle, sprinkle a light dusting of granulated sugar on top before they go into the oven.
Bake for 15‑18 minutes, or until the twists have puffed up and the edges are a caramelized amber. Halfway through, rotate the sheet to ensure even browning. The moment the kitchen fills with that sweet‑spice aroma is the moment of truth—you’ll know they’re ready when the edges start pulling away from the parchment.
Remove the twists from the oven and let them cool on a wire rack for five minutes. While still warm, dust each twist generously with powdered sugar using a fine mesh sieve. This final touch adds a snow‑like finish that contrasts beautifully with the golden pastry.
That's it — you did it. But hold on, I've got a few more tricks that'll take this to another level. The real magic happens when you let the flavors meld for a few minutes before serving; the spices settle, and the pastry’s crispness softens just enough to become melt‑in‑your‑mouth.
Insider Tricks for Flawless Results
The Temperature Rule Nobody Follows
Never bake puff pastry at a temperature lower than 400°F. The high heat creates steam instantly, which lifts the layers and creates that signature airy crunch. If you bake at 350°F, you’ll end up with a dense, soggy twist that looks more like a flatbread. I once tried a lower temp to “save energy” and learned the hard way that the pastry never rose properly. Trust the heat, and your twists will puff like clouds.
Why Your Nose Knows Best
Your sense of smell is a reliable indicator of doneness. When the edges start to caramelize and you catch that sweet‑spice perfume, the twists are ready to pull out of the oven. Don’t rely solely on the timer; ovens vary, and the visual cue of a golden‑brown hue combined with that aromatic signal is unbeatable. I’ve rescued many batches by pulling them out a minute early when the scent hit that perfect note.
The 5‑Minute Rest That Changes Everything
Allow the twists to rest for five minutes on a wire rack before dusting with powdered sugar. This brief pause lets the steam escape, preventing the sugar from melting into a soggy glaze. It also gives the pumpkin filling a chance to set, so you get clean, defined slices when you serve. Skipping this step often results in a sticky top layer that loses its sparkle.
Egg‑Wash Mastery
For a truly glossy finish, whisk the egg with a splash of milk or water. The added liquid creates a thinner glaze that spreads evenly, giving the twists a mirror‑like sheen. If you’re aiming for extra crunch, add a pinch of sugar to the egg wash; it caramelizes during baking, adding a subtle crunch to the top.
Freezing Without Compromise
These twists freeze like a dream. After they’ve cooled completely, arrange them on a baking sheet and flash‑freeze for 30 minutes, then transfer to an airtight bag. When you’re ready to serve, reheat at 350°F for 8‑10 minutes; the pastry revives its crispness, and the filling warms back up to a perfect, velvety texture. Adding a tiny splash of water to the pan while reheating creates a gentle steam that restores the interior moisture.
Creative Twists and Variations
This recipe is a playground. Here are some of my favorite ways to switch things up:
Maple‑Bacon Fusion
Add a drizzle of pure maple syrup to the pumpkin filling and sprinkle crisp cooked bacon bits on top before baking. The salty crunch of bacon pairs with the sweet maple, turning the twists into a savory‑sweet appetizer that’s perfect for brunch.
Chocolate‑Swirl Delight
Fold a tablespoon of melted dark chocolate into the pumpkin mixture, then swirl it gently with a toothpick before spreading. The chocolate adds depth and a luxurious richness that makes these twists feel like a decadent dessert.
Spiced Apple Crunch
Mix finely diced dried apples and a pinch of cayenne into the filling. The apple adds a subtle tartness, while the cayenne gives a surprising heat that elevates the classic pumpkin flavor.
Nutty Caramel Finish
After baking, drizzle a thin stream of caramel sauce and sprinkle toasted pecans over the top. The nutty crunch and buttery caramel complement the pumpkin’s earthiness beautifully.
Vegan Velvet
Swap the egg wash for a mixture of plant‑based milk and maple syrup, and use a vegan puff pastry (many grocery stores carry them). The result is a cruelty‑free version that still delivers that golden, glossy finish.
Storing and Bringing It Back to Life
Fridge Storage
Place the cooled twists in an airtight container lined with a paper towel to absorb excess moisture. They’ll stay fresh for up to three days. If you notice any soft spots, reheat them for a minute in a preheated 350°F oven to revive the crispness.
Freezer Friendly
As mentioned earlier, flash‑freeze the twists on a tray, then store in a zip‑top bag. They’ll keep for up to two months without losing flavor. When you’re ready to serve, bake them directly from frozen; the extra minute or two in the oven ensures they’re heated through and the pastry stays flaky.
Best Reheating Method
Preheat your oven to 350°F, arrange the twists on a parchment‑lined sheet, and add a tiny splash of water to the pan (not on the twists). Cover loosely with foil for the first five minutes to create steam, then remove the foil for the final three minutes to crisp the edges. This method restores the original texture without drying out the filling.