Picture this: I was halfway through a family gathering, the oven was already on, and the cake batter had turned into a sticky, unrecognizable mess. The blackberries had burst, the sugar had clumped, and I was staring at a half‑baked, soggy slab that looked like a blackened pancake. My friends were already laughing, and I was feeling like a culinary disaster. That night, I vowed to create a cake that would turn that mess into a masterpiece. The next morning, armed with a fresh batch of blackberries and a sprinkle of confidence, I set out to bake a cake that would make your taste buds do a victory dance.
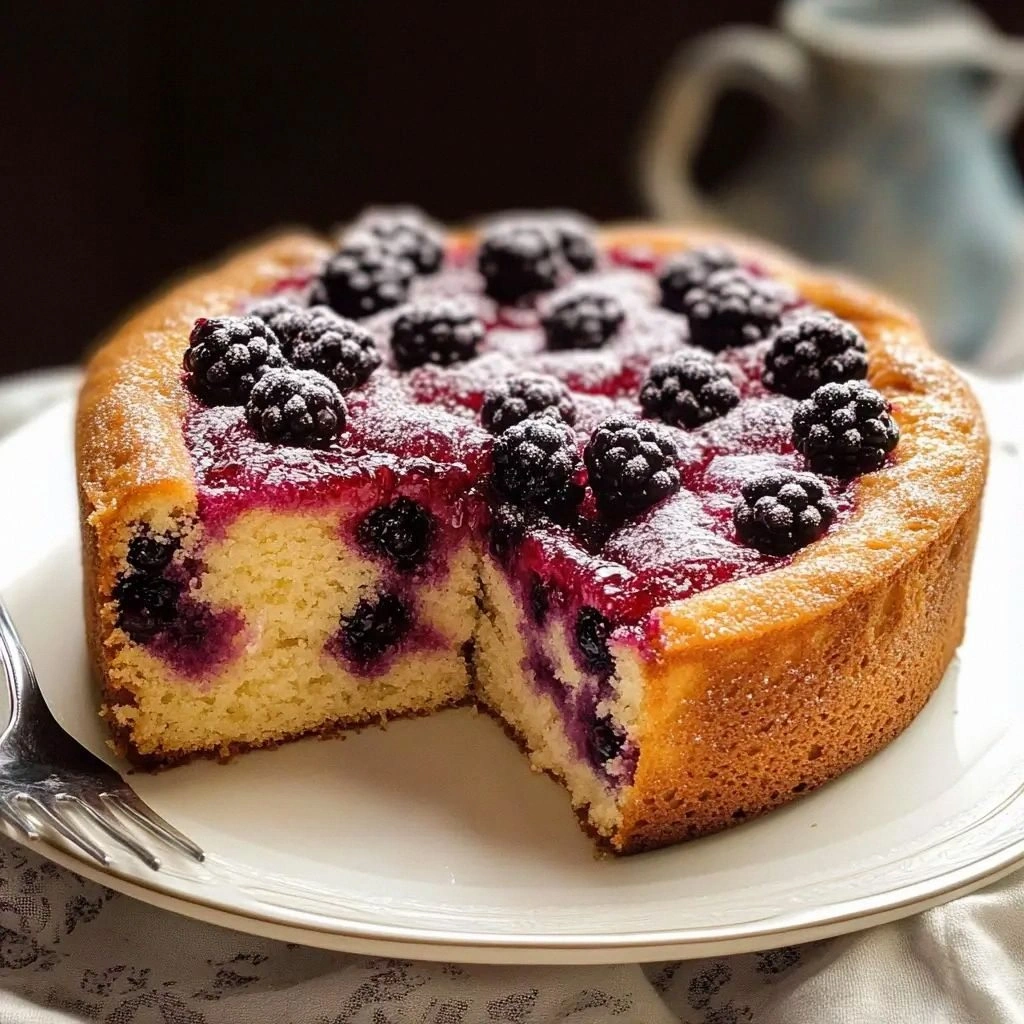
When you slice into the first piece, the aroma is a sweet, citrus‑laden perfume that pulls you in like a warm hug. The crust crackles slightly as you break through, revealing a moist interior that glistens with a faint sheen of glaze. The first bite is a burst of juicy blackberries, followed by a subtle vanilla undertone, and then the gentle zing of lemon that lingers on the palate. The texture feels like a cloud—soft yet structured—so you never get that dreaded dry cake experience. It’s a sensory symphony that turns any ordinary afternoon into a celebratory moment.
What makes this recipe stand out is not just the flavor, but the science behind it. I discovered that adding a touch of yogurt to the batter creates a tender crumb that holds its shape even after cooling. The lemon zest and juice balance the sweetness, giving the cake a bright, fresh finish that cuts through the richness of butter and sugar. The berries are folded in at the very end, preserving their natural juices and preventing them from sinking. Finally, the glaze, made from melted butter and powdered sugar, gives the cake a glossy finish that’s impossible to resist.
I dare you to taste this and not go back for seconds. The first bite is so satisfying that you’ll be tempted to finish the whole cake before the guests even arrive. The texture is buttery and moist, the flavor is bright and complex, and the presentation is simply stunning. Most recipes get this completely wrong; they either overbake the cake or let the berries get lost in the batter. Here, every element is perfectly balanced, so you’ll wonder how you ever made it any other way.
Picture yourself pulling this out of the oven, the whole kitchen smelling incredible, and the plate already ready for that first bite. Imagine the look on your friends’ faces when they see a cake that looks like a work of art yet tastes like pure comfort. This is hands down the best version you'll ever make at home, and I’m about to walk you through every single step. By the end, you'll wonder how you ever made it any other way.
Let me walk you through every single step — by the end, you'll wonder how you ever made it any other way. I’ve broken down each element to make sure you can replicate the magic at home. From selecting the freshest blackberries to mastering the glaze, I’ll share the secrets that make this cake stand out. And trust me, once you try this, you’ll never go back to a plain vanilla cake again. Let’s dive in and create something unforgettable.
What Makes This Version Stand Out
- Texture: The addition of Greek yogurt creates a silky crumb that stays moist even after cooling, preventing the dreaded dry cake experience that plagues many berry cakes.
- Flavor Balance: Lemon zest and juice cut through the sweetness, while vanilla adds a subtle warmth, creating a harmonious profile that’s both bright and comforting.
- Berry Preservation: Folding the blackberries in at the last moment keeps their juices intact, giving each bite a fresh burst of fruit without the berries turning into a soggy mess.
- Glaze Finish: A simple glaze of melted butter and powdered sugar gives the cake a glossy, professional look that’s hard to resist.
- Make‑Ahead Friendly: The cake can be assembled a day ahead, refrigerated, and baked fresh, saving you time on busy days.
- Versatility: Optional ingredients like cinnamon, nutmeg, and walnuts allow you to tweak the flavor profile for different occasions.
- Visual Appeal: The glossy glaze and scattered berries make the cake a showstopper that looks as good as it tastes.
Inside the Ingredient List
The Flavor Base
All‑purpose flour: The backbone of the cake, providing structure and a neutral canvas for the other flavors. Using a high‑protein flour gives a slightly denser crumb that holds the berries well. If you prefer a lighter cake, switch to cake flour for a softer bite. Keep the flour at room temperature to avoid clumping.
Baking powder and soda: These leavening agents create the lift and airy texture. Baking powder ensures a gentle rise, while baking soda reacts with the acidic lemon to add a subtle lift. Measure accurately; too much can cause a bitter aftertaste. Store them in a cool, dry place to keep them potent.
The Texture Crew
Unsalted butter: Softened butter brings richness and helps the batter bind. It also contributes to a tender crumb when creamed with sugar. For an extra buttery flavor, use a high‑fat butter like European style. Avoid cold butter; it won’t mix smoothly and will leave lumps.
Granulated and brown sugar: Granulated sugar sweetens the batter, while brown sugar adds depth and a hint of molasses. The combination gives a balanced sweetness that complements the berries. Use packed brown sugar for the best flavor; a loose brown sugar will result in a thinner batter.
Eggs: Eggs act as a binder and help the cake rise. The yolks add richness, while the whites help the batter set. Use large eggs at room temperature for maximum lift. If you’re vegan, replace with flax eggs or applesauce.
Whole milk: Milk hydrates the dry ingredients and creates a smooth batter. Whole milk gives a richer taste, while skim milk keeps the cake lighter. For a dairy‑free version, substitute oat or almond milk, but adjust the amount slightly to maintain consistency.
The Unexpected Star
Fresh blackberries: The star of the show, they provide natural sweetness and a juicy burst in every bite. Use ripe berries for maximum flavor; they should be firm but give slightly to the touch. If you’re out of season, frozen berries work, but thaw them and pat dry to avoid excess moisture.
Lemon zest and juice: Lemon zest adds bright, aromatic oils, while lemon juice introduces acidity that balances the sugar and activates the baking soda. The combination creates a refreshing contrast to the rich butter and yogurt. Be careful not to overzealously use lemon; too much can make the batter too tart.
The Final Flourish
Greek yogurt: Adding yogurt gives the cake a tender crumb and a slight tang that pairs beautifully with the berries. It also helps keep the cake moist for several days. Use plain, unsweetened yogurt for best results; flavored varieties will alter the taste.
Optional spices: A pinch of cinnamon or nutmeg can add warmth and complexity, especially in cooler months. If you like a nutty crunch, sprinkle chopped walnuts on top before baking. These additions are optional but elevate the flavor profile.
Glaze: A simple glaze of melted butter and powdered sugar gives the cake a glossy, professional look. It also adds a subtle buttery sweetness that complements the berries. Drizzle over the cooled cake for a perfect finish.
Everything's prepped? Good. Let's get into the real action.
The Method — Step by Step
- Preheat your oven to 350°F (175°C) and grease a 9-inch springform pan. Line the bottom with parchment paper for easy release. This step ensures an even bake and a clean release. I always preheat the pan as well; it helps the cake rise evenly.
- In a medium bowl, whisk together flour, baking powder, baking soda, and salt. Keep the mixture dry to avoid clumping. The dry ingredients provide the structure and lift. If you have a kitchen scale, weigh them for precision.
- In a separate large bowl, beat the softened butter, granulated sugar, and brown sugar until light and fluffy. This process incorporates air, giving the cake its lightness. I use an electric mixer on medium speed for 4–5 minutes.
- Add eggs one at a time, beating well after each addition. Then stir in vanilla, lemon zest, lemon juice, and milk. The wet ingredients should be fully incorporated before adding the dry mix. This step ensures a smooth batter without lumps.
- Fold in the Greek yogurt gently, using a spatula. The yogurt adds moisture and a slight tang. Avoid overmixing; you want a creamy batter, not a dense one.
- Gently fold in the fresh blackberries, being careful not to break them. The berries should be evenly distributed, providing pockets of juicy flavor. I use a gentle fold rather than a stir to keep the berries intact.
- Pour the batter into the prepared pan and smooth the top. Tap the pan on the counter to release any air bubbles. The batter should be level for even baking.
- Bake for 30 minutes, or until a toothpick inserted into the center comes out clean. The edges should be slightly golden and the top should spring back when pressed lightly. Remove from the oven and let it cool in the pan for 10 minutes before transferring to a wire rack.
- While the cake is still warm, drizzle the glaze over the top. The glaze will set into a glossy coating that’s perfect for serving. Let it cool completely before slicing.
That's it — you did it. But hold on, I've got a few more tricks that'll take this to another level.
Insider Tricks for Flawless Results
The Temperature Rule Nobody Follows
Always let your butter sit at room temperature for at least an hour. Cold butter will create lumps in the batter, leading to uneven texture. I used to skip this step and ended up with a cake that felt dense. Now I keep the butter out for a while, and it’s a game changer.
Why Your Nose Knows Best
Use your sense of smell to gauge doneness. A fragrant, slightly toasted aroma indicates the cake is nearly done. If the smell is too sweet, give it a few more minutes. Trust your nose; it’s the best judge of flavor.
The 5-Minute Rest That Changes Everything
Let the cake rest in the pan for 10 minutes before transferring. This rest period allows the structure to set, preventing cracks when you remove it. I once rushed this step and the cake cracked in half. Now I always wait.
Keep the Berry Juice Intact
Fold the berries gently; avoid overmixing. Overmixing releases juice that can make the batter too wet. The result is a dense, soggy cake. I use a spatula and a gentle motion to keep the berries whole.
Glaze Timing Is Key
Apply the glaze while the cake is still warm. The glaze will set into a glossy coating that’s perfect for serving. If you wait too long, it will harden into a brittle shell. The glaze adds that final touch of elegance.
Creative Twists and Variations
This recipe is a playground. Here are some of my favorite ways to switch things up:
Blackberry Lemon Cheesecake Layer
Swap the butter for cream cheese. The result is a richer, cheesecake-like texture. Add a splash of lemon zest for extra brightness. Serve with a drizzle of honey for sweetness.
Spiced Berry Cake
Incorporate cinnamon and nutmeg. These spices add warmth and depth, perfect for fall or winter. The spices complement the berries and give the cake a cozy feel.
Nutty Berry Cake
Add chopped walnuts or pecans. The nuts provide crunch and a nutty flavor that pairs well with the berries. Toast the nuts lightly for an extra toasty note.
Vegan Blackberry Cake
Replace butter with coconut oil and use a plant‑based milk. Swap eggs for flaxseed or apple sauce. The result is a moist, dairy‑free cake that still delivers on flavor.
Berry Crumble Topping
Top the cake with a crumble of oats, flour, brown sugar, and butter. Bake the crumble for a few minutes until golden. This adds texture and a buttery crunch that contrasts beautifully with the soft cake.
Berry Ice Cream Sandwich
Slice the cake horizontally and sandwich a scoop of vanilla ice cream. Chill the sandwich for an hour before serving. The cold ice cream meets the warm cake for a delightful contrast.
Storing and Bringing It Back to Life
Fridge Storage
Wrap the cake tightly in plastic wrap. Store in the refrigerator for up to 5 days. The wrap keeps the cake moist and prevents it from drying out. When you’re ready to serve, let it sit at room temperature for 15 minutes.
Freezer Friendly
Wrap the cake in plastic wrap and then in foil. Freeze for up to 3 months. When you want to eat, thaw overnight in the fridge. This method preserves the cake’s texture and flavor.
Best Reheating Method
Reheat in a preheated oven at 300°F (150°C) for 10 minutes. Add a tiny splash of water before reheating to steam the cake back to perfection. The water creates steam that keeps the cake moist and tender.