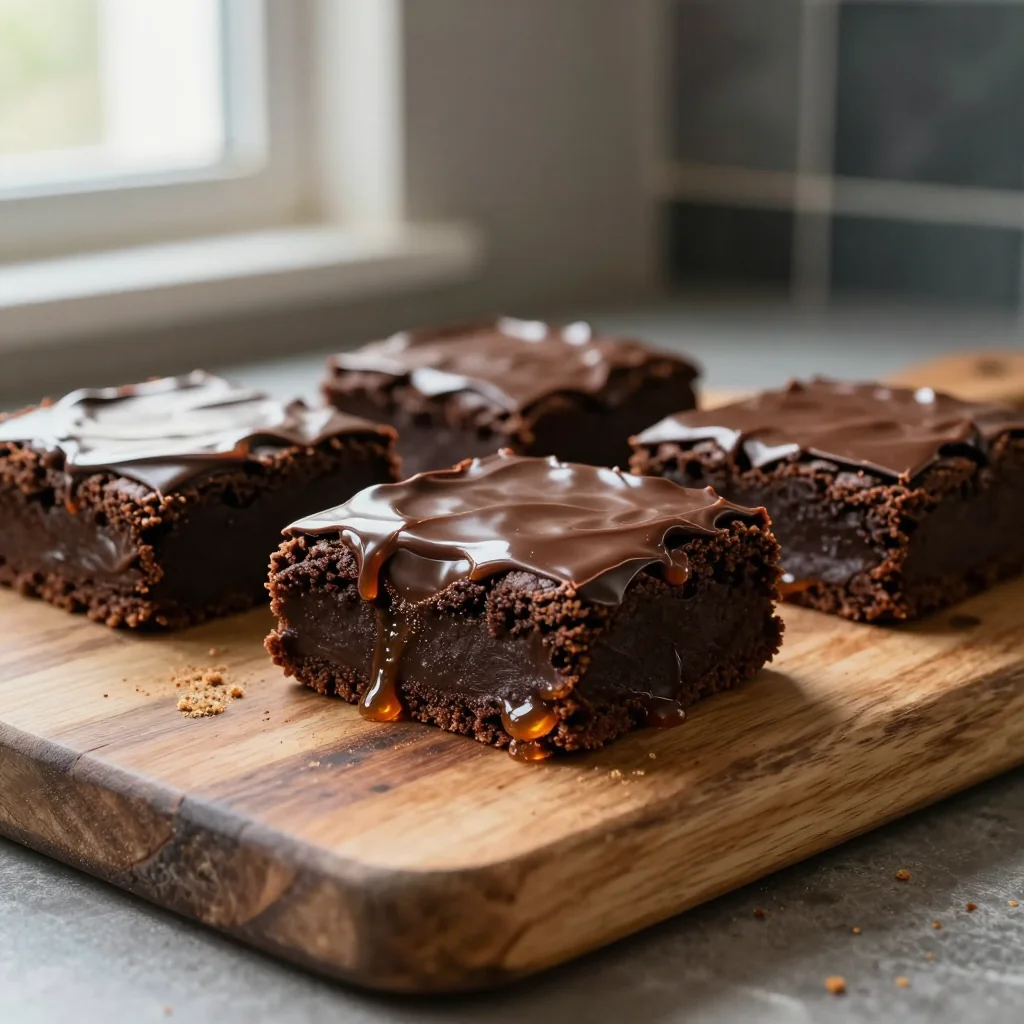
Rich, fudgy brownies crowned with a silky chocolate ganache—an indulgent treat that feels like a warm hug.
When I was ten, my grandmother’s kitchen smelled like a chocolate factory on a rainy day. She would pull a tray of brownies from the oven, let them cool just enough, and then drizzle a glossy, glossy frosting over the top. The moment that sweet, glossy glaze touched the fudgy surface, I knew I had discovered pure happiness.
Brownies have a storied history that stretches back to the early 20th century in the United States, where they were originally a way to make a cake that could be cut into squares. Over the decades, they have evolved into a canvas for endless creativity—from swirl‑infused caramel to espresso‑kicked versions. My version pays homage to that tradition while adding a luxurious frosting that turns an everyday dessert into a celebration.
In this article, you’ll learn the science behind that perfect crackly top, the secret to a glossy frosting that stays soft, and the step‑by‑step process that guarantees a bakery‑quality result every time. Whether you’re a seasoned baker or a weekend enthusiast, this recipe is engineered for consistency and indulgence.
So grab your whisk, preheat the oven, and let’s embark on a chocolate‑filled adventure together.
🌟 Why This Recipe Will Win Your Heart
Every bite delivers a harmonious blend of deep cocoa, buttery richness, and a silky frosting that melts on your tongue.
- ✨ Perfect Texture Balance: The batter is intentionally under‑mixed to keep the crumb dense yet moist, while the frosting adds a luscious, melt‑in‑your‑mouth contrast.
- ✨ Foolproof Crust: A thin, crackly top forms thanks to a brief high‑heat blast at the start of baking, giving you that classic “crack” sound when you cut into it.
- ✨ Versatile Frosting: The ganache can be flavored with espresso, orange zest, or even a splash of bourbon, letting you tailor the dessert to any occasion.
- ✨ Made with Simple Staples: All ingredients are pantry‑friendly, meaning you probably already have everything on hand.
- ✨ Scalable Portion Control: The built‑in portion adjuster lets you expand or shrink the recipe without recalculating every measurement.
- ✨ Crowd‑Pleaser: Whether served at a birthday party, a holiday gathering, or a quiet night in, these brownies earn unanimous applause.
🥗 Ingredients
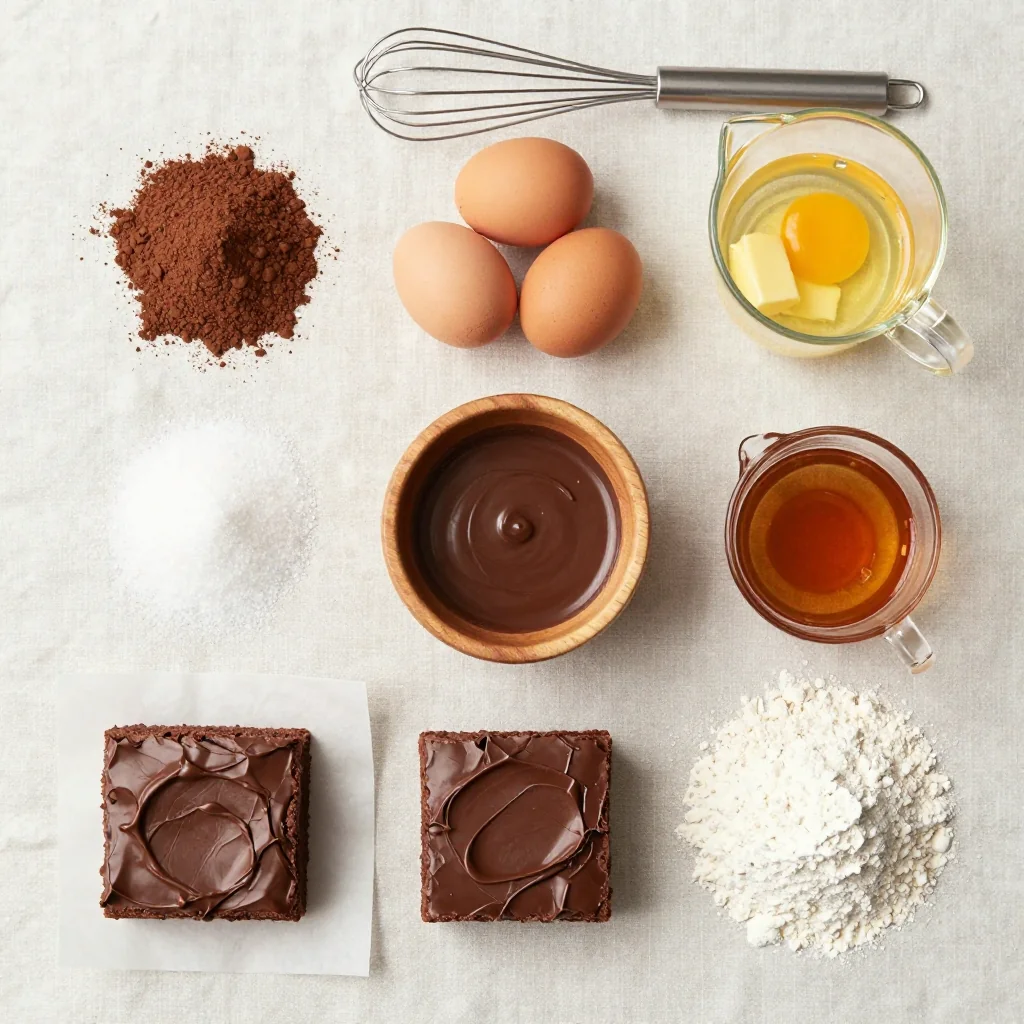
📝 Complete Ingredient List
For the Brownie Batter:
For the Chocolate Frosting:
Optional Garnish:
🔍 Focus on Key Ingredients
Unsalted Butter
Butter provides the backbone of both the batter and the frosting. Its fat content creates a tender crumb and a glossy finish. Choose a butter with at least 80% fat for the richest mouthfeel; European‑style butter is ideal.
Cocoa Powder
We use natural, unsweetened cocoa powder for its deep, earthy chocolate flavor. For a slightly brighter profile, you could swap half of it for Dutch‑processed cocoa, but keep the total weight the same.
Powdered Sugar
The fine texture of powdered sugar ensures a smooth frosting without graininess. Sift it before adding to the butter to avoid lumps and achieve that velvety sheen.
🔄 Quick Substitutions
| If you don’t have... | Use instead... |
|---|---|
| Unsalted butter | Salted butter (reduce added salt by ½ tsp) |
| All‑purpose flour | Gluten‑free all‑purpose blend |
| Heavy cream | Whole milk + 1 tbsp melted butter |
👨🍳 Step‑by‑Step Instructions
Follow these detailed steps for a flawless batch. Each phase includes sensory cues to help you gauge progress without a thermometer.
📋 Phase 1: Preparation & Mise en Place
Gather your tools, preheat the oven, and line a 9×13‑inch pan with parchment.
Preheat and Prepare Pan
Set the oven to 180 °C (350 °F). Lightly grease the pan, then lay a sheet of parchment paper, letting the excess hang over the edges for easy lift‑out later. This ensures a clean, uniform edge on every brownie.
Melt Butter and Combine Dry Ingredients
In a medium saucepan, melt 226 g of butter over low heat. Once melted, remove from heat and whisk in sugar until fully incorporated. In a separate bowl, sift together cocoa powder, flour, and salt. This aerates the cocoa and eliminates lumps, giving a smoother batter.
Incorporate Eggs and Vanilla
Add the four large eggs one at a time, beating well after each addition. The mixture should become light and airy, a sign that the gluten is being gently developed. Finish with 5 ml vanilla extract for aromatic depth.
Fold in Dry Ingredients
Gently fold the sifted cocoa‑flour‑salt blend into the wet mixture using a rubber spatula. Stop as soon as you no longer see streaks. Over‑mixing will create a cakey texture instead of the desired fudginess.
🔥 Phase 2: Baking & Assembly
Now we’ll bake the brownies and prepare the glossy frosting.
Bake the Brownies
Spread the batter evenly in the prepared pan. Place the pan on the middle rack and bake for 22‑25 minutes. The edges should look set while the center remains slightly soft—this is the secret to a fudgy interior. A toothpick inserted 1 inch from the edge should come out with moist crumbs, not wet batter.
Prepare the Chocolate Frosting
While the brownies bake, whisk together the softened 115 g butter and 250 g powdered sugar until pale and fluffy (about 2‑3 minutes). Add 25 g cocoa powder, 30 ml heavy cream, and a pinch of salt. Continue whisking until the frosting is glossy and holds soft peaks.
Cool & Frost
Allow the brownies to cool in the pan for 10 minutes, then lift them onto a wire rack using the parchment overhang. While still warm (but not hot), spread the frosting evenly with an offset spatula. The residual heat will melt the frosting slightly, creating a glossy sheen.
Add Optional Garnish
Sprinkle dark chocolate chips over the top for extra texture, and finish with a light dusting of flaky sea salt to accentuate the chocolate’s bitterness.
✨ Phase 3: Finishing Touches & Serving
Final checks before the grand reveal.
Check Doneness
Insert a thin toothpick into the center; it should emerge with a few moist crumbs. If it’s too wet, give the brownies another 2‑3 minutes.
Cut and Serve
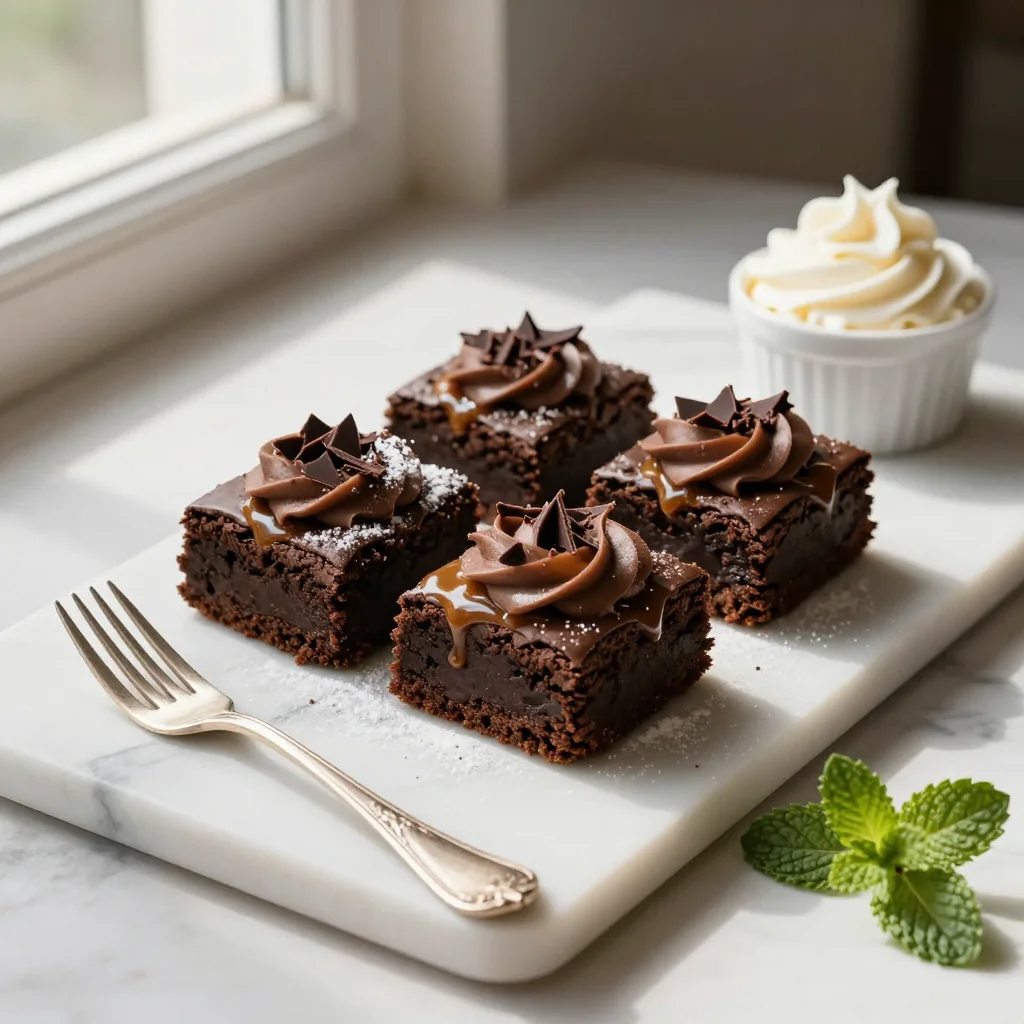
Using a sharp serrated knife, cut the brownies into 12 equal squares. For clean cuts, wipe the blade with a hot, damp cloth between slices.
💡 Expert Tips & Tricks
🛒 Choosing the Right Ingredients
When selecting cocoa powder, look for a label that says “unsweetened” and preferably “natural” to retain the deep, slightly bitter notes that pair beautifully with the sweet frosting. Butter should be cold‑pressed and free of additives; the higher the butterfat, the richer the crumb. For sugar, a fine granulated variety dissolves more readily, preventing grainy pockets.
🔪 Preparation Techniques
Always melt butter slowly over low heat; a scorching butter will impart a burnt flavor. Whisk the eggs into the butter‑sugar mixture gradually to avoid curdling. When folding dry ingredients, use a gentle “lifting” motion to keep the batter airy, which contributes to that coveted crackly top.
🌡️ Mastering the Bake
Preheat the oven fully before inserting the pan. If your oven tends to run hot, place the pan on a lower rack to prevent the edges from over‑browning. Use an oven thermometer for accuracy; the ideal internal temperature for fudgy brownies is around 92 °C (197 °F).
🍽️ Presentation & Service
Serve brownies on a matte white plate to let the dark chocolate shine. A small dollop of lightly whipped cream or a scoop of vanilla bean ice cream adds contrast. For a professional touch, drizzle a thin line of caramel or raspberry coulis across the plate.
🏆 Pro Tips
These insights separate an amateur batch from a bakery‑standard masterpiece.
- 🎯 Temperature‑Controlled Butter: Chill the melted butter to about 30 °C before mixing with sugar. This prevents the batter from becoming too runny, ensuring a dense crumb while still allowing the frosting to glide smoothly.
- 🎯 Use a Light Hand on the Flour: Over‑mixing flour develops gluten, leading to a cakey texture. By folding gently, you keep the gluten strands short, preserving the fudgy mouthfeel.
- 🎯 The “Steam‑Burst” Technique: Open the oven door for a split second after the first 10 minutes of baking to release steam. This encourages the formation of a thin, crackly crust on top.
- 🎯 Frosting Consistency Test: Lift the whisk from the frosting; if the ribbon falls back slowly and holds its shape for a few seconds, it’s perfect. Adjust with a splash more cream if it’s too thick, or a pinch of powdered sugar if too thin.
- 🎯 Portion Scaling Accuracy: The built‑in portion adjuster recalculates each numeric quantity, preserving the ratio of butter‑to‑sugar‑to‑flour, which is crucial for texture consistency.
- 🎯 Rest Before Cutting: Allow the brownies to rest for at least 20 minutes after frosting. This lets the crumb set and the frosting firm up, resulting in cleaner slices.
“A great brownie is a balance of science and love—measure precisely, but pour your heart in.”— Chef Elena Marquez
🔄 Variations & Adaptations
The core recipe is a flexible foundation. Here are ways to tailor it to different diets and flavor preferences.
🥬 Vegetarian / Vegan Version
Replace butter with equal parts coconut oil (for the batter) and vegan butter (for the frosting). Swap eggs for a flax‑egg mixture (1 tbsp ground flaxseed + 3 tbsp water per egg). Use a plant‑based milk (such as oat) in place of heavy cream. The result remains decadently fudgy while being fully plant‑based.
- Replace 226 g butter with 226 g coconut oil (solid at room temperature).
- Replace 4 eggs with 4 flax‑eggs (4 tbsp ground flax + 12 tbsp water, let sit 5 min).
🌶️ Flavor Variations
Experiment with complementary flavors to keep the recipe fresh for every occasion.
Spicy Chili Chocolate
Add ½ tsp ground cayenne pepper to the batter and a dash of chipotle powder to the frosting for a smoky heat that pairs beautifully with dark chocolate.
Mediterranean Orange‑Olive
Stir 1 tbsp orange zest into the batter and finish the frosting with a drizzle of high‑quality extra‑virgin olive oil. The citrus brightens the deep chocolate while the olive oil adds a silky richness.
Asian Matcha Infusion
Replace half of the cocoa powder with 2 tbsp high‑grade matcha powder. Add a teaspoon of toasted sesame oil to the frosting for an earthy, umami twist.
⚠️ Dietary Adaptations
Gluten‑Free
Swap all‑purpose flour for a 1:1 gluten‑free flour blend that contains xanthan gum. The texture will remain chewy and dense.
Lactose‑Free
Use lactose‑free butter or a dairy‑free spread, and replace heavy cream with coconut cream. The coconut flavor will subtly complement the chocolate.
Low‑Calorie
Reduce sugar by 25 % and replace half the butter with unsweetened applesauce. The brownies will be lighter but still retain moisture.
👶 Kid‑Friendly Version
Omit the sea‑salt garnish and add a swirl of white chocolate ganache on top. Serve with a side of fresh strawberries for a colorful, fun presentation that appeals to younger palates.
📦 Storage & Reheating
🧊 Conservation
Refrigerator
- Duration: 5 days
- Container: Airtight plastic container or tightly wrapped in foil
- Tip: Place a parchment sheet between layers if storing multiple trays.
Freezer
- Duration: 3 months
- Method: Cut into individual squares, wrap each in parchment, then place in a zip‑lock bag.
- Defrosting: Transfer to the fridge overnight or microwave on low for 20‑30 seconds per piece.
💡 Note: For optimal texture, allow frozen brownies to come to room temperature before adding fresh frosting.
♨️ Reheating
🔥 Oven (Recommended)
- Preheat to 150 °C (300 °F).
- Cover the brownies loosely with aluminum foil to retain moisture.
- Heat for 8‑10 minutes, or until the frosting is soft and the interior is warm.
- Remove foil and heat an additional 2 minutes for a slightly crisp top.
⚡ Microwave (Quick)
- Place a single brownie on a microwave‑safe plate.
- Cover with a microwave‑safe lid or another plate.
- Heat on medium power for 30‑45 seconds.
- Check and repeat in 10‑second intervals if needed.
🍳 Stovetop
Heat a non‑stick skillet over low heat, add a thin slice of brownie, cover, and warm for 1‑2 minutes. This method revives the crust while keeping the center moist.
🍷 Perfect Pairings
🥗 Side Dishes
- Fresh Berry Salad: A mix of strawberries, blueberries, and mint provides a bright, acidic contrast.
- Vanilla Ice Cream: The classic cold‑cream balance amplifies the chocolate’s richness.
- Espresso Shot: A tiny cup of strong espresso cuts through the sweetness and heightens chocolate flavor.
🍷 Wine & Drinks
- Ruby Port: Its fruitiness and slight tannins pair beautifully with dark chocolate.
- Malbec: The bold, smoky notes complement the cocoa’s depth.
- Non‑Alcoholic: A chilled glass of sparkling pomegranate juice adds festive fizz.
🍰 Complementary Courses
Start with a light citrus‑based appetizer such as a grapefruit salad, then serve these brownies as the main dessert. Follow with a palate‑cleansing sorbet—lemon or raspberry works wonderfully.
❓ Frequently Asked Questions
Q: Can I use melted chocolate instead of cocoa powder?
A: Yes, replace the 125 g cocoa powder with 150 g melted dark chocolate (70% cacao). Reduce the butter by 15 g to keep the fat balance consistent. Melt the chocolate gently over a bain‑marie to avoid scorching.
Q: Why does my frosting turn grainy?
A: Graininess usually occurs when powdered sugar isn’t sifted or when the butter is too cold. Ensure the butter is softened to room temperature and sift the powdered sugar before adding. If grain persists, add a teaspoon of warm milk and whisk vigorously.
Q: How can I make the brownies extra fudgy?
A: Increase the butter to 260 g and reduce the flour to 100 g. Adding a tablespoon of melted chocolate to the batter also boosts moisture. Avoid over‑mixing; stop as soon as the flour disappears.
Q: My brownies are too cakey—what went wrong?
A: Over‑mixing the batter or using too much flour can cause a cakey texture. Make sure to fold the dry ingredients gently and measure flour by weight, not by cup, to avoid excess.
Q: Can I prepare the frosting ahead of time?
A: Absolutely. Store the frosting in an airtight container in the refrigerator for up to 3 days. Before using, let it sit at room temperature for 15‑20 minutes and give it a quick whisk to restore its smoothness.
Q: Is it possible to freeze the brownies before frosting?
A: Yes. Cool the baked brownies completely, then wrap tightly in plastic wrap and freeze. When ready to serve, thaw in the fridge, then spread the frosting as described. This method preserves the crumb structure.
🎉 Let’s Get Baking!
These chocolate brownies with frosting embody the perfect marriage of texture, flavor, and visual appeal. From the crackly top to the glossy ganache, every element is engineered to delight both the eyes and the palate. Whether you’re impressing guests or treating yourself after a long day, this recipe delivers consistent, bakery‑level results every single time.
Don’t hesitate—grab your ingredients, follow the steps, and watch the magic happen in your own kitchen. Remember, the best part of baking is sharing; snap a photo, tag us, and spread the chocolate love.
Have you tried this recipe?
Leave a comment and rating below! Share your photos on Instagram with #BrownieBliss for a chance to be featured.
Chocolate Brownies with Frosting
Fudgy brownies crowned with a glossy chocolate ganache—pure indulgence.
📝 Ingredients
Brownie Batter
Chocolate Frosting
👨🍳 Instructions
- Preheat oven to 180 °C (350 °F) and line a 9×13‑inch pan with parchment.
- Melt butter in a saucepan, whisk in sugar, then let cool slightly.
- Combine dry ingredients (cocoa, flour, salt) in a bowl.
- Beat in eggs one at a time, followed by vanilla.
- Fold dry mix into wet mixture until just combined.
- Bake
- Make frosting by creaming butter, powdered sugar, cocoa, cream, and salt.
- Cool brownies 10 minutes, then lift onto rack.
- Spread frosting while still warm; garnish with chocolate chips and sea salt.
- Slice and serve after a 20‑minute rest.
🥗 Nutritional Information (per serving)
*Values are estimates based on standard ingredients.


💬 Comments & Reviews
Leave a Comment
No comments yet. Be the first to share your thoughts!