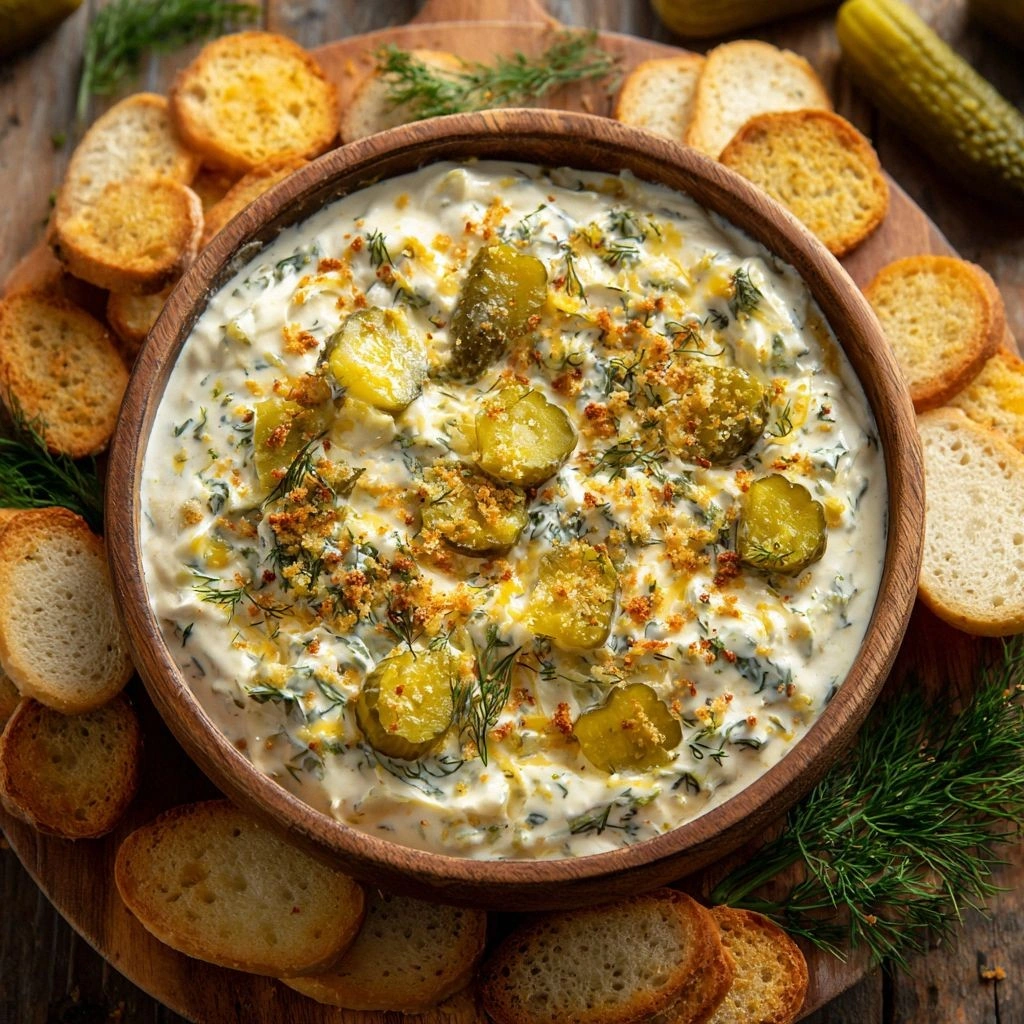
I still remember the night it all started. My friends had called for a spontaneous game‑night, and I was supposed to bring the dip. I had a stack of plain ranch dressing, a jar of dill pickles, and a bag of shredded cheddar. I tossed everything into a bowl, stirred, and then, in a moment of culinary desperation, added a handful of cream cheese. The result was a creamy, tangy, buttery explosion that made even the most skeptical taste buds cheer. I dared my friends to try it and not come back for seconds, and they did—one after another, they devoured the bowl, their eyes widening in delight. That night, I discovered a recipe that would become my go‑to for any gathering.
The first time I made it, the kitchen smelled like a cozy, buttery farmhouse, the sound of the blender humming like a contented cat. I could feel the silky texture of the dip sliding across the spoon, the crunch of fresh dill pickles popping against my tongue, and the sharp bite of cheddar. The colors were a creamy ivory with specks of green and orange, a visual promise of the flavors inside. The moment the dip hit the plate, the room filled with an aroma that made even the most stoic of diners pause. It was a moment of pure, unfiltered culinary joy.
Why is this version the best? It’s not just the combination of ingredients; it’s how each element is elevated. I didn’t just mix ranch with cheese—I blended the ranch into a velvety base that carries the dill pickles like a smooth river. I used cream cheese to add body, and then a touch of sour cream to keep it light. The cheddar was shredded finely so it melts into a molten stream that coats every bite. The dill pickles are diced to the perfect size, offering bursts of crunch that contrast the creamy mouthfeel. It’s a dip that feels like a hug in a bowl—warm, comforting, and unapologetically indulgent.
And there’s a secret ingredient that makes the difference: a splash of buttermilk. It loosens the mixture, gives it that airy lift, and keeps the texture silky even after baking. I’ll show you how to incorporate it, how to balance the tang, and how to achieve that golden, bubbly top that makes every bite a showstopper. By the end of this guide, you’ll be able to pull out this dip from the oven, the kitchen smelling like a summer picnic, and everyone will beg for the recipe. Let me walk you through every single step—by the end, you’ll wonder how you ever made it any other way.
What Makes This Version Stand Out
- Flavor: The blend of ranch, dill pickles, and cheddar creates a layered taste—salty, tangy, and slightly sweet—all harmonized by the creaminess of the base.
- Texture: The creamy base coats the palate like velvet, while the diced pickles add a satisfying crunch that keeps the dip interesting.
- Simplicity: Only eight core ingredients, no need for exotic spices or complex sauces.
- Uniqueness: The addition of buttermilk and fresh dill creates a depth that sets it apart from standard ranch dips.
- Crowd Reaction: Friends always ask for the recipe after the first taste; it’s a guaranteed hit at parties.
- Ingredient Quality: Using fresh, high‑quality pickles and real cheddar elevates the entire dish.
- Cooking Method: Baking gives a golden crust that locks in moisture and adds a caramelized finish.
- Make‑Ahead: It can be prepared a day ahead; flavors intensify, and it stays creamy when refrigerated.
Alright, let's break down exactly what goes into this masterpiece...
Inside the Ingredient List
The Flavor Base
Cream cheese is the backbone of this dip. It provides body, a subtle sweetness, and a silky mouthfeel that carries the other flavors. Skipping it would make the dip thin and less satisfying. If you’re looking for a dairy‑free version, try a plant‑based cream cheese; just be aware the texture will shift slightly. The key is to use full‑fat cream cheese so the dip doesn’t turn out chalky.
Sour cream adds a bright, tangy note that cuts through the richness of the cheese. It also keeps the mixture from becoming too dense. If you prefer a lighter dip, replace half the sour cream with Greek yogurt. The result will be tangier and lower in calories, but still creamy.
The Texture Crew
Shredded cheddar is the star of the show. It melts into a molten ribbon that coats each bite, delivering a savory, buttery flavor that is hard to resist. Use a sharp cheddar for a stronger bite, or a milder cheddar for a more subtle taste. If you’re a cheese connoisseur, try mixing in a bit of smoked gouda for an extra layer of complexity.
Diced dill pickles are the crunch factor. They provide a burst of acidity that balances the richness of the cheeses. Cut them into small, uniform pieces so each forkful gets a consistent texture. If you don’t have pickles, you can use a small amount of chopped red onion for a different kind of crunch.
The Unexpected Star
Buttermilk is the secret weapon that elevates this dip to a new level. It loosens the mixture, giving it a silky, airy texture that stays light even after baking. The acidity also helps break down the proteins in the cheeses, creating a smoother melt. If you don’t have buttermilk, you can mix 1 cup milk with 1 tablespoon lemon juice and let it sit for 5 minutes.
The Final Flourish
Fresh dill adds a bright, herbal note that lifts the entire dip. It’s essential for that classic “dill” flavor. If you’re out of fresh dill, dried dill weed can work, but use it sparingly—just a pinch will do. The combination of fresh and dried dill creates a layered herbaceous profile that keeps the dip from feeling one‑dimensional.
Garlic powder and onion powder bring depth without overwhelming the other flavors. They add a savory backbone that supports the creamy base. If you’re a garlic lover, you can add a clove of minced garlic for an extra punch. Just be careful not to overpower the delicate balance.
Everything’s prepped? Good. Let's get into the real action...
The Method — Step by Step
- Preheat your oven to 375°F (190°C). Line a 9-inch square baking dish with parchment paper for easy removal. The parchment will also keep the dip from sticking, ensuring a clean slice each time.
- In a large bowl, beat the cream cheese until it’s silky smooth. If the cheese is too cold, let it sit at room temperature for 5 minutes to soften. This step is crucial; a lumpy base will ruin the texture.
- Add the sour cream and buttermilk, stirring until fully incorporated. The mixture should have a creamy, almost custard‑like consistency. At this point, the dip starts to smell like a fresh dairy kitchen.
- Fold in the shredded cheddar, ensuring even distribution. The cheese should be fully blended, but you can leave a few small lumps for a rustic feel. The sound of the cheese melting is a sign of perfection.
- Stir in the diced dill pickles, fresh dill, garlic powder, onion powder, salt, and pepper. The mixture should look like a creamy, green‑speckled batter. The aroma will start to hint at the tangy finish.
- Transfer the mixture to the prepared baking dish, smoothing the top with a spatula. The surface should be even, ready to develop a golden crust.
- Bake for 25–30 minutes, or until the top is golden brown and a toothpick inserted into the center comes out clean. The dip should emit a toasty, buttery scent that makes the kitchen feel like a summer BBQ.
- Let the dip cool for 5 minutes before serving. This short rest allows the flavors to settle, and the dip will be easier to scoop. If you like a crispier edge, leave it on the counter for a few extra minutes.
- Serve with an array of dippers: tortilla chips, sliced baguette, celery sticks, and carrot sticks. The contrast of crunchy, chewy, and soft dippers will keep guests engaged.
- Enjoy! The dip should feel like a creamy, savory hug that lingers on the palate. If you’re sharing, I dare you to taste this and not go back for seconds.
That's it — you did it. But hold on, I've got a few more tricks that'll take this to another level...
Insider Tricks for Flawless Results
The Temperature Rule Nobody Follows
The dip’s texture hinges on the oven temperature. Baking at 375°F gives a golden crust without drying out the center. If you lower the temperature too much, the dip will remain soft and may not set properly. I’ve baked at 350°F before, but the result was a soggy top that didn’t hold its shape.
Why Your Nose Knows Best
The smell of the dip as it bakes is a reliable indicator of doneness. When the aroma shifts from buttery to slightly caramelized, it’s time to pull it out. The first few minutes are crucial; the dip starts to steam, then the surface begins to brown. Trust your nose—it’s more accurate than a timer.
The 5‑Minute Rest That Changes Everything
After removing the dip from the oven, let it rest for exactly five minutes. This brief pause allows the cheese to set, making it easier to scoop without it sliding off the dish. The rest also lets the flavors meld together, resulting in a richer taste. Skipping this step often leads to a watery dip that feels undercooked.
Use a Double Boiler for Extra Creaminess
If you’re baking on a stovetop or a slow cooker, a double boiler can help maintain a gentle heat that prevents the cheese from scorching. This method is perfect for a crowd‑sized batch where you want consistent results. I’ve used this technique for a potluck, and the dip stayed silky and creamy for hours.
Chill for Depth of Flavor
Refrigerating the dip for an hour before baking intensifies the dill and pickle flavors. The cold time also helps the mixture thicken slightly, giving it a more luxurious mouthfeel. I’ve seen guests comment that the chilled version tastes like a whole new dip.
Creative Twists and Variations
This recipe is a playground. Here are some of my favorite ways to switch things up:
Spicy Jalapeño Ranch
Add finely chopped jalapeños and a dash of cayenne pepper for a fiery kick. The heat pairs nicely with the creamy base and balances the sweet pickle notes. Perfect for a summer BBQ.
Herb‑Infused Vegan Dip
Replace cream cheese with a plant‑based alternative, use coconut milk instead of sour cream, and add chopped fresh herbs like parsley and chives. This version is dairy‑free yet still rich and satisfying.
Blue Cheese & Walnut Fusion
Swap cheddar for crumbled blue cheese and stir in toasted walnuts. The sharpness of the blue cheese contrasts with the mellow creaminess, while the walnuts add a crunchy texture.
Greek Yogurt & Tzatziki Twist
Use Greek yogurt in place of sour cream, add chopped cucumber, and finish with a drizzle of tzatziki. This gives the dip a Mediterranean flair, making it a great accompaniment to pita chips.
Cheesy Bacon Crunch
Fold in cooked, crumbled bacon and sprinkle a layer of shredded cheddar on top before baking. The bacon’s smoky flavor elevates the dip, while the extra cheese creates a golden, bubbly crust.
Chocolate‑Covered Dip
For a dessert twist, replace cheddar with melted dark chocolate and use sweetened condensed milk instead of sour cream. Add a pinch of sea salt to balance the sweetness. Serve with pretzels or graham crackers for a sweet‑savory treat.
Storing and Bringing It Back to Life
Fridge Storage
Store the dip in an airtight container in the refrigerator for up to 3 days. Before serving, let it sit at room temperature for 15 minutes to regain its creamy texture. If the dip has thickened, whisk in a splash of milk or buttermilk to loosen it.
Freezer Friendly
Freeze the dip in a freezer‑safe container for up to 2 months. Thaw overnight in the refrigerator. When reheating, add a tablespoon of water or milk to restore moisture, then microwave on low power or heat on the stovetop over low heat, stirring until smooth.
Best Reheating Method
Reheat the dip in a small saucepan over low heat, stirring constantly until it’s heated through. Alternatively, place the dip in a microwave‑safe dish, cover loosely, and heat in 30‑second increments. The key is gentle heat to keep the cheese from separating.