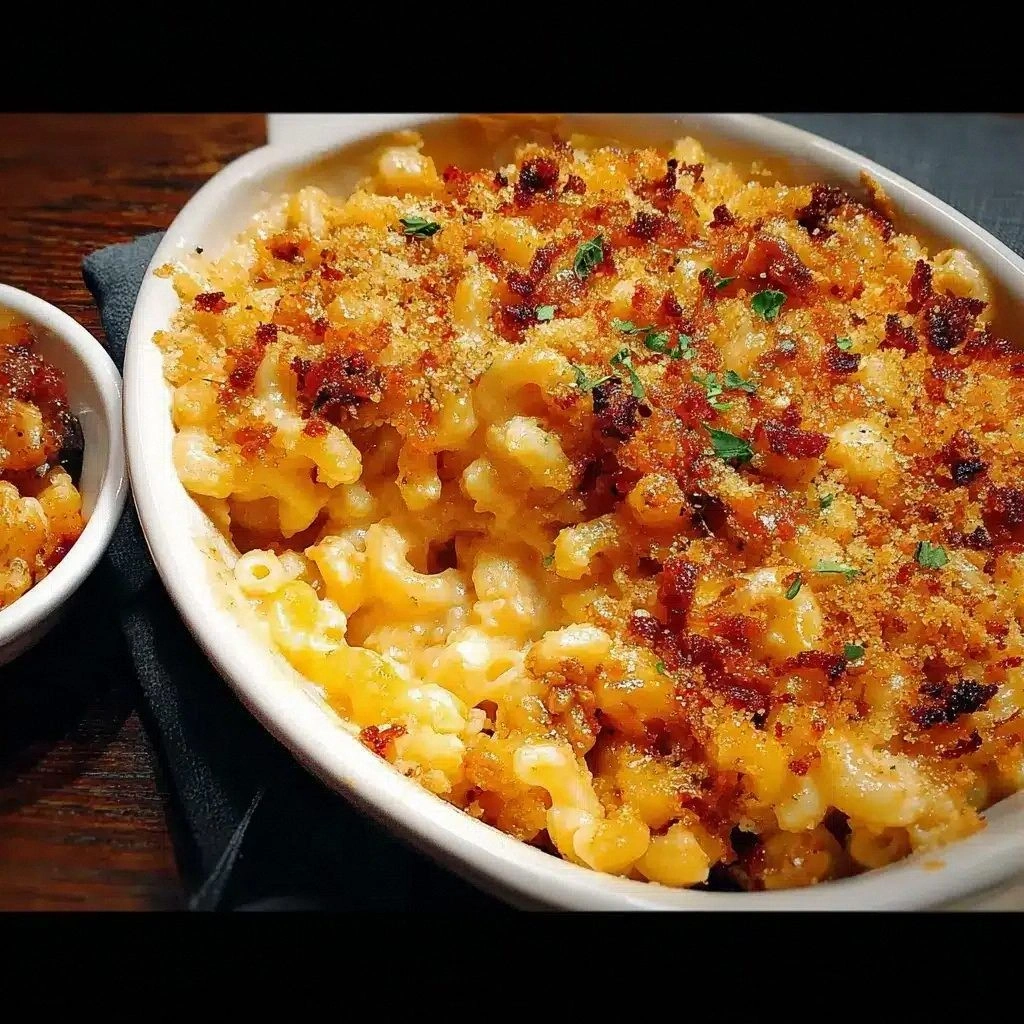
I was halfway through a midnight binge on the couch when the kitchen lights flickered and a sudden craving for a creamy, cheesy comfort food burst through my brain like a rogue fireworks display. I stared at the empty fridge, then at the pile of pasta that had somehow survived the last week of my diet, and thought, “Why not turn that humble elbow macaroni into something that could make even the most seasoned foodie weep with joy?” The idea was simple: replicate the legendary Longhorn Steakhouse mac and cheese, but with a secret twist that would make every bite feel like a warm hug from an old friend.
Imagine the moment the first spoonful hits your tongue: a velvety blend of sharp cheddar and creamy Monterey Jack, a hint of smoky paprika, and a subtle kick from a whisper of cayenne that dances just beneath the surface. The aroma rises, rich and buttery, and you can almost hear the gentle crackle of the oven as the golden crust begins to form. The sound is a subtle, satisfying hiss that signals the transformation from simple pasta to a dish worthy of a five‑star review. The texture is a perfect marriage of gooey cheese and tender noodles, with a buttery crust that shatters like thin ice when you bite into it. The taste? A savory, slightly sweet, and utterly comforting symphony that lingers on your palate long after the last bite.
What sets this version apart isn’t just the blend of cheeses or the crispy breadcrumb topping; it’s the meticulous layering of flavors and the precision in cooking technique. I’ve spent countless nights tweaking ratios, adjusting temperatures, and experimenting with different cheese combinations until I found the sweet spot that delivers that signature “Longhorn” crunch and melt. The result is a dish that feels like a hug, a memory, and a promise that you’ve earned a treat. It’s the kind of comfort food that can turn a regular dinner into a celebratory feast.
But here’s the kicker: there’s a subtle ingredient that most copycats overlook—a dash of Dijon mustard that adds depth and a touch of tang, making the cheese sauce feel more complex and less one‑dimensional. I dare you to taste this and not go back for seconds. And if you think a recipe is complete without a crunchy, buttery topping, think again—my breadcrumb‑Parmesan layer is a game‑changer that gives the dish that coveted, golden finish. Picture yourself pulling this out of the oven, the whole kitchen smelling incredible, and the anticipation of that first bite building like a crescendo in a symphony.
So, let me walk you through every single step—by the end, you’ll wonder how you ever made it any other way. Whether you’re a seasoned cook or a kitchen newbie, this recipe will become your new go‑to comfort dish. Ready? Let’s dive in.
What Makes This Version Stand Out
- Cheese Blend: The combination of sharp cheddar, Monterey Jack, and mozzarella creates a melt that’s both rich and silky, unlike the single‑cheese recipes that often taste flat.
- Flavor Depth: A splash of Dijon mustard and a whisper of smoked paprika give the sauce complexity that elevates it from ordinary to unforgettable.
- Crispy Crust: The breadcrumb‑Parmesan topping, toasted to a golden perfection, adds a satisfying crunch that contrasts beautifully with the creamy interior.
- Texture Control: Cooking the pasta al dente before mixing ensures the noodles absorb the sauce without becoming mushy, a subtle but crucial detail.
- Make‑Ahead Friendly: This dish can be assembled ahead of time and baked just before serving, making it a perfect crowd‑pleaser for parties or family gatherings.
- Ingredient Quality: Using high‑quality cheeses and fresh butter makes a noticeable difference in flavor, proving that premium ingredients pay off.
- Time Efficiency: With a prep time of just 15 minutes and a cook time of 30 minutes, you can have a gourmet dish on the table in under an hour.
- Adaptability: The recipe’s modular nature allows you to swap cheeses or add proteins like bacon or chicken without compromising the core experience.
Alright, let's break down exactly what goes into this masterpiece...
Inside the Ingredient List
The Flavor Base
The foundation of this dish is the cheese sauce, where each cheese plays a distinct role. Sharp cheddar provides the bold, tangy bite that is the hallmark of Longhorn’s mac. Monterey Jack adds a silky smoothness that keeps the sauce from becoming too thick, while mozzarella contributes a subtle stretchiness that makes every bite feel indulgent. Together, they create a sauce that coats the pasta like velvet, ensuring that every strand is drenched in flavor.
Butter, the unsalted variety, is essential for the roux that thickens the sauce. It adds a rich, nutty flavor and helps the flour develop a golden hue before the milk is incorporated. The all‑purpose flour, on the other hand, acts as the binding agent that transforms liquid into a luxurious, silky sauce. The balance between these ingredients is delicate; too much flour and the sauce becomes chalky, too little and it will be thin and runny.
Milk and heavy cream are the liquid components that give the sauce its body. Whole milk provides a creamy base, while heavy cream boosts the richness, making the sauce feel decadent. The ratio of milk to cream is critical; a 2:1 ratio (milk to cream) ensures the sauce is luxurious without becoming overly heavy. If you’re watching calories, you can swap the heavy cream for half‑fat milk, but the texture will shift slightly.
Seasonings are the unsung heroes that tie everything together. Garlic powder and onion powder bring depth without the bulk of fresh aromatics. Smoked paprika offers a subtle, earthy warmth, while cayenne pepper adds a gentle heat that keeps the dish from feeling flat. A pinch of salt and a dash of black pepper balance the flavors, ensuring that the cheese’s natural saltiness isn’t overwhelmed.
The Texture Crew
Elbow macaroni is the classic choice for mac and cheese, thanks to its ability to hold sauce and its firm bite. Cooking it to al dente is crucial; it should have a slight resistance to the bite, preventing it from becoming mushy once the sauce coats it. If you prefer a different shape, you can experiment with shells or penne, but the elbow remains the gold standard.
Breadcrumbs are not merely a topping; they’re a textural layer that adds crunch and contrast. Using fresh breadcrumbs toasted with a bit of butter creates a golden, buttery crust that pops with each bite. The addition of grated Parmesan cheese to the breadcrumb mix infuses a nutty, savory flavor that elevates the topping from ordinary to extraordinary.
The final flourish comes from a sprinkle of fresh parsley, which adds a burst of color and a hint of brightness that cuts through the richness. A drizzle of melted butter on top before baking gives the crust an extra sheen and a buttery finish that is simply irresistible.
The Unexpected Star
Dijon mustard is the secret ingredient that many copycats miss. Its tangy, slightly sharp profile adds depth to the cheese sauce, preventing it from tasting one‑dimensional. A tablespoon is all you need; it blends seamlessly into the sauce, offering a subtle complexity that makes the dish feel more sophisticated. If you’re wary of mustard, you can use a mild yellow mustard, but the flavor profile will shift slightly.
Another hidden gem is the use of heavy cream in the sauce. While some recipes rely solely on milk, the addition of cream creates a velvety mouthfeel that feels indulgent. It also helps the cheese melt more evenly, preventing the sauce from separating. If you’re looking for a lower‑fat version, swap the heavy cream for Greek yogurt, but the texture will be noticeably different.
The Final Flourish
The combination of melted butter, breadcrumbs, and Parmesan creates a golden crust that is the crowning glory of this dish. As the cheese melts, the butter in the topping creates a crisp, caramelized layer that adds a delightful crunch. The Parmesan’s nutty flavor complements the sharp cheddar, while the breadcrumbs provide the necessary crunch to break the creamy surface.
A final touch is the sprinkle of fresh parsley, which not only adds color but also a subtle herbal note that balances the richness. The parsley’s bright green hue contrasts beautifully with the golden crust, making the dish visually appealing as well as delicious. With these finishing touches, your mac and cheese will look as good as it tastes.
Everything's prepped? Good. Let's get into the real action...
The Method — Step by Step
- Begin by bringing a large pot of salted water to a rolling boil. Add the elbow macaroni and cook it until it’s just shy of al dente—about 7 minutes. The pasta should still have a slight bite; this prevents it from becoming mushy once the sauce is added. Drain the pasta and rinse it under cold water to stop the cooking process. Pat it dry with a paper towel, then set aside. This step is critical for achieving that perfect creamy texture.
- While the pasta cooks, melt the butter in a medium saucepan over medium heat. Once the butter is foamy, stir in the all‑purpose flour, whisking constantly to form a smooth roux. Let the roux cook for about 1–2 minutes until it turns a light golden color—this eliminates the raw flour taste. The smell of toasted butter should fill the kitchen, signaling that the roux is ready for the next step.
- Gradually whisk in the whole milk and heavy cream, ensuring a smooth, lump‑free sauce. Keep the heat on medium and let the sauce thicken, stirring frequently. It should reach a silky consistency that coats the back of a spoon. This process takes about 5 minutes; if the sauce starts to look too thick, add a splash of milk to loosen it.
- Reduce the heat to low and add the shredded sharp cheddar, Monterey Jack, and mozzarella cheeses, one handful at a time. Stir continuously until each cheese is fully melted and incorporated, creating a glossy, cohesive sauce. The cheese should melt evenly without separating. The aroma at this point is unmistakably rich and buttery.
- Season the sauce with garlic powder, onion powder, smoked paprika, cayenne pepper, salt, and black pepper. Stir well to distribute the spices evenly. Add the tablespoon of Dijon mustard, which will dissolve into the sauce, adding a subtle tang that balances the richness. Taste the sauce; adjust seasoning if necessary—this is your chance to fine‑tune the flavor profile.
- Fold in the drained pasta, ensuring each noodle is coated with the cheese sauce. If the sauce feels too thick, add a splash of milk to loosen it to your desired consistency. Transfer the mixture to a greased 9x13 inch baking dish, spreading it evenly. The pasta should be a uniform layer, ready for the final golden crust.
- In a small bowl, combine the breadcrumbs, grated Parmesan, and 2 tablespoons of melted butter. Mix until the crumbs are evenly coated. Sprinkle the breadcrumb mixture over the pasta, ensuring an even distribution. The breadcrumbs will form the signature crunchy crust that makes this dish unforgettable.
- Bake in a preheated oven at 375°F (190°C) for 20–25 minutes, or until the top is golden brown and the cheese is bubbling. Halfway through baking, use a spatula to gently stir the pasta—this helps the breadcrumbs bake evenly and ensures the sauce remains glossy.
- Remove the dish from the oven and let it rest for 5 minutes. This resting period allows the flavors to meld and the crust to set, preventing a sticky mess when you cut into it. Sprinkle fresh parsley over the top for a splash of color and a hint of brightness.
- Serve hot, spooning generous portions onto plates. The first bite will reveal a creamy, cheesy interior with a crisp, buttery crust. The contrast between the gooey sauce and crunchy topping will leave you craving more. Enjoy this masterpiece with a side of crisp green salad or garlic bread for a complete meal.
That's it — you did it. But hold on, I've got a few more tricks that'll take this to another level. These insider tips will help you perfect the dish every time and avoid common pitfalls that even seasoned cooks stumble over.
Insider Tricks for Flawless Results
The Temperature Rule Nobody Follows
Many home cooks think that a high oven temperature is always better, but for mac and cheese, a moderate 375°F (190°C) is ideal. A lower temperature allows the cheese to melt evenly and the breadcrumb crust to toast slowly, preventing a burnt top while ensuring a golden finish. If you’re using a convection oven, reduce the temperature by 25°F to avoid over‑browning. This small adjustment can make a huge difference in texture and flavor.
Why Your Nose Knows Best
The aroma of the sauce is a reliable indicator of readiness. When the cheese has fully melted and the sauce is silky, you’ll smell a rich, buttery scent. If you still detect raw flour or a metallic taste, it means the roux hasn’t cooked long enough. Trust your nose; it’s your best sous‑chef when it comes to timing.
The 5-Minute Rest That Changes Everything
After baking, let the mac and cheese rest for exactly five minutes. This pause allows the heat to distribute evenly, preventing a hot spot that can burn your tongue. It also lets the breadcrumb crust set, so the crust doesn’t crumble when you cut into it. I’ve found that this short rest period is the difference between a dish that’s a bit too gooey and one that’s perfectly balanced.
Keep the Sauce Silky
If your sauce starts to separate or look greasy, gently whisk in a tablespoon of cold milk or a splash of heavy cream. The cold liquid helps recombine the fat with the cheese, restoring the sauce’s silky texture. Avoid overheating the sauce; keep the heat low once the cheese has melted to prevent separation.
Swap for a Protein Punch
Add cooked bacon or shredded chicken to the pasta mixture before baking for an extra protein boost. Bacon adds a smoky crunch, while chicken provides a mild, savory flavor that pairs well with the cheeses. Just sprinkle the protein evenly so that every bite contains a burst of flavor.
Creative Twists and Variations
This recipe is a playground. Here are some of my favorite ways to switch things up:
Truffle Mac & Cheese
Add a tablespoon of truffle oil to the cheese sauce for an earthy, luxurious flavor. Top with shaved Parmesan and a sprinkle of truffle salt. This version is perfect for a fancy dinner party or a special occasion.
BBQ Chicken Mac
Stir in shredded rotisserie chicken and a half cup of your favorite barbecue sauce before baking. The sweet, smoky sauce pairs wonderfully with the creamy cheese, creating a hearty, comfort‑food classic.
Vegan Cheesy Delight
Replace the dairy with plant‑based alternatives: use vegan cheddar and mozzarella, oat milk, and a vegan butter substitute. Add nutritional yeast for a cheesy depth. This version is dairy‑free yet still indulgent.
Spinach & Artichoke Mac
Fold in a cup of thawed, drained spinach and a half cup of chopped artichoke hearts before baking. The greens add a pop of color and a subtle earthy flavor that complements the cheeses.
Buffalo Buffalo Mac
Stir in a cup of shredded buffalo chicken and a tablespoon of hot sauce. Finish with a drizzle of ranch dressing on top before serving. The spicy kick and cool ranch balance each other beautifully.
Chocolate Chili Mac
Add a teaspoon of cocoa powder and a pinch of chili powder to the cheese sauce for a sweet‑spicy twist. Top with crushed pretzels for crunch. This playful version is a conversation starter.
Storing and Bringing It Back to Life
Fridge Storage
Store leftover mac and cheese in an airtight container in the refrigerator for up to 3 days. The cheesy sauce may thicken slightly; simply stir in a splash of milk or cream before reheating to restore its silky texture. The breadcrumb crust will stay crisp, but if it softens, a quick reheat in a preheated oven at 350°F (175°C) for 5 minutes will revive the crunch.
Freezer Friendly
For longer storage, freeze the dish in a freezer‑safe container for up to 2 months. When ready to eat, thaw in the refrigerator overnight, then reheat in the oven at 350°F (175°C) until heated through. Add a splash of milk or cream before reheating to prevent the sauce from drying out.
Best Reheating Method
The best way to reheat is in the oven. Cover the dish with foil to keep the top from burning, then heat at 350°F (175°C) for 15–20 minutes. If you prefer a quick microwave method, transfer a portion to a microwave‑safe bowl, cover loosely, and heat in 30‑second intervals, stirring between each. Remember to add a splash of milk or cream for a silky finish.