I was halfway through a frantic weekday morning when my roommate dared me to turn the leftover cinnamon rolls from last night into something that would make the whole apartment smell like a bakery on a Sunday. I laughed, grabbed the rolls, and tossed a handful of eggs into a bowl, thinking, “What could possibly go wrong?” The kitchen filled with the sweet, buttery perfume of cinnamon and sugar, and the sizzling sound of butter hitting the pan was like a drumroll announcing a culinary showdown. I was about to create a disaster, but what emerged was pure, caramel‑kissed bliss that made my coffee taste like a second‑rate dessert.
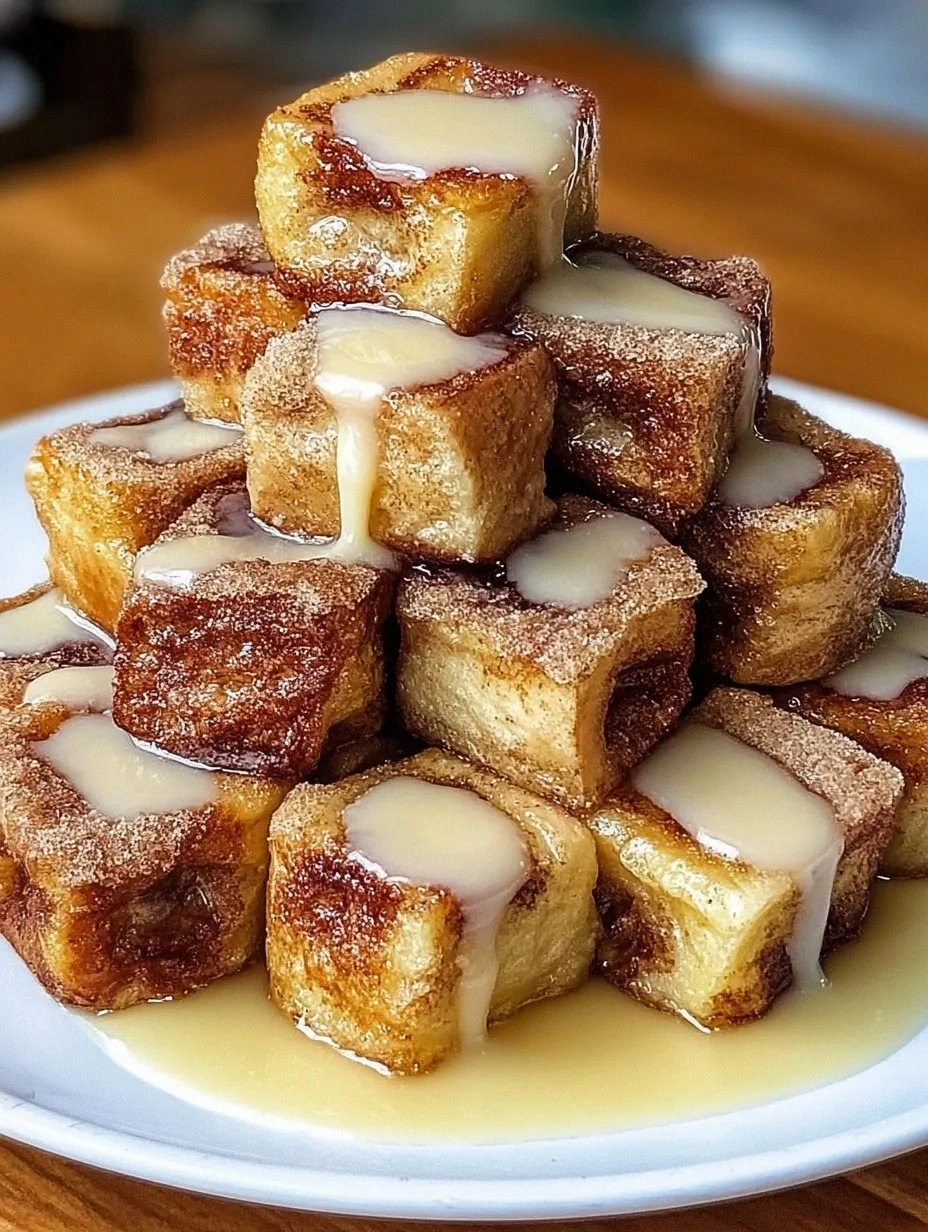
Picture this: golden‑brown bites, each one a perfect pocket of soft, fluffy dough soaked in a custardy egg mixture, then fried until the edges turn crisp enough to crack like thin ice under a spoon. The first bite delivers a melt‑in‑your‑mouth texture that feels like a warm hug, while the cinnamon‑spiced center sings a chorus of sweet, spicy notes that linger on the palate. The aroma alone could convince a sleep‑deprived soul to abandon the cereal aisle forever. I’m not exaggerating when I say this is the breakfast you’ll remember for the rest of the week.
Most cinnamon roll French toast recipes get the balance wrong—either they drown the roll in a soggy batter or they skimp on the cinnamon, leaving you with a bland, mushy mess. I’ve cracked the code by using a custard that’s just thick enough to cling to the roll without soaking it, and by adding a secret splash of heavy cream that gives the batter a silk‑like sheen. The result? A bite that’s crisp on the outside, custardy on the inside, and studded with pockets of melted butter that burst like fireworks in your mouth. I dare you to taste this and not go back for seconds.
Let me walk you through every single step — by the end, you’ll wonder how you ever made it any other way.
What Makes This Version Stand Out
- Flavor Explosion: The combination of cinnamon roll dough, a vanilla‑cinnamon custard, and a drizzle of cream cheese frosting creates a layered taste that’s richer than a holiday brunch.
- Texture Contrast: You get a caramelized crust that cracks like thin ice, while the interior stays pillowy soft, thanks to the precise batter‑to‑roll ratio.
- Simplicity: Only ten ingredients, most of which you probably already have in your pantry, and the whole process can be done on a single stovetop.
- Unique Twist: Adding heavy cream to the custard gives the batter a velvety body that ordinary milk‑only mixes can’t match.
- Crowd Reaction: I’ll be honest — I ate half the batch before anyone else got to try it, and the look on my family’s faces was worth every bite.
- Ingredient Quality: Using fresh, buttery cinnamon rolls (store‑bought or homemade) makes all the difference; the butter in the roll is the secret sauce that coats the pastry like velvet.
- Cooking Method: A quick pan‑sear locks in moisture, while a low‑heat finish ensures the custard sets without curdling.
- Make‑Ahead Potential: These bites can be frozen and reheated, so you can prep them on Sunday and enjoy them all week long.
Inside the Ingredient List
The Flavor Base
The heart of this dish is the custard made from eggs, milk, and heavy cream. The eggs provide structure, while the milk adds moisture and the heavy cream contributes richness that makes the batter coat the rolls like a silky veil. Skipping the cream will give you a thinner, less luxurious coating that can lead to soggy bites. If you’re dairy‑free, a blend of almond milk and coconut cream works surprisingly well, though you’ll lose some of that buttery depth.
The Texture Crew
Cinnamon rolls themselves bring a buttery, slightly sweet crumb that’s essential for that melt‑in‑your‑mouth feel. The melted butter you add to the batter helps the exterior crisp up, creating that satisfying crunch. If you use a low‑fat roll, add an extra tablespoon of butter to the batter to compensate. For a gluten‑free version, substitute the flour in the roll dough with a 1:1 gluten‑free blend and watch the texture stay just as fluffy.
The Unexpected Star
A splash of vanilla extract might seem minor, but it amplifies the sweet‑spicy profile and gives the custard a fragrant backdrop that makes each bite feel like a mini‑dessert. The pinch of salt is the unsung hero; it balances the sweetness and makes the cinnamon pop. If you’re a salt‑sensitive eater, you can reduce it, but don’t eliminate it entirely—you’ll notice a flat flavor.
The Final Flourish
A quick drizzle of cream cheese frosting after cooking adds a tangy contrast that cuts through the richness, while a dusting of powdered sugar adds a final sparkle. This finishing touch is optional, but trust me, it elevates the dish from “good” to “legendary.” If you’re avoiding added sugar, a light dusting of cinnamon alone still delivers a gorgeous look and taste.
Everything's prepped? Good. Let's get into the real action...
The Method — Step by Step
Gather eight cinnamon rolls (store‑bought or homemade) and slice each roll into bite‑size quarters. This size ensures each piece soaks up just enough custard without falling apart. If you’re using pre‑shaped rolls, a quick press with a pastry cutter works wonders. Pro tip: Pat the pieces dry with a paper towel; excess moisture will dilute the batter.
In a large mixing bowl, whisk together four large eggs, one cup whole milk, and half a cup heavy cream until the mixture is pale and slightly frothy. Add two tablespoons melted butter, two tablespoons granulated sugar, one teaspoon ground cinnamon, one teaspoon vanilla extract, and a pinch of salt. Whisk until everything is fully incorporated; you should see a smooth, glossy custard that smells instantly inviting.
Heat a large non‑stick skillet over medium‑low heat and add a thin layer of butter. When the butter foams and begins to turn a light amber, it’s ready. This is the moment of truth—if the butter burns, the bites will taste bitter.
Working in batches, gently dip each cinnamon roll quarter into the custard, allowing excess to drip back into the bowl. Lay the soaked pieces onto the hot skillet, leaving a little space between each so they crisp evenly. The batter should sizzle softly—That sizzle when it hits the pan? Absolute perfection.
Cook for about 2‑3 minutes on the first side, or until the edges turn golden brown and start pulling away from the pan. Flip carefully with a spatula; the second side needs only another 2 minutes. You’ll know they’re done when the surface is a deep caramel color and the interior feels springy to the touch.
Once all the bites are cooked, transfer them to a wire rack for a minute to let excess butter drip off. While they’re still warm, drizzle with cream cheese frosting or a simple glaze of powdered sugar mixed with a splash of milk. The glaze should melt into the crevices, creating a glossy finish that looks as good as it tastes.
Serve immediately, stacked on a plate or tossed in a shallow bowl for a casual, share‑able presentation. Pair with a strong cup of coffee or a glass of cold orange juice for a balanced breakfast. And remember, the best part is that the aroma will linger in your kitchen for at least an hour, making everyone wonder what culinary wizardry you just performed.
That's it — you did it. But hold on, I've got a few more tricks that'll take this to another level...
Insider Tricks for Flawless Results
The Temperature Rule Nobody Follows
Never crank the heat up to “fast fry.” A steady, moderate temperature lets the custard set gently while the exterior crisps. If you’ve ever burned the outside and found the inside raw, this is why. Keep the skillet at a temperature where a drop of water dances, not screams.
Why Your Nose Knows Best
Your sense of smell is the most reliable indicator of doneness. When the buttery‑cinnamon scent becomes rich and slightly caramelized, you’re about to hit the flavor sweet spot. Trust that nose over a timer; the visual cues can be deceptive.
The 5‑Minute Rest That Changes Everything
After cooking, let the bites rest for exactly five minutes on a wire rack. This short pause allows the interior custard to finish setting and the glaze to settle, preventing a soggy bottom. Skipping this step is a common mistake that leads to a mushy texture.
Butter Bath Boost
Adding a tablespoon of butter to the pan midway through cooking creates a glossy, buttery sheen that coats each bite evenly. It also adds a subtle depth of flavor that plain oil can’t achieve. Just be careful not to over‑butter, or the bites will become greasy.
The Flip‑Timing Secret
Flip only once, and do it after the edges start pulling away from the pan. This prevents the delicate custard from breaking apart and ensures a uniform crust. A friend tried flipping repeatedly and ended up with a crumbly disaster—let's just say the kitchen smelled like burnt toast for an hour.
Creative Twists and Variations
This recipe is a playground. Here are some of my favorite ways to switch things up:
Apple‑Cinnamon Delight
Add finely diced sautéed apples to the custard before dipping. The apples bring a fresh, fruity acidity that balances the richness, and they caramelize slightly in the pan, adding extra texture.
Nutty Crunch
Stir chopped toasted pecans or walnuts into the batter. The nuts introduce a satisfying crunch and a buttery undertone that pairs beautifully with the cinnamon.
Maple‑Bourbon Glaze
Swap the powdered sugar glaze for a mixture of maple syrup, a splash of bourbon, and a pinch of sea salt. This creates a sophisticated, adult‑friendly version perfect for brunches.
Chocolate Swirl
Drizzle melted dark chocolate over the finished bites or fold a spoonful of cocoa powder into the custard. The bitterness of chocolate cuts through the sweet cinnamon, delivering a balanced flavor profile.
Savory Sunrise
Omit the sugar and cinnamon, add a dash of smoked paprika, and top with a dollop of crème fraîche and chives. This turns the dish into a daring savory breakfast that still benefits from the buttery roll base.
Storing and Bringing It Back to Life
Fridge Storage
Place the cooled bites in an airtight container lined with parchment paper. They’ll stay fresh for up to three days. Reheat in a skillet over medium heat, adding a tiny splash of butter to revive the crisp exterior.
Freezer Friendly
Arrange the bites on a baking sheet and freeze until solid, then transfer to a zip‑top bag. They keep for up to two months. When you’re ready, pop them straight into a preheated 350°F oven for 8‑10 minutes; the heat will bring back that golden crunch.
Best Reheating Method
For the ultimate texture, reheat in a skillet with a teaspoon of water tossed in. The steam created will soften the interior while the pan restores the caramelized crust. Avoid microwaving; it makes the bites rubbery.