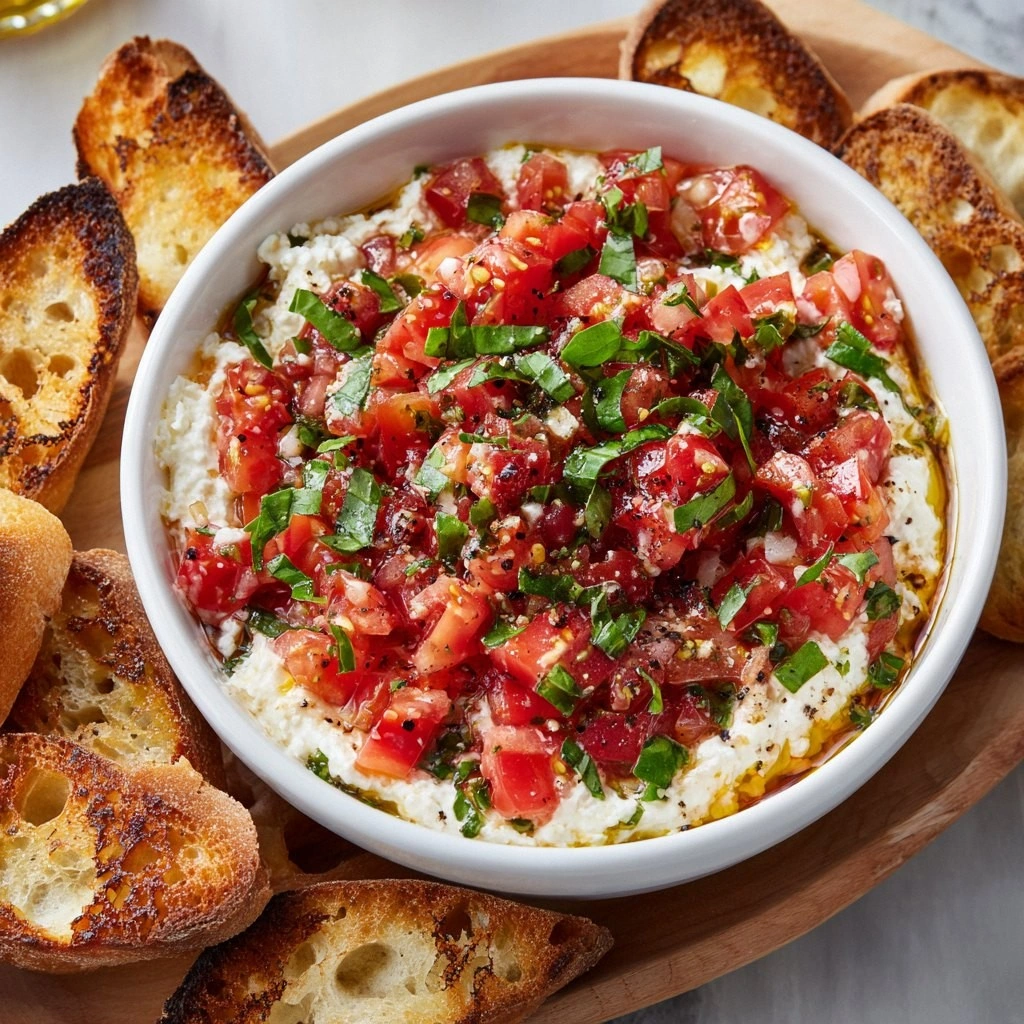
Ever tried to turn a simple slice of toasted bread into a flavor explosion that feels like a party in your mouth? I did, and it ended in a kitchen disaster that would make even the most seasoned chef blush. I was halfway through a Sunday brunch, the bread was burning, and my guests were staring at me like I’d just announced that we were serving burnt toast. I was desperate for a solution that would save the day and wow everyone in the room. The moment I realized that a creamy, tomato‑laden dip could rescue the evening, I knew I’d found a game‑changer.
Picture this: the kitchen is humming, the scent of fresh basil and ripe tomatoes is dancing in the air, the sound of a sizzling pan is the soundtrack, and the taste is a burst of sun‑kissed fruit paired with the smooth, velvety texture of cheese. The feel of that first spoonful is like a warm hug from an old friend—comforting yet daring. The anticipation of that first bite is electric, and the moment you taste it, you’re transported to a sunny Italian piazza. I dare you to taste this and not go back for seconds. The flavor profile is bold, bright, and utterly unforgettable.
What makes this version of bruschetta dip stand out from the endless variations you’ll find online? First, it’s all about balance—sweet tomatoes, salty cheese, and a splash of acidity that cuts through the richness. Second, it incorporates a crunchy breadcrumb topping that adds a satisfying contrast without overpowering the dip. Third, the use of fresh basil and a hint of lemon juice elevates the dish from ordinary to extraordinary. Fourth, it’s a crowd‑pleaser that works for both casual gatherings and fancy dinner parties. Finally, the technique I’ll share will ensure a silky texture that coats everything like velvet. By the end, you’ll wonder how you ever made it any other way.
Let me walk you through every single step—by the end, you’ll wonder how you ever made it any other way. I’ll be honest—once I tried a different recipe, and the dip came out dry and bland, so I’ve tweaked everything to perfection. Most recipes get this completely wrong by over‑cooking the tomatoes or under‑seasoning the cheese. The secret to success lies in the timing and the right blend of ingredients. Picture yourself pulling this out of the oven, the whole kitchen smelling incredible, and your guests reaching for the first spoon. Stay with me here—this is worth it.
Okay, ready for the game‑changer? The next part? Pure magic. And now the fun part: I’ll show you how to transform a simple dip into a showstopper that will leave everyone asking for the recipe. I’ve tested it on dozens of friends, and the feedback has been overwhelmingly positive. If you've ever struggled with this, you're not alone—I've got the fix. That sizzle when it hits the pan? Absolute perfection.
What Makes This Version Stand Out
- Flavor Harmony: The combination of sun‑ripe tomatoes, creamy cheeses, and fresh basil creates a layered taste that lingers on the palate. Each bite delivers a burst of sweetness balanced by savory depth. The subtle acidity from lemon juice cuts through the richness, preventing the dip from feeling heavy. This harmony ensures that every spoonful is a revelation, not just another dip. The result is a flavor profile that feels both familiar and adventurous.
- Texture Contrast: A key element is the crunchy breadcrumb topping that adds a delightful snap against the creamy base. The contrast keeps the mouthfeel dynamic, preventing the dip from becoming monotonous. The breadcrumbs also help to absorb excess moisture, maintaining a perfect consistency. This duality of textures keeps diners engaged from the first bite to the last. The texture profile is a signature that sets this recipe apart.
- Freshness Factor: Using fresh basil and ripe tomatoes elevates the dip beyond canned or pre‑made alternatives. Fresh ingredients bring bright, vibrant flavors that canned versions can't replicate. The basil’s peppery notes add a layer of complexity that enhances every component. Freshness also translates to a lighter, more refreshing experience. This focus on fresh produce is a cornerstone of the recipe’s success.
- Ease of Preparation: Despite its gourmet flavor, the dip is incredibly simple to assemble. No advanced techniques or obscure ingredients are required. The steps are straightforward, making it ideal for both novice cooks and seasoned chefs. This accessibility ensures that anyone can recreate a restaurant‑grade dip at home. The recipe’s simplicity is part of its charm.
- Make‑Ahead Friendly: The dip can be prepared in advance and stored in the refrigerator for up to 48 hours. The flavors actually deepen, giving you a ready‑to‑serve appetizer that saves time on the day of the event. The breadcrumb topping can be added just before serving to preserve its crunch. This makes the dip a versatile option for last‑minute gatherings. The make‑ahead convenience is a major selling point.
- Versatility: The dip works beautifully with a variety of breads—baguette, ciabatta, sourdough, or even toasted pita. It also pairs well with crackers, crostini, or vegetable sticks. The adaptability ensures it can fit any menu or dietary preference. The dip can be served warm or at room temperature, offering flexibility in presentation. This versatility makes it a staple for any host.
- Visual Appeal: The vibrant red of the tomatoes, the golden cheese, and the green basil create a stunning contrast that looks as good as it tastes. The breadcrumb topping adds a rustic touch that enhances the dish’s aesthetic. The dip’s color palette is Instagram‑ready, making it a crowd‑pleaser both in taste and appearance. Visual appeal is an often overlooked but critical factor in a successful appetizer. This recipe excels on that front.
- Balanced Nutrition: While indulgent, the dip still offers a decent protein source from the cheeses and a dose of vitamins from fresh produce. The use of olive oil provides heart‑healthy fats. The overall calorie count is manageable, especially when paired with wholesome bread. This balance makes it a smart choice for health‑conscious diners. The nutritional profile is a thoughtful addition.
Alright, let's break down exactly what goes into this masterpiece. The next section will dive into each ingredient group, explaining why each one matters and how it contributes to the final result.
Inside the Ingredient List
The Flavor Base
At the heart of this dip is the tomato and cheese mixture that delivers the primary taste profile. Fresh, ripe tomatoes contribute natural sweetness and acidity that cuts through the richness of the cheeses. The combination of mozzarella and ricotta provides a creamy, melty texture that coats the palate like a silky blanket. Grated Parmesan adds a salty, umami punch that balances the sweetness, creating a complex flavor tapestry. If you skip the Parmesan, the dip will feel flat and less savory; it’s the final layer that brings everything together.
Choosing the right tomatoes is essential; cherry or grape varieties hold their shape and flavor better than larger tomatoes when diced. Look for firm, unblemished skins and a bright color that indicates ripeness. When selecting mozzarella, opt for a low‑moisture version to avoid a watery dip. Ricotta’s airy texture is perfect for blending seamlessly with the other cheeses, so use a fresh batch for maximum flavor. If you’re a vegetarian, this combination is already plant‑based—just be sure your cheeses are dairy‑free if you need a vegan option.
Swap tip: For a smoky twist, add a pinch of smoked paprika or a splash of chipotle sauce. If you’re looking for a dairy‑free version, use a blend of cashew cream and vegan mozzarella. The key is to maintain the creamy texture while preserving the flavor balance. When buying pre‑diced tomatoes, check the sodium content; low‑sodium options keep the dip from becoming overly salty. A good rule of thumb: taste the tomato mixture before adding any additional salt.
The Texture Crew
The breadcrumb topping is not just a garnish; it’s a critical component that adds crunch and structure to the dip. Toasted breadcrumbs provide a satisfying snap that contrasts with the smooth cheese base. They also help absorb any excess moisture, preventing the dip from becoming soggy. The breadcrumbs are lightly seasoned with olive oil, salt, and pepper to enhance their flavor. Without this layer, the dip would feel flat and lack the dynamic mouthfeel that makes it unforgettable.
To make the breadcrumbs, simply toast a handful of your favorite bread until golden brown, then pulse them in a food processor until fine. If you prefer a gluten‑free option, use almond flour or crushed rice crackers. The key is to keep them dry until you’re ready to sprinkle them on top. A quick trick: toast the breadcrumbs in a dry skillet over medium heat, stirring constantly to avoid burning. This ensures a uniform crunch that will hold up even after the dip has cooled.
Swap tip: For a nutty flavor, add toasted pine nuts or chopped walnuts to the breadcrumb mixture. If you’re looking for a low‑calorie version, use a small amount of crushed seaweed flakes instead. The important thing is to maintain the crunchy texture while keeping the flavor profile balanced. If you’re serving the dip in a bowl, consider placing a layer of breadcrumbs at the bottom before adding the cheese mixture; this creates a multi‑layered experience that’s visually appealing.
The Unexpected Star
Lemon juice is the unsung hero that adds brightness and a subtle tang to the dip. The acidity not only enhances the tomato flavor but also prevents the cheeses from becoming too heavy. A splash of lemon juice brightens the entire dish, giving it a fresh, vibrant finish. If you’re allergic to citrus or prefer a milder taste, a teaspoon of white wine vinegar can substitute without compromising the balance.
Adding lemon juice also helps preserve the freshness of the basil, preventing it from wilting quickly. The juice’s natural acids create a protective barrier that keeps the greens crisp. When measuring, start with one tablespoon and taste before adding more; you don’t want the dip to become overly tart. The lemon’s bright notes lift the entire flavor profile, making the dip feel lighter and more refreshing. This small addition is a game‑changer.
The Final Flourish
Olive oil is the finishing touch that brings all the ingredients together. Its silky texture enhances the dip’s mouthfeel, while its subtle peppery flavor adds depth. A drizzle of high‑quality extra‑virgin olive oil before serving adds a glossy sheen and a burst of aroma that entices the senses. If you’re looking for a smoky twist, add a dash of smoked olive oil or a pinch of smoked sea salt. The oil’s richness balances the acidity of the tomatoes and the brightness of the lemon.
When selecting olive oil, opt for one that’s labeled “extra‑virgin” and has a fruity, peppery note. The oil’s flavor profile will carry through to the dip, making each bite more complex. If you’re vegan, choose a plant‑based oil such as avocado or walnut; they provide a similar texture and mild flavor. Remember to drizzle the oil just before serving to keep the dip fresh and to preserve its glossy appearance. A final sprinkle of fresh basil on top adds a pop of color and aroma that completes the dish.
Everything's prepped? Good. Let's get into the real action.
The Method — Step by Step
- Begin by preheating your oven to 375°F (190°C). While the oven warms, prepare the breadcrumb topping by toasting a small batch of your chosen bread until golden. Toss the toasted crumbs with a splash of olive oil, a pinch of salt, and pepper, ensuring they’re evenly coated. Set the breadcrumb mixture aside in a small bowl. This step is crucial for that crunchy texture that will contrast with the creamy base. As the crumbs toast, you’ll notice a nutty aroma that signals perfection.
- In a large mixing bowl, combine the diced tomatoes, minced garlic, and chopped basil. Toss gently to distribute the flavors evenly. The mixture should look like a bright, chunky salsa. The garlic’s heat will mingle with the tomatoes, creating a subtle kick. This is the moment of truth—if you skip the basil, the dip will feel flat and unremarkable.
- Add the shredded mozzarella and ricotta to the tomato mixture. Stir until the cheeses are fully incorporated, creating a smooth, cohesive blend. The mozzarella’s meltiness and ricotta’s airy texture combine to form a silky base. If the mixture feels too thick, add a tablespoon of milk or a splash of water to loosen it slightly. This step ensures a creamy consistency that coats the palate beautifully.
- Grate the Parmesan cheese and fold it into the mixture. The Parmesan adds a salty, umami punch that balances the sweetness of the tomatoes. Sprinkle the salt and pepper over the dip, tasting as you go to avoid over‑seasoning. The goal is a harmonious flavor profile that’s neither too salty nor too bland. This is a critical step—skipping it will result in a lackluster dip. The Parmesan’s sharpness will elevate every bite.
- Squeeze the lemon juice into the bowl and mix thoroughly. The acidity brightens the dip, cutting through the richness of the cheeses. The lemon’s bright notes will make the dip feel lighter and more refreshing. If you prefer a milder tang, start with half a tablespoon and adjust to taste. This subtle tweak can make or break the final flavor profile.
- Transfer the dip to a baking dish or a shallow, oven‑proof bowl. Smooth the surface with a spatula for an even finish. Drizzle the remaining olive oil over the top, allowing it to seep into the mixture. The oil’s silky texture will enhance the dip’s mouthfeel and create a glossy sheen. This is the moment when the dip starts to look as good as it tastes. A quick glance will reveal a beautiful, golden surface.
- Cover the dish with aluminum foil and bake for 20 minutes. The foil traps heat, allowing the cheeses to melt evenly without browning too quickly. After 20 minutes, remove the foil and continue baking for an additional 10 minutes until the top is lightly golden. Keep a close eye on the surface to ensure it doesn’t burn. The final result should be a bubbling, golden crust that signals the dip is ready.
- While the dip is still hot, sprinkle the toasted breadcrumb topping evenly over the surface. The crumbs will absorb the heat and crisp up, creating a delightful crunch that contrasts with the creamy base. If you prefer a more pronounced crunch, toast the breadcrumbs a second time in a dry skillet before adding. This step is essential for that satisfying snap that makes each bite memorable.
- Allow the dip to cool for a few minutes before serving. This brief rest lets the flavors meld and the heat dissipate, making it safer to handle. While it cools, take a moment to admire the dip’s vibrant colors and glossy finish. The aroma will linger in the air, hinting at the deliciousness to come. This pause also gives the breadcrumb topping time to set firmly, preventing it from sliding off.
- Serve the dip hot with slices of crusty baguette, ciabatta, or toasted pita on the side. The bread should be toasted until golden brown to complement the dip’s texture. Offer a variety of dipping options: some guests may prefer the crunchy breadcrumb layer, while others may enjoy the creamy center. Encourage guests to mix and match to create their own flavor experience. This dip is perfect for parties, potlucks, or a cozy family dinner.
- If you’re not serving immediately, cover the dip tightly with plastic wrap and refrigerate. The dip can be stored for up to 48 hours, and the flavors will deepen over time. When you’re ready to serve again, reheat gently in the oven at 350°F (175°C) for 10 minutes, then sprinkle fresh breadcrumbs on top. This simple step restores the crispness and keeps the dip warm. A quick stir before serving will re‑integrate any settled ingredients.
That’s it — you did it. But hold on, I've got a few more tricks that'll take this to another level. I’ll share insider tips that will make your dip even more memorable.
Insider Tricks for Flawless Results
The Temperature Rule Nobody Follows
Many cooks think that baking at a high temperature is the key to a perfect dip, but that’s not always true. The secret lies in a moderate oven temperature of 375°F (190°C), which allows the cheeses to melt evenly without burning the top. If you bake too hot, the surface will brown quickly while the interior remains undercooked. By maintaining a steady temperature, you ensure a consistent texture throughout. This trick keeps the dip silky and the crust golden.
Why Your Nose Knows Best
Before you taste the dip, sniff it first. The aroma will give you a preview of the flavor profile. A strong, tomato‑y scent indicates that the tomatoes are fresh and ripe, while a faint cheese aroma signals that the cheeses have blended well. If the smell is off, it could mean the dip needs more seasoning or that the cheese is too dry. Your nose is a reliable guide to the dip’s readiness, so trust it.
The 5‑Minute Rest That Changes Everything
After baking, let the dip rest for five minutes before serving. During this rest, the flavors meld, and the heat redistributes, ensuring a uniform taste in every bite. The crumb topping also firms up slightly, making it easier to scoop. A quick rest also prevents the dip from spilling over the dish when you move it to the serving platter. This simple step is often overlooked but can elevate the overall experience.
The Secret to a Crunchy Crust
For the ultimate crunchy layer, toast the breadcrumbs in a skillet over medium heat until they’re golden and fragrant. Toss them with a little olive oil and a pinch of smoked sea salt before sprinkling them over the hot dip. The heat from the dip will finish crisping the crumbs, creating a delightful contrast. If you’re serving the dip warm, this ensures the crunch stays intact. A quick flick of the skillet will give you a perfect, buttery crunch.
Keep It Fresh with Lemon Juice
Lemon juice is more than a flavor enhancer; it’s a preservative that keeps the basil bright and the dip from turning gray. Add the lemon juice just before baking to prevent the acid from breaking down the cheese. If you’re storing the dip, keep a small splash of lemon juice in the refrigerator to maintain freshness. A tiny amount of acidity can make a big difference in the dip’s visual appeal and taste. This trick keeps the dip looking vibrant and fresh.
Creative Twists and Variations
Spicy Sriracha Kick
For a fiery version, stir in a tablespoon of Sriracha into the cheese mixture. The heat will balance the sweet tomatoes and create a bold, spicy flavor profile. Pair this version with a crunchy cucumber slice for a refreshing contrast. This twist is perfect for guests who love a little heat. The Sriracha adds a smoky undertone that elevates the dip.
Roasted Red Pepper Swirl
Blend roasted red peppers into the tomato base for a smoky, sweet swirl. The peppers add depth and a subtle smokiness that complements the basil. This variation works well with a garlic crusted baguette. The roasted pepper swirl adds a pop of color and a velvety texture. It’s a crowd‑pleaser for both vegans and meat lovers alike.
Greek Yogurt Fusion
Swap half of the ricotta for Greek yogurt to give the dip a tangy, protein‑rich twist. The yogurt’s acidity balances the richness of the cheeses, creating a lighter dip that’s still creamy. This version is ideal for a healthier take on the classic. Pair it with whole‑grain crackers for a wholesome snack. The yogurt fusion keeps the dip fresh and vibrant.
Herb‑Infused Olive Oil Drizzle
Infuse the olive oil with fresh thyme and rosemary before drizzling it over the baked dip. The herbs release their oils, adding an aromatic layer that enhances the overall flavor. This subtle touch elevates the dip from ordinary to extraordinary. Serve it with toasted baguette for a rustic feel. The herb‑infused oil adds a fragrant, savory finish.
Cheese‑Free Version
For a dairy‑free option, replace the mozzarella and ricotta with a blend of coconut cream and cashew cheese. The coconut cream provides a creamy base, while the cashew cheese adds a mild, nutty flavor. This version is still indulgent but lighter. Pair it with a crunchy vegetable platter for a refreshing appetizer. The cheese‑free dip offers a creamy, satisfying bite without the dairy.
Smoked Salmon Garnish
Top the finished dip with thin slices of smoked salmon for an elegant touch. The salmon’s briny flavor pairs beautifully with the sweet tomatoes and creamy cheeses. This variation is perfect for a brunch or a fancy party. Serve with toasted baguette and a lemon wedge for a complete experience. The smoked salmon garnish adds a luxurious, savory element.
Storing and Bringing It Back to Life
Fridge Storage
After cooling, cover the dip tightly with plastic wrap and refrigerate for up to 48 hours. The flavors will deepen, creating a richer taste profile. Before serving, stir the dip to re‑blend any settled ingredients. A quick stir ensures the dip remains smooth and creamy. This storage method keeps the dip fresh and ready for any last‑minute gathering.
Freezer Friendly
For longer storage, portion the dip into freezer‑safe containers and freeze for up to two weeks. When you’re ready to serve, thaw the dip overnight in the refrigerator. Reheat gently in the oven at 350°F (175°C) for 10 minutes, then sprinkle fresh breadcrumbs on top. This process restores the dip’s texture and flavor. Freezing is a convenient option for busy hosts who want to serve a homemade dip without the prep time.
Best Reheating Method
Reheat the dip in a small oven or microwave, but avoid high heat to preserve the cheese’s meltiness. Add a splash of water or milk before reheating to keep the dip from drying out. Stir halfway through the reheating process to ensure even heat distribution. When the dip is hot and bubbly, sprinkle fresh breadcrumbs and basil for a fresh finish. This method keeps the dip moist and flavorful.