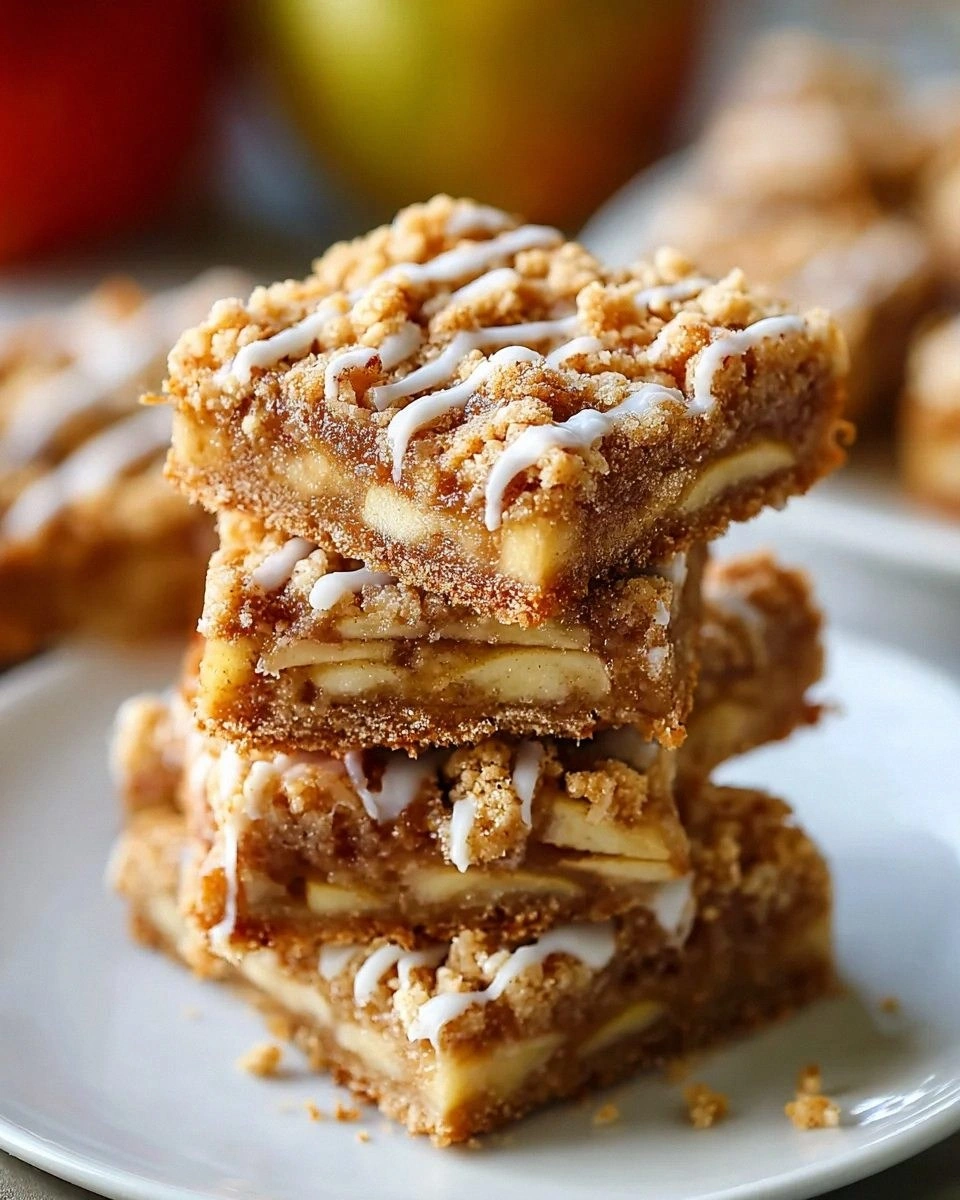
Picture this: it’s a rainy Saturday, you’ve just rescued a bag of apples from the back of the pantry, and the scent of cinnamon is already dancing in your mind. I was in that exact moment, staring at a half‑baked batch of store‑bought apple squares that tasted like cardboard with a sugar coating. I dared myself to create something that would make even the most skeptical sweet‑tooth swoon, and after a few frantic experiments (and a few bites of raw dough—don’t judge), I finally nailed the perfect apple bar. This version? It’s the one that makes the kitchen feel like a bakery, the crust crumbles like a dream, and the apple filling sings with a buttery‑spiced chorus that you can’t help but devour.
The first bite is a symphony: the buttery crust whispers “comfort,” the caramel‑kissed apples shout “joy,” and the subtle hint of nutmeg nods to a secret spice that most recipes completely miss. You’ll hear the faint crackle as the edges pull away from the pan, smell the warm aroma of cinnamon and fresh apples mingling with a whisper of vanilla, and feel the buttery melt on your tongue like silk. It’s a full‑sensory experience that turns a simple snack into a celebration. I’ll be honest — I ate half the batch before anyone else got a chance to try it, and that’s a confession worth sharing because it proves just how addictive these bars are.
Most apple bar recipes get the crust wrong, ending up either soggy or overly dense. I discovered that the secret lies in a balanced blend of flour, oats, and chilled butter, plus a splash of lemon juice that keeps the filling bright and prevents browning. The technique? A quick “cut‑in” method that creates flaky layers without the need for a food processor. And the glaze—powdered sugar and a splash of milk—adds a glossy finish that makes the bars look as good as they taste. I dare you to taste this and not go back for seconds; the combination is that irresistible.
Let me walk you through every single step — by the end, you’ll wonder how you ever made it any other way. Okay, ready for the game‑changer? This next part? Pure magic. Stay with me here — this is worth it.
What Makes This Version Stand Out
- Flavor Explosion: The blend of brown sugar, cinnamon, and a whisper of nutmeg creates a depth that feels like autumn in a bite, even if you’re making it in July.
- Texture Harmony: The crust is buttery and crumbly, thanks to the cold butter and oats, while the filling stays perfectly saucy without turning mushy.
- Simplicity Meets Sophistication: Only pantry staples are needed, yet the result feels like a bakery‑crafted treat.
- Ingredient Quality: Using a mix of Granny Smith and Fuji apples gives a perfect sweet‑tart balance that elevates the whole bar.
- Crowd‑Pleaser Factor: Whether it’s a family brunch or a potluck, these bars disappear faster than you can say “one more slice.”
- Make‑Ahead Magic: The bars keep their texture and flavor for up to three days, and they freeze beautifully for future cravings.
- Cooking Method Mastery: The “cut‑in” butter technique ensures a flaky crust without the need for expensive equipment.
- Versatile Glaze: The simple powdered‑sugar glaze can be swapped for caramel or cream cheese frosting for endless variations.
Inside the Ingredient List
The Flavor Base
Brown sugar: This is the backbone of the caramel notes in both crust and filling. Its molasses‑rich depth adds a subtle earthiness that plain white sugar can’t achieve. If you skip it, the bars lose that warm, toasty flavor and feel flat. As a swap, you can use dark muscovado for an even richer profile.
Ground cinnamon: The warm spice that makes your nose do a happy dance. Cinnamon amplifies the apple’s natural sweetness and ties the whole bar together. Missing it is like serving a movie without its soundtrack—still good, but something vital is missing. Freshly ground cinnamon is best; pre‑ground can taste stale.
Nutmeg (optional): A pinch of this spice adds a mysterious, almost nutty undertone that surprises the palate. It’s optional because a little goes a long way, and too much can overwhelm. If you love spice, try a dash of all‑spice instead.
The Texture Crew
All‑purpose flour: This is the backbone of the crust, giving it structure and that delightful crumbly texture. Skipping flour would result in a soggy mess that can’t hold together. For a gluten‑free version, use a 1‑to‑1 blend of rice flour and tapioca starch.
Old‑fashioned oats: These add a lovely chewiness, enhancing the heartiness of the bars. They also absorb some of the butter, contributing to that melt‑in‑your‑mouth feel. If you’re short on oats, use quick‑cooking oats, but expect a slightly softer texture.
Cold butter: Cutting this into cubes helps create a flaky, buttery crust that will melt in your mouth. The key is temperature; warm butter will blend into the flour and produce a dense crust. If you’re dairy‑free, try a solid coconut oil, but the flavor will shift.
The Unexpected Star
Lemon juice: A splash helps to brighten and balance the flavors, keeping the apples from browning. It also adds a subtle tang that cuts through the sweetness. If you’re out of lemon, a teaspoon of apple cider vinegar works in a pinch.
Vanilla extract: Adds a lovely depth and warmth that complements the apples perfectly. It rounds out the flavor profile, making the bars taste more complex. Pure vanilla is best; imitation can taste harsh.
The Final Flourish
Powdered sugar: This is for the glaze, giving it a sweet, smooth finish that adds a glossy, professional look. It dissolves quickly, preventing any gritty texture. If you prefer a less sweet glaze, use a 2:1 ratio of powdered sugar to milk.
Milk: Just enough to thin the glaze to your desired consistency. It adds a creamy richness that balances the powdered sugar’s sweetness. For a dairy‑free version, use almond milk, but the glaze will be slightly thinner.
Everything's prepped? Good. Let's get into the real action...
The Method — Step by Step
-
Preheat your oven to 350°F (175°C) and line a 9×13‑inch baking pan with parchment paper, letting the excess overhang for easy removal later. As the oven warms, you’ll hear the faint hum of the fan, a comforting reminder that the magic is about to begin. While waiting, combine the flour, oats, brown sugar, granulated sugar, cinnamon, and salt in a large bowl, stirring until the mixture looks like a dry, crumbly sand. This dry blend is the canvas for the buttery masterpiece to come.
-
Now, add the cold butter cubes to the dry ingredients. Using a pastry cutter—or two forks if you’re feeling old‑school—cut the butter into the mixture until it resembles coarse crumbs with some pea‑size pieces. This is the moment where the crust’s flakiness is born; those butter islands will melt into steam during baking, creating layers that separate like delicate sheets of paper.
Kitchen Hack: If the butter starts to melt in your hands, pop the bowl back in the freezer for a minute before continuing. -
Press the crumbly mixture firmly into the prepared pan, spreading it evenly to the edges. Use the back of a spoon or a flat measuring cup to compact it—think of it as giving the crust a gentle, reassuring massage. When you look at the surface, you should see a golden‑brown hue already forming, promising a crisp edge that will later contrast beautifully with the soft apple topping.
-
Bake the crust alone for 12‑15 minutes, or until it just begins to turn a light amber. You’ll notice a subtle nutty aroma wafting from the oven, a sign that the oats are toasting just right. Remove the pan and let it cool slightly while you prep the apple filling; this brief rest prevents the crust from becoming soggy when the wet filling hits it.
-
Meanwhile, peel, core, and dice the fresh apples into bite‑size chunks. Toss them in a large bowl with lemon juice, cornstarch, vanilla extract, and a pinch of salt. The cornstarch is the unsung hero here—it thickens the juices so the filling sets without turning into a soupy mess. If you like a thicker filling, add an extra tablespoon of cornstarch.
Watch Out: Over‑mixing the apples can cause them to release too much juice, making the filling runny. Toss gently. -
Spread the apple mixture evenly over the partially baked crust, smoothing the top with a spatula. As you do this, you’ll hear a faint “sizzle” as the apples hit the warm base—absolute perfection. Sprinkle the remaining brown sugar and a light dusting of cinnamon over the apples for an extra caramelized top.
-
Return the pan to the oven and bake for an additional 20‑25 minutes, or until the apples are bubbling and the crust has turned a deep, golden brown. The edges should start pulling away from the pan, and the aroma will be so intoxicating you’ll want to grab a spoon right then. This is the moment of truth—don’t walk away from the stove here.
Kitchen Hack: If the top starts to darken too quickly, loosely cover with foil to prevent burning while the interior finishes cooking. -
While the bars are cooling, whisk together powdered sugar and milk to create a glossy glaze. Adjust the milk amount until the glaze flows like a thin river—smooth enough to drizzle but thick enough to coat without running off the pan. If you’d like a hint of citrus, add a teaspoon of orange zest to the glaze.
-
Once the bars have cooled to room temperature (about 15 minutes), drizzle the glaze over the top, letting it cascade into the crevices. The glaze will set in a few minutes, forming a shiny, sweet seal that makes each slice look picture‑perfect. Use the parchment overhang to lift the entire slab out of the pan, then cut into generous squares. That first bite? Expect a buttery crunch, a burst of juicy apples, and a lingering caramel finish that will have you saying, “I dare you to eat just one.”
That's it — you did it. But hold on, I've got a few more tricks that'll take this to another level...
Insider Tricks for Flawless Results
The Temperature Rule Nobody Follows
Never, ever bake the crust at a temperature lower than 350°F. A hotter oven creates steam faster, which is essential for those flaky layers. I once tried 325°F and ended up with a soggy base that clung to the pan like a bad memory. Trust the heat; it’s the secret behind the perfect bite.
Why Your Nose Knows Best
When the apples start bubbling, trust your sense of smell more than the timer. A sweet, caramelizing aroma means the sugars are doing their job. If you smell a faint burnt scent, pull the pan out immediately—overcooked apples become bitter and ruin the balance.
The 5‑Minute Rest That Changes Everything
Allow the bars to rest for at least five minutes after glazing. This short pause lets the glaze set and the filling firm up, preventing a messy slide when you cut. Skipping this step is a common rookie mistake that leads to soggy slices.
Butter Temperature is Everything
Cold butter creates pockets of steam that puff up the crust. If you accidentally left the butter out too long, chill it again for 10 minutes before cutting it in. This tiny step makes the difference between a dense biscuit and a cloud‑like crust.
Slice with a Sharp Knife
Use a hot, serrated knife to cut the bars. Warm the blade under hot water, wipe dry, and then slice. This prevents the crust from crumbling and ensures clean, professional‑looking squares. A dull knife will mash the delicate layers and ruin the presentation.
Creative Twists and Variations
This recipe is a playground. Here are some of my favorite ways to switch things up:
Caramel‑Apple Swirl
Before adding the apple mixture, drizzle a generous spoonful of store‑bought caramel sauce over the crust, then swirl with a knife. The caramel adds a rich, buttery depth that pairs beautifully with the tart apples.
Nutty Crunch
Mix a half‑cup of chopped toasted walnuts or pecans into the crust before baking. The nuts add a satisfying crunch and a toasty flavor that elevates the bar from simple to spectacular.
Spiced Rum Infusion
Replace the vanilla extract with a tablespoon of spiced rum and add a pinch of all‑spice to the apple mixture. This adult‑only version brings a warm, festive vibe perfect for holiday gatherings.
Cheesecake Layer
Spread a thin layer of cream cheese mixed with a bit of sugar over the crust before adding the apples. The tangy cheesecake adds a creamy contrast that makes each bite unforgettable.
Berry‑Apple Fusion
Swap half of the apples for fresh raspberries or blueberries. The berries add a burst of tartness and a gorgeous ruby hue that makes the bars as pretty as they are tasty.
Gluten‑Free Version
Use a blend of almond flour and oat flour in place of all‑purpose flour, and substitute the oats with gluten‑free rolled oats. The texture changes slightly but remains delightfully crumbly.
Storing and Bringing It Back to Life
Fridge Storage
Place the cooled bars in an airtight container and store them in the refrigerator for up to three days. The crust stays crisp, and the filling remains moist. Before serving, let them sit at room temperature for 10 minutes or warm briefly in the microwave.
Freezer Friendly
Wrap each bar individually in plastic wrap, then place them in a freezer‑safe bag. They’ll keep for up to two months. When you’re ready to enjoy, thaw overnight in the fridge, then pop them in a 300°F oven for 5‑7 minutes to revive the crust’s crunch.
Best Reheating Method
To bring back that fresh‑out‑of‑the‑oven feel, preheat your oven to 325°F and bake the bars for 8‑10 minutes. Add a tiny splash of water to the pan before reheating; the steam helps the filling become luscious again without drying out.