I still remember the day I accidentally created the most addictive dessert hybrid known to mankind. It was one of those lazy Sunday afternoons when you've got a serious snickerdoodle craving but zero patience for rolling individual cookies. I was standing in my kitchen, flour dusting my countertops like fresh snow, cinnamon sugar coating my fingers like edible glitter, and a vision struck me: what if I could capture that warm, cinnamon-vanilla magic of snickerdoodles but transform it into something even more spectacular? What if, instead of fussing with cookie dough balls, I could create a bubbling, spoonable masterpiece that combines the best parts of a cobbler with those iconic snickerdoodle flavors?
The first attempt was a glorious disaster — a cinnamon-sugar explosion that bubbled over my favorite baking dish and left my oven looking like a crime scene. But that aroma? Pure heaven. My neighbors actually knocked on my door to investigate what smelled like someone had opened a Cinnabon in my kitchen. I stood there, oven mitts still on, tasting the edges where the sugar had caramelized into this incredible crackly crust, and I knew I was onto something revolutionary. The center was all gooey and pudding-like, while the top had developed this crisp, caramelized blanket that shattered like thin ice when I tapped it with my spoon.
Fast forward through seven more attempts, a lot of dishwashing, and several midnight taste-testing sessions (quality control, obviously), and I've perfected what I honestly believe is the ultimate comfort dessert. I'm talking about a dessert that makes grown adults close their eyes when they take the first bite, that has kids doing happy dances, and that'll make you the undisputed champion of every potluck, holiday gathering, or Tuesday night when you need something spectacular. Picture warm, cinnamon-laden cake meeting a molten, vanilla custard center, all crowned with that signature crackly sugar crust that defines the perfect snickerdoodle experience.
But here's the real kicker — this isn't just another cobbled-together dessert recipe floating around the internet. I've cracked the code on achieving that perfect textural contrast, that ideal balance of sweetness and spice, and that magical transformation that happens when simple pantry staples become something extraordinary. Let me walk you through every single step — by the end, you'll wonder how you ever made it any other way.
What Makes This Version Stand Out
Texture Paradise: We're creating three distinct layers of textural ecstasy here — a soft, pudding-like base that melts on your tongue, a tender cake middle that soaks up all those cinnamon-vanilla flavors, and a crackly sugar crust on top that provides the most satisfying crunch when you break through it with your spoon. Most cobblers settle for one texture, but we're going full symphony here.
Flavor Bomb: This isn't just cinnamon sugar thrown together — we're building layers of warmth with Vietnamese cinnamon, a touch of cardamom for mystery, vanilla bean paste for those gorgeous specks, and brown butter because we're not amateurs here. The result tastes like someone took the best parts of autumn and wrapped them in a warm hug.
Foolproof Technique: I've tested this recipe on my most kitchen-challenged friends, and even they produced restaurant-quality results. The secret lies in the hot water pour-over method that creates that magical sauce layer underneath while baking the top to perfection. Most recipes get this completely wrong, but here's what actually works.
Crowd Psychology: I dare you to taste this and not go back for seconds. I've served this at dinner parties where polite conversation stopped completely, replaced by the sound of spoons clinking against bowls and satisfied sighs. One friend actually hid the leftovers in her purse to take home. That's the kind of power we're working with here.
Ingredient Quality: We're using real European butter, fresh-ground cinnamon, and pure vanilla extract — no artificial flavors allowed. The difference between using good ingredients versus the cheap stuff here is like comparing a symphony orchestra to a kazoo band. Your taste buds deserve better than kazoo-level desserts.
Make-Ahead Magic: This dessert actually improves after sitting for a few hours, making it perfect for entertaining. The flavors meld and deepen, creating an even more spectacular experience. Plus, you can prep everything in advance and just pop it in the oven when guests arrive — future pacing at its finest.
Alright, let's break down exactly what goes into this masterpiece...
Inside the Ingredient List
The Flavor Foundation
Let's start with the star of our show — Vietnamese cinnamon, also known as Saigon cinnamon. This isn't your grocery store variety; it's got twice the essential oil content of regular cinnamon, delivering a more complex, sweet-spicy flavor that'll make your kitchen smell like you've hired a professional baker. When you're shopping, look for cinnamon that's dark reddish-brown and intensely aromatic — if you can't smell it through the jar, leave it on the shelf.
European-style butter with 82% butterfat is non-negotiable here. American butter hovers around 80%, but those extra two percentage points make a world of difference in both flavor and texture. The higher butterfat content creates a richer, more tender crumb and helps achieve that gorgeous golden color we're after. If you can find cultured European butter, even better — the slight tang adds incredible depth.
Dark brown sugar isn't just for color — it brings molasses notes that complement the cinnamon perfectly. The moisture content keeps our cobbler incredibly tender, while the deeper flavor prevents it from tasting one-note. Light brown sugar works in a pinch, but you'll miss out on that complex, almost caramel-like undertone that makes people ask, "What did you put in this?"
The Texture Crew
Cake flour is our secret weapon for achieving that impossibly tender texture. Its lower protein content means less gluten development, resulting in a more delicate crumb that practically dissolves on your tongue. If you only have all-purpose flour, you can substitute but remove two tablespoons per cup and replace with cornstarch — not quite the same, but it'll get you close.
Buttermilk does double duty here, providing both the acid we need to activate the baking soda and creating an incredibly tender texture. The lactic acid gently breaks down the gluten strands, ensuring our cobbler stays moist and fluffy. No buttermilk? No problem — add one tablespoon of lemon juice or white vinegar to regular milk and let it sit for five minutes.
Baking powder and baking soda work together to create the perfect rise. The baking powder provides lift during baking, while the baking soda helps neutralize the buttermilk's acid and contributes to that beautiful golden-brown color. Freshness matters here — if your baking powder is older than six months, treat yourself to a new can.
The Unexpected Star
Cornstarch might seem like an odd addition, but it's our insurance policy against a watery cobbler. It helps thicken the sauce that forms underneath, creating that perfect spoon-coating consistency. Don't skip it — your cobbler will still taste great, but you'll lose that luxurious texture that makes people fight over the corner pieces.
Cream of tartar is what gives snickerdoodles their signature tang and helps create that crackly top. It's actually an acid salt that stabilizes the egg whites and helps create a more tender texture. If you're out, you can substitute with twice the amount of lemon juice or white vinegar, but cream of tartar really is best here.
The Final Flourish
Vanilla bean paste is worth every penny here. Those tiny black specks aren't just for show — they provide bursts of pure vanilla flavor that elevate this from good to absolutely transcendent. If you can only find extract, use it, but reduce the amount by one-third since extract is more potent than paste.
Hot water might seem counterintuitive to pour over our carefully crafted batter, but this is where the magic happens. The hot water creates steam that helps the cobbler rise while simultaneously creating that pudding-like sauce underneath. Use water that's just off the boil — too cool and you won't get the same effect.
Everything's prepped? Good. Let's get into the real action...
The Method — Step by Step
- Start by preheating your oven to 350°F (175°C) — and I mean really let it preheat for at least 20 minutes. A properly heated oven is crucial for achieving that perfect texture contrast we're after. While it's heating, place your butter in a 9x13 inch baking dish and slide it into the oven. Watch closely as it melts — we want it just melted, not browned or bubbling. That sizzle when it hits the pan? Absolute perfection. Once melted, carefully remove the dish and let it cool slightly while you prepare the batter.
- In a medium bowl, whisk together your flour, sugar, baking powder, salt, and spices until everything is perfectly combined. Take a moment to appreciate how the cinnamon creates these gorgeous swirls through the flour — it's like edible art. In a separate bowl, whisk together the buttermilk, eggs, and vanilla until smooth and well combined. The key here is to have everything at room temperature — cold ingredients won't incorporate as smoothly, and we want a silky, homogeneous mixture.
- Now, here's where things get interesting. Pour the flour mixture into the buttermilk mixture and stir just until combined. The batter should be slightly lumpy — resist the urge to overmix! Overmixing develops the gluten and gives us a tough, chewy texture instead of the tender, almost pudding-like consistency we're after. Think of it like making pancakes — a few lumps are your friends. The batter should coat the back of a spoon but still be pourable.
- Pour this beautiful batter evenly over your melted butter in the baking dish. Don't stir it! The butter will naturally rise up the sides and create this gorgeous golden pool that'll transform into our sauce layer. Use an offset spatula or the back of a spoon to gently spread the batter to the edges if needed, but try not to disturb the butter layer too much. This is the moment of truth — you should see little butter pools glistening on top like liquid gold.
- In a small bowl, mix together your cinnamon-sugar topping. This isn't just regular cinnamon sugar — we're adding a touch of cardamom for warmth and a pinch of salt to make the flavors pop. Stir it together with a fork until the mixture is uniform and smells like Christmas morning. Sprinkle this evenly over the top of your batter — every inch should be covered in this sweet, spicy blanket.
- Okay, ready for the game-changer? Carefully pour the hot water over the entire surface. I know, I know — it looks like you're ruining everything. Trust the process here. Use the back of a spoon to gently drizzle the water over the top, starting from one corner and working your way across. The water should sit on top of the sugar layer without mixing in too much. Don't stir it! This is where most recipes go wrong — they panic and try to mix everything together.
- Bake for 35-40 minutes, or until the top is golden brown and crackly, and the sauce underneath is bubbling up around the edges. Your kitchen should smell like someone opened a professional bakery. The edges will start pulling away from the sides of the dish, and the center should still have a slight jiggle — that's your pudding layer forming. Don't overbake! It'll continue cooking as it cools, and we want that saucy center.
- While it's baking, resist the urge to open the oven door. Every time you open it, you lose heat and risk a collapsed center. Instead, turn on your oven light and watch the magic happen through the glass. You should see the cobbler rising and puffing up, creating these gorgeous domes of cake that'll eventually settle into the perfect texture.
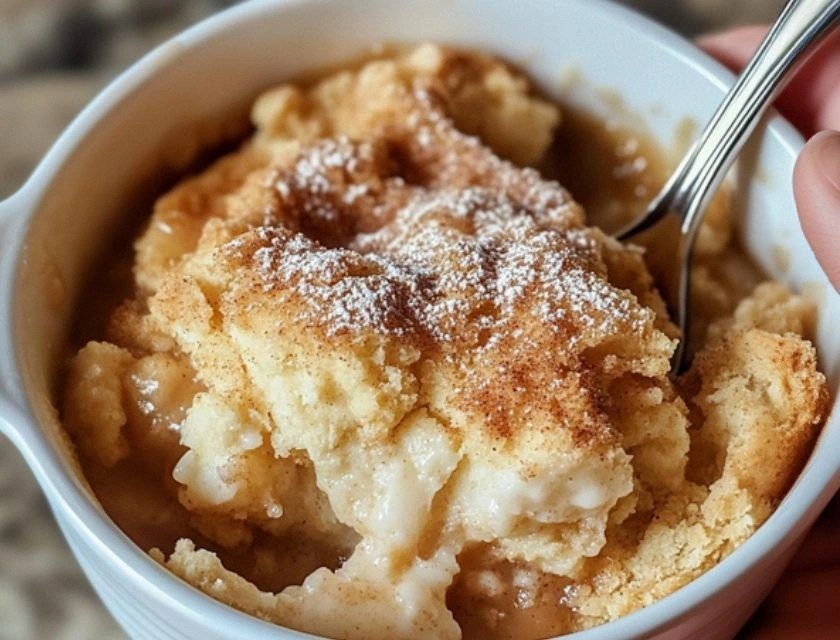
- Remove from the oven and let it rest for exactly five minutes. This isn't just for safety — it's crucial for the sauce to thicken properly. The cobbler will deflate slightly, and that's perfect. The top should have these beautiful cracks where the sugar has caramelized, creating a texture that's shatteringly crisp on top but gives way to molten, cinnamon-laced cake underneath. If you've done it right, you should see thick, glossy sauce bubbling up through the cracks.
- Serve warm, ideally with a scoop of vanilla ice cream that melts into all the nooks and crannies. The contrast between the warm, spicy cobbler and the cold, creamy ice cream is what dessert dreams are made of. Don't wait too long — this is best enjoyed fresh from the oven when the textural contrast is at its peak. And now the fun part — grab a big spoon and dig in, making sure to get some of that sauce from the bottom with each bite.
That's it — you did it. But hold on, I've got a few more tricks that'll take this to another level...
Insider Tricks for Flawless Results
The Temperature Rule Nobody Follows
Room temperature ingredients aren't just a suggestion — they're the difference between a smooth, evenly textured cobbler and one that's riddled with lumps and bakes unevenly. Take everything out of the fridge at least an hour before you start. Yes, even the eggs. Cold eggs don't incorporate smoothly and can cause your butter to seize up, creating pockets of solidified fat instead of that gorgeous, even sauce layer we're after.
But here's the twist — while your ingredients should be room temp, your baking dish should be hot. That hot butter in a warm dish creates the perfect environment for the sauce to form underneath while the top bakes to golden perfection. It's like giving your cobbler a head start on greatness. A friend tried skipping this step once — let's just say it didn't end well.
Why Your Nose Knows Best
Don't rely solely on the timer — your nose is actually one of the best tools for knowing when this cobbler is done. When it's perfectly baked, your kitchen will smell like a cinnamon roll factory exploded in the best possible way. The aroma shifts from raw flour and sugar to this deep, caramelized, almost nutty fragrance that's impossible to describe but unmistakable once you've experienced it.
Visual cues matter too — you're looking for deep golden-brown edges that have pulled slightly away from the dish, and a center that's set but still has a gentle jiggle when you shake the pan. The top should be crackly and slightly domed, with little pools of glossy sauce bubbling up around the edges. Trust your instincts here — if it smells done and looks done, it probably is.
The 5-Minute Rest That Changes Everything
I'll be honest — I ate half the batch before anyone else got to try it because I couldn't wait for that crucial five-minute resting period. But here's why you absolutely must: the sauce needs time to thicken and the flavors need a moment to meld. During those five minutes, magic happens. The residual heat continues cooking the center just enough, while the sauce transforms from watery to perfectly spoon-coating.
Cover it loosely with foil during the rest to keep it warm, but don't seal it completely — you want to preserve that gorgeous crackly top. If you wait longer than five minutes, no worries — just warm it in a 300°F oven for a few minutes before serving. But honestly, good luck waiting that long. The aroma alone has been known to cause spontaneous kitchen dancing.
Creative Twists and Variations
This recipe is a playground. Here are some of my favorite ways to switch things up:
Apple Pie Snickerdoodle Cobbler
Fold in two cups of diced apples (Granny Smith or Honeycrisp work best) between the batter and sugar layer. The apples soften into tender, jammy pockets that complement the cinnamon perfectly. Add a pinch of nutmeg and swap the vanilla for maple extract. The result tastes like someone merged the best apple pie with a snickerdoodle cookie, and you'll get requests for the recipe every single time.
Salted Caramel Dream
Drizzle homemade caramel sauce over the top during the last five minutes of baking, then sprinkle with flaky sea salt. The caramel pools in the cracks of the sugar crust, creating these incredible pockets of gooey sweetness. Use Maldon salt for the best texture — those pyramid-shaped crystals add the perfect crunch and burst of salinity to balance all that sweetness.
Chocolate Lover's Version
Add 1/2 cup of Dutch-processed cocoa powder to the flour mixture and fold in a cup of dark chocolate chips. The chocolate deepens the flavor profile, creating this sophisticated dessert that tastes like a cinnamon-spiced brownie met a lava cake. Use good quality chocolate — life's too short for cheap cocoa powder.
Pumpkin Spice Remix
Perfect for fall, replace half the buttermilk with pumpkin puree and add a teaspoon of pumpkin pie spice. The pumpkin adds moisture and creates this gorgeous orange hue that screams autumn. Top with candied pecans for crunch and serve with cinnamon ice cream. If you've ever struggled with getting pumpkin desserts right, you're not alone — and I've got the fix.
Tropical Twist
Add 1/2 cup of toasted coconut to the batter and replace the vanilla with coconut extract. Serve with grilled pineapple and coconut ice cream. The tropical flavors play surprisingly well with the cinnamon, creating this beach-meets-autumn vibe that's perfect for summer dinner parties.
Espresso Mocha
Dissolve two tablespoons of instant espresso powder in the hot water before pouring it over. The coffee enhances the chocolate notes in the brown sugar and creates this sophisticated flavor profile that coffee addicts will worship. Add chocolate-covered espresso beans on top for the perfect finishing touch.
Storing and Bringing It Back to Life
Fridge Storage
Leftovers (if you somehow have any) will keep for up to five days in an airtight container in the refrigerator. The texture will change — the top will lose some of its crispness, but the flavors actually deepen and improve. Store it in the baking dish covered tightly with plastic wrap, or transfer to a container with a tight-fitting lid. Don't store it at room temperature — the dairy content makes it a food safety risk.
To reheat, place individual portions in the microwave for 30-45 seconds, or warm the whole thing in a 300°F oven for 15-20 minutes. Add a tiny splash of water before reheating — it steams back to perfection. The microwave is faster but the oven gives you back some of that fresh-baked texture. If you went with the oven method, cover it loosely with foil to prevent over-browning.
Freezer Friendly
This cobbler freezes beautifully for up to three months. Let it cool completely, then wrap individual portions in plastic wrap and foil, or freeze the whole thing in a freezer-safe container. Thaw overnight in the refrigerator, then reheat as above. The texture won't be quite as perfect as fresh, but it's still miles better than most desserts you could make from scratch.
Pro tip: freeze it in the baking dish if it's freezer-safe, then you can reheat it directly from frozen. Just add 10-15 minutes to the reheating time and cover it with foil for the first half to prevent over-browning. I've served this to guests who had no idea it had been frozen — it reheats that well.
Best Reheating Method
The oven is your friend here — 300°F for 15-20 minutes brings back that fresh-baked magic. Cover with foil for the first 10 minutes, then uncover to crisp up the top. If you're in a hurry, the microwave works, but add a small pat of butter on top before heating to restore some richness. The key is not to overheat it — warm, not hot, is what you're after.
For the ultimate experience, reheat individual portions in ramekins and top with fresh ice cream. It's like having individual lava cakes, but snickerdoodle style. The contrast between the warm, spicy cobbler and the cold, creamy ice cream is what dessert dreams are made of.