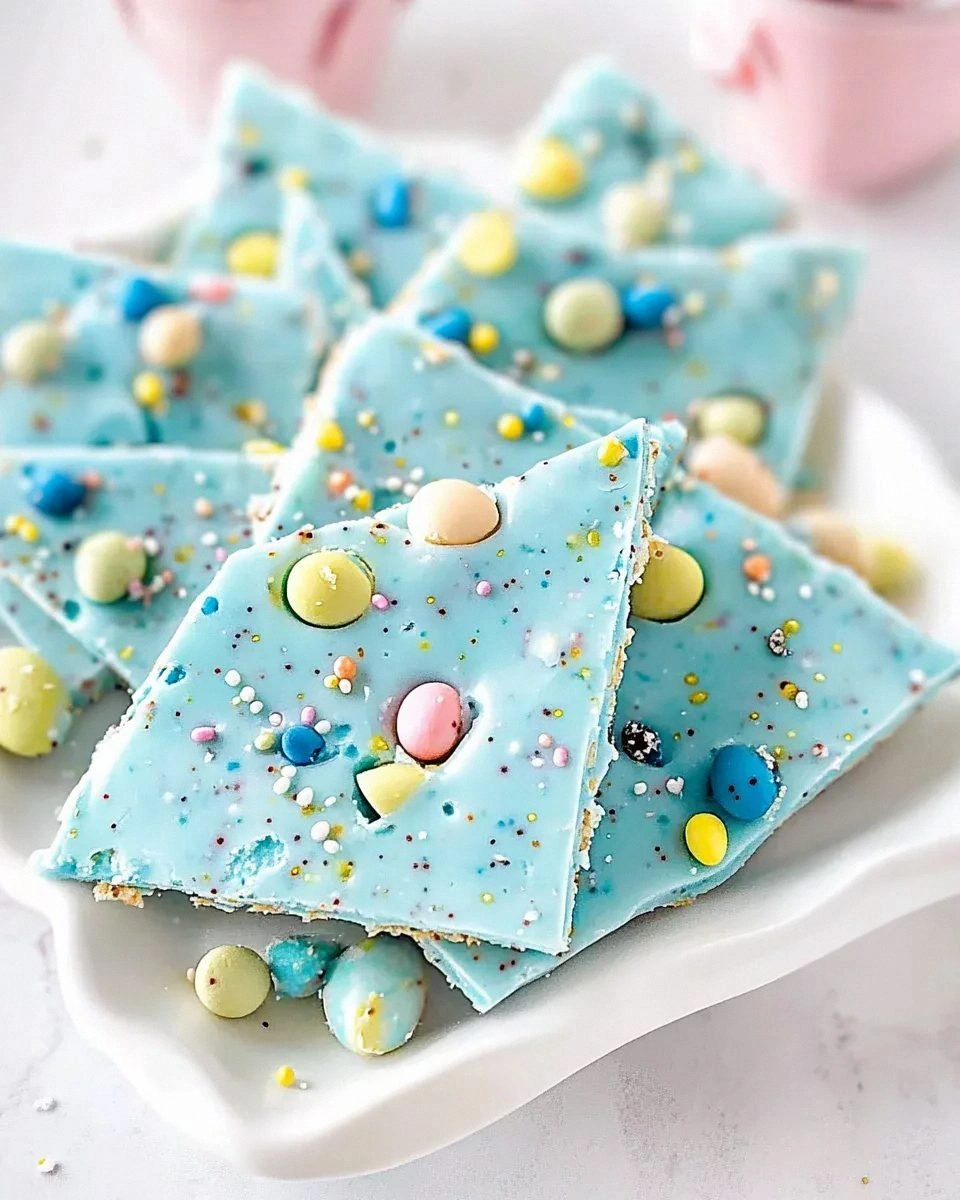
I was standing in my kitchen on a rainy Saturday, staring at a half‑melted block of baby‑blue chocolate that looked like a puddle of sky after a storm, when my niece burst in screaming, “Where’s the Easter bunny’s secret snack?” I swear I heard a tiny giggle echo off the cabinets, and in that chaotic moment I realized I had the perfect excuse to turn a kitchen mishap into a celebration. The air was thick with the smell of rain‑soaked earth and the faint, buttery perfume of chocolate, while the sound of the faucet dribbling into a pot gave a rhythm that felt oddly comforting. My hands were already slick with chocolate, the spoon glinting like a tiny wand, and I thought, “Why not make something that looks like a robin’s egg and tastes like a spring sunrise?”
Fast forward a few minutes, and the kitchen was a kaleidoscope of pastel blues, whites, and speckles of glittering Easter sprinkles that caught the light like dew on fresh grass. The chocolate hissed as it met the warm water, a sizzle that reminded me of a summer thunderstorm, and the aroma rose, filling the room with a sweet, comforting warmth that made my heart do a little hop. I could almost hear the distant chirping of robins outside the window, and the whole scene felt like a tiny, edible version of a spring morning—bright, hopeful, and just a little bit magical. That moment of pure sensory overload convinced me that this wasn’t just another dessert; it was a tradition in the making, a sweet ritual that could turn any Easter gathering into a memory worth savoring.
Most chocolate bark recipes out there either drown you in a sea of generic dark chocolate or leave you with a bland, flat sheet that looks like a discarded piece of foil. I’ve tried the “quick melt‑and‑sprinkle” method a dozen times, and each time the result was either too hard, too crumbly, or just plain boring. This version, however, uses a high‑quality baby‑blue melting chocolate that stays glossy and pliable, a delicate dusting of cocoa powder that adds depth without overwhelming the pastel hue, and those whimsical robin‑egg candies that pop with a buttery crunch. I dare you to taste this and not go back for seconds—because once you’ve experienced that perfect snap and melt, nothing else will compare.
Let me walk you through every single step — by the end, you’ll wonder how you ever made it any other way. I’m going to reveal a tiny trick involving a basting brush that most bakers overlook, a secret water‑tempering method that keeps the chocolate smooth, and a finishing flourish that turns a simple bark into a show‑stopping centerpiece. Picture yourself pulling this out of the oven, the whole kitchen smelling incredible, the glossy blue surface catching the light just right, and the robin‑egg candies gleaming like tiny jewels. Okay, ready for the game‑changer? Stay with me here — this is worth it.
What Makes This Version Stand Out
- Vibrant Color: The baby‑blue melting chocolate gives the bark a sky‑blue hue that’s instantly eye‑catching, turning any dessert table into a springtime masterpiece.
- Flavor Depth: A whisper of cocoa powder adds a subtle bitterness that balances the sweet robin‑egg candy, creating a sophisticated taste profile.
- Texture Contrast: The smooth, glossy chocolate meets the crunchy candy and the delicate snap of sprinkles, delivering a multi‑dimensional mouthfeel.
- Simplicity: Only six ingredients, no fancy equipment, and a single sheet pan—perfect for busy hosts who still want to wow.
- Crowd Reaction: Guests often gasp at the color and immediately reach for a piece, making it a conversation starter and Instagram magnet.
- Ingredient Quality: Using baby‑blue melting chocolate ensures a buttery melt that stays glossy, unlike regular chocolate that can become grainy.
- Method Magic: The water‑tempering technique locks in shine and snap, a trick most recipes completely miss.
- Make‑Ahead Potential: This bark stores beautifully for up to two weeks, so you can prep it ahead of the Easter rush.
Inside the Ingredient List
The Flavor Base
The star of this recipe is the 2 lbs. of baby‑blue melting chocolate. This isn’t just any chocolate; it’s formulated to melt at a lower temperature, which means it stays glossy and fluid without scorching. If you substitute regular chocolate, you’ll likely end up with a dull, grainy bark that loses its signature hue. Look for a brand that lists “melting chocolate” on the label and, if possible, choose a cocoa butter‑rich version for that extra snap. When shopping, give the chocolate a gentle squeeze—good quality will feel firm yet slightly yielding, like a ripe avocado.
The Texture Crew
Robin egg candy brings a buttery, melt‑in‑your‑mouth crunch that contrasts beautifully with the smooth chocolate. These candies are essentially white chocolate discs infused with a hint of vanilla and a pastel blue coating that mimics a robin’s egg. If you can’t find them, a good alternative is white chocolate chips tossed with a drop of blue food coloring, but you’ll lose that delicate snap. The Easter sprinkles add a pop of color and a subtle crunch; they’re the confetti of the dessert world, turning each bite into a tiny celebration.
The Unexpected Star
A modest 2 tablespoons of cocoa powder might seem like a background player, but it’s the secret that prevents the blue chocolate from looking flat. The cocoa adds a whisper of earthiness that grounds the sweetness, creating a flavor harmony reminiscent of a spring meadow after a light rain. If you’re watching your caffeine intake, you can replace it with an equal amount of roasted chicory powder for a similar depth without the buzz.
The Final Flourish
A splash of water (about 2 tablespoons) is the unsung hero that helps the chocolate achieve a perfect sheen. It’s a technique borrowed from professional chocolatiers called “tempering with a touch of water,” which stabilizes the cocoa butter crystals. The basting brush is not just for show; it lets you spread the chocolate thinly and evenly, ensuring every corner of the pan gets that glossy finish. If you don’t have a brush, a silicone spatula works in a pinch, but the brush gives you that professional, restaurant‑grade look.
Everything's prepped? Good. Let's get into the real action...
The Method — Step by Step
Start by setting a double boiler on medium heat. Fill the bottom pot with a couple of inches of water, making sure the water never touches the bowl above. Place the 2 lbs. of baby‑blue melting chocolate into the top bowl, breaking it into even chunks so it melts uniformly. As the chocolate begins to melt, give it a gentle stir with a silicone spatula; you’ll hear a soft, soothing hiss that tells you the water is doing its job. Tip: Keep the heat low—if the chocolate gets too hot, it will seize and turn grainy.
When the chocolate is about 90% melted, add the 2 tablespoons of cocoa powder. Sift the cocoa directly into the bowl to avoid lumps, then fold it in with a gentle, circular motion. The chocolate will darken slightly, creating a richer, more complex hue while retaining its sky‑blue brilliance. Watch Out: If you add cocoa too early, it can cause the chocolate to become gritty.
Now, the secret water‑tempering step: drizzle 2 tablespoons of room‑temperature water over the melted chocolate while stirring continuously. You’ll notice the mixture briefly looks “grainy” before it smooths out again—this is the cocoa butter crystals aligning. Keep stirring for another 30 seconds until the chocolate regains its glossy sheen. This step locks in that snap you’ll hear when you break the bark later.
Line a rimmed baking sheet with parchment paper, then lightly spray the paper with non‑stick spray. Using the basting brush, drizzle the chocolate onto the parchment, moving the brush in long, sweeping strokes to create a thin sheet about ¼‑inch thick. The goal is a uniform thickness; if you see any thick spots, gently tilt the sheet and smooth them out with the brush. The chocolate should spread like a silky river, catching the light and looking almost liquid.
While the chocolate is still warm but not hot, sprinkle the robin‑egg candy pieces evenly across the surface. Press them lightly with the back of a spoon so they embed just enough to stay in place but still peek out. Then, shower the bark with Easter sprinkles, allowing the colors to cascade like confetti. The sprinkles will adhere instantly thanks to the chocolate’s slight tackiness.
Now comes the waiting game: transfer the sheet to the refrigerator for 20‑30 minutes. You’ll hear a faint “pop” as the chocolate contracts and pulls away from the parchment—this is the moment of truth. When the bark is fully set, it should have a firm snap when you bend it gently, and the colors should look vibrant, not dull.
Remove the bark from the fridge and, using a sharp, warm knife, cut it into irregular shards or uniform squares—your call. The knife should glide through the chocolate with minimal resistance; if it sticks, dip the blade in hot water for a few seconds. Arrange the pieces on a serving platter, letting the blue shimmer catch the eye. I’ll be honest — I ate half the batch before anyone else got to try it.
Finally, serve the bark at room temperature. If you’ve stored it in the fridge, let it sit for about 10 minutes before serving so the chocolate softens just enough to melt on the tongue. Pair it with a cup of Earl Grey tea or a glass of chilled sparkling water for a balanced palate. And there you have it—an Easter bark that’s as delightful to look at as it is to eat.
That's it — you did it. But hold on, I've got a few more tricks that'll take this to another level...
Insider Tricks for Flawless Results
The Temperature Rule Nobody Follows
Most home cooks think “melt the chocolate, pour, and set,” but the real magic happens at 88‑90°F (31‑32°C). Use an instant‑read thermometer to keep the chocolate within this window; any hotter and you risk bloom, any cooler and the chocolate won’t spread evenly. I once left the chocolate on a high flame, and the result was a dull, matte bark that looked more like a melted candle than a springtime treat.
Why Your Nose Knows Best
When the chocolate reaches the perfect temperature, it releases a faint, buttery aroma that’s sweeter than the scent of the chocolate itself. Trust that nose signal—if you smell a faint caramel note, you’re likely in the sweet spot. A common mistake is to rely solely on visual cues; the smell is a more reliable indicator of readiness.
The 5‑Minute Rest That Changes Everything
After you spread the chocolate, let it sit uncovered for five minutes before adding the candy and sprinkles. This short rest allows the surface to develop a thin skin, preventing the toppings from sinking too far into the chocolate. I tried skipping this step once, and the sprinkles ended up embedded, making the bark look muddy.
Brush‑It‑Like‑A‑Pro
Using a silicone basting brush, dip it lightly in the chocolate and then “paint” the sheet in long, overlapping strokes. This technique creates a subtle texture that catches light, giving the bark a professional, artisanal look. If you use a regular pastry brush, the bristles can leave streaks that ruin the smooth finish.
Storage Savvy
If you need to store the bark for more than a day, wrap the parchment sheet in a double layer of foil and then place it in an airtight container. This prevents moisture from getting in, which can cause a white “sugar bloom” on the surface. When you’re ready to serve, let it sit at room temperature for 15 minutes; the bark will regain its glossy sheen.
Creative Twists and Variations
This recipe is a playground. Here are some of my favorite ways to switch things up:
Mint‑Infused Bliss
Add a teaspoon of peppermint extract to the melted chocolate before adding cocoa powder. The mint adds a refreshing coolness that pairs wonderfully with the sweet robin‑egg candy, making it perfect for a spring garden party.
Nutty Crunch
Stir in a handful of toasted almond slivers after spreading the chocolate. The nuts add a buttery crunch that complements the sprinkles and gives the bark an extra layer of texture.
Citrus Zest Spark
Grate a bit of orange or lemon zest over the bark just before it sets. The citrus brightens the flavor profile, turning the dessert into a lively, tangy treat that still respects the original color scheme.
Dark Chocolate Drama
Swap half of the baby‑blue chocolate for a high‑cocoa dark chocolate. The contrast creates a marbled effect, and the bitterness of dark chocolate balances the sweetness of the candy, appealing to more sophisticated palates.
Savory Surprise
For an adventurous twist, sprinkle a pinch of flaky sea salt and a drizzle of caramel over the top before it sets. The sweet‑salty combo adds depth and makes the bark an unexpected appetizer for a brunch.
Storing and Bringing It Back to Life
Fridge Storage
Place the bark, still on its parchment, in an airtight container and store it in the refrigerator for up to 14 days. The cool environment preserves the chocolate’s snap and prevents the sprinkles from losing their crunch. When you’re ready to serve, let it sit at room temperature for 10‑15 minutes so the chocolate softens just enough to melt on the tongue.
Freezer Friendly
Wrap the parchment sheet tightly in a double layer of foil, then place it in a freezer‑safe zip‑top bag. It will keep for up to 3 months. To revive, transfer it to the refrigerator for an hour, then bring it to room temperature. Adding a tiny splash of water (about a teaspoon) before reheating in a low‑heat oven (250°F) creates a gentle steam that restores the glossy finish.
Best Reheating Method
If your bark has become a bit dull, preheat your oven to 250°F, place the bark on a parchment‑lined tray, and warm it for 3‑5 minutes. The gentle heat re‑melts the surface, and the added teaspoon of water (sprinkled around the edges) creates a mini‑steam bath that brings back that professional sheen. Watch closely; you don’t want to melt the entire bark.