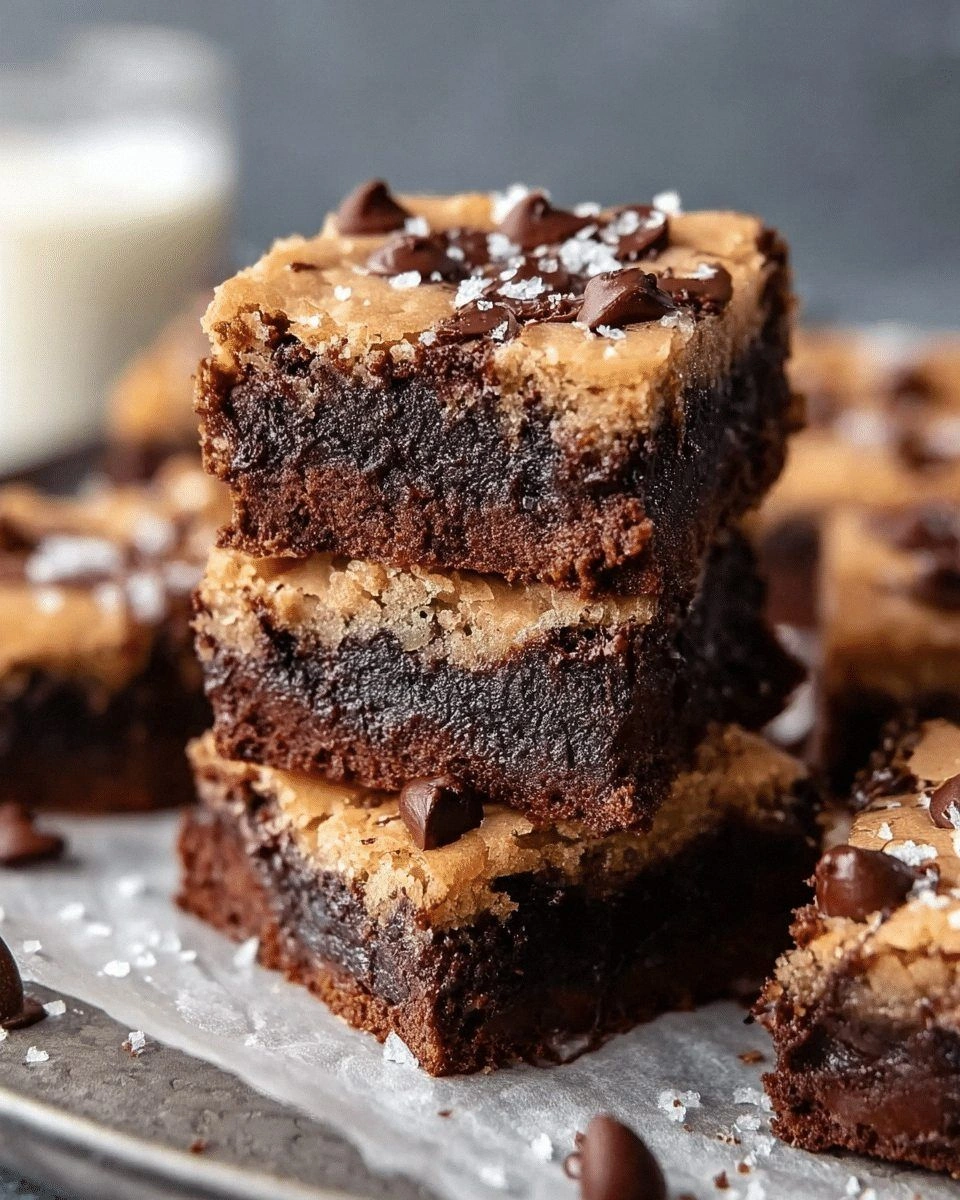
Picture this: I’m standing in a cramped apartment kitchen, the oven preheated, and a friend’s birthday party looming. The last thing I want is a bland, half‑baked dessert that looks like a sad, soggy cookie. So I dove headfirst into the world of brookies—those glorious hybrids of brownies and cookies—and decided to double down, literally. I’m talking two layers: a fudgy brownie base, a chewy cookie top, and a drizzle of silky vegan chocolate that melts in your mouth like a dream. This isn’t just a sweet treat; it’s a culinary dare, a taste‑testing challenge that I promise you can’t resist.
The first time I tried this version, the kitchen exploded with a symphony of aromas: the deep, chocolatey scent of cocoa powder, the buttery perfume of melted vegan butter, and the subtle nutty undertone of almond milk. The sound of the batter swirling in the bowl was a comforting hum, like a lullaby for the impatient. When I slid the pan into the oven, the air filled with the promise of something golden and irresistible. The sizzle that followed was the soundtrack of success—an audible cue that I was on the right track. And that moment when you pull the tray out, the steam curling like a cloud of chocolatey mist—well, that’s the kind of sensory snapshot that will stay with you forever.
What makes this recipe stand out is that it’s not just a simple “mix and bake” formula. It’s a carefully engineered balance of texture and flavor that delivers a cookie’s chewy bite and brownie’s fudgy depth in one bite. The secret lies in the double‑layer approach, the choice of vegan butter over coconut oil for a richer mouthfeel, and the subtle use of peanut butter to bind the layers together. I’ve tweaked the ratios so that the top cookie layer is crisp yet not brittle, while the bottom brownie layer remains moist enough to melt on the tongue. The result? A dessert that feels like a guilty pleasure but is entirely plant‑based—perfect for the vegan crowd or anyone craving a healthier twist.
I dare you to taste this and not go back for seconds. Trust me, the first bite will leave you craving more, and the second will confirm you’ve discovered the best version of brookies ever. If you’ve ever struggled with achieving that perfect balance between chewy and fudgy, you’re not alone—this recipe is the fix you’ve been waiting for. Picture yourself pulling this out of the oven, the whole kitchen smelling incredible, and watching your friends’ eyes widen as they see the double‑layered masterpiece. I’m about to walk you through every single step—by the end, you’ll wonder how you ever made it any other way.
What Makes This Version Stand Out
- Texture: The dual layers create a mouth‑watering contrast—crisp cookie edges meet a silky, fudgy brownie center.
- Flavor: A generous splash of vanilla and a dash of sea salt elevate the chocolate, giving depth without overpowering.
- Simplicity: The recipe uses pantry staples—no obscure ingredients or fancy equipment required.
- Uniqueness: The peanut‑butter swirl not only adds protein but also a subtle nutty undertone that sets it apart.
- Crowd‑Pleaser: Whether at a birthday party or a casual gathering, the double‑layer effect makes it a show‑stopper.
- Ingredient Quality: We rely on high‑quality cocoa powder and fair‑trade chocolate chips to ensure a rich, authentic taste.
- Make‑Ahead: The entire batch can be assembled, frozen, and baked later—ideal for busy schedules.
- Nutrition: Packed with plant‑based protein and healthy fats, it satisfies sweet cravings without the guilt.
Alright, let’s break down exactly what goes into this masterpiece…
Inside the Ingredient List
The Flavor Base
Cocoa powder is the star of the show, providing that deep, bittersweet backbone that defines any chocolate dessert. Using a high‑quality, unsweetened cocoa ensures the flavor stays robust without an overly sweet finish. If you’re feeling adventurous, try a dark chocolate‑infused cocoa for an extra kick.
Almond milk acts as the liquid binder, delivering a subtle nutty nuance while keeping the batter silky. It’s also a great way to keep the recipe dairy‑free without sacrificing moisture. If you prefer a richer taste, swap it with oat milk or a splash of coconut milk.
Vanilla extract is the silent hero that rounds out the chocolatey richness, adding warmth and depth. A dash of sea salt brings out the chocolate’s sweetness, creating a balanced flavor profile that’s both indulgent and sophisticated.
The Texture Crew
All‑purpose flour provides structure, ensuring the brownie base holds its shape while the cookie layer remains chewy. If you want a gluten‑free version, replace it with a 1:1 gluten‑free blend, but keep an eye on the moisture content.
Granulated sugar sweetens the batter and contributes to the caramelization on the cookie top. For a lower‑glycemic option, try a blend of coconut sugar and maple syrup, adjusting the total liquid slightly to maintain consistency.
Baking powder and baking soda work together to lift the batter, preventing it from sinking or becoming dense. They’re essential for that airy, cake‑like crumb in the brownie layer, giving it a tender bite.
The Unexpected Star
Peanut butter isn’t just a flavor enhancer—it’s a binding agent that creates a subtle swirl between the layers, adding a protein punch and a creamy texture that contrasts beautifully with the crunchy cookie edges. If you’re allergic, use sunflower seed butter for a similar effect.
Shredded coconut brings a hint of tropical sweetness and a slight crunch, elevating the overall mouthfeel. It also adds a subtle caramelized flavor when baked, giving the top a golden, slightly crisp finish.
The Final Flourish
Chocolate chips are the ultimate indulgence, melting into pockets of gooey chocolate that burst with each bite. Using a mix of dark and milk chips can add complexity, creating a layered flavor profile that keeps you guessing.
Optional walnuts or almonds provide crunch and a nutty aroma, complementing the peanut butter swirl. They’re a great way to add texture and a bit of healthy fat, making each bite a little more satisfying.
Everything’s prepped? Good. Let’s get into the real action…
The Method — Step by Step
- Preheat your oven to 350°F (175°C) and line a 9x13 inch baking pan with parchment paper. This ensures the brookies release easily and stay intact. While the oven warms, gather all your ingredients and have a clean, dry mixing bowl ready. The anticipation of the aroma building in the kitchen is half the joy.
- In a large bowl, whisk together the flour, cocoa powder, baking powder, baking soda, and salt. The dry mix should be light and airy, indicating the leavening agents are ready to work. A quick sift can help break up any clumps, ensuring an even batter. This step is crucial for a consistent texture across both layers.
- In a separate saucepan, combine the melted vegan butter, melted coconut oil, and almond milk. Warm the mixture over low heat until it’s smooth and glossy. The blend of fats will give the brownie base its fudgy richness. Keep the heat low to prevent the milk from scorching.
- Add the sugar and vanilla extract to the wet mixture, whisking until the sugar dissolves completely. The batter should look glossy and slightly thickened. This is the moment where the sweet aroma begins to dance in the kitchen, signaling that you’re close to greatness. A well‑mixed wet blend is the foundation of a moist, tender brownie.
- Pour the wet mixture into the dry ingredients and fold gently until just combined. Over‑mixing can result in a dense brownie layer; aim for a few streaks of flour. The batter should be thick but pourable, like a thick cake batter. This gentle folding preserves the air pockets needed for that light, airy crumb.
- Transfer half of the batter to the prepared pan, smoothing the top with a spatula. The batter should spread evenly, covering the base of the pan. This will form the fudgy brownie foundation. The edges should be slightly raised to prevent spilling during the next steps.
- Spoon the peanut butter into the center of the brownie layer, then swirl it gently with a knife or toothpick. The peanut butter should create a subtle ripple effect, adding a protein boost and a creamy texture. This swirl not only looks impressive but also ensures every bite contains that rich peanut flavor.
- Fold the remaining batter over the peanut butter swirl, covering it completely. This creates the double‑layer effect: the brownie base, the peanut butter swirl, and the cookie top. The batter should be level, so the cookies bake evenly.
- Sprinkle the chocolate chips evenly over the top, then press them lightly into the batter. The chips will melt into pockets of molten chocolate, adding a delightful surprise with each bite. The chips should be distributed so that each slice contains a few, but not too many, to avoid overwhelming the flavor.
- Bake for 30–35 minutes, or until a toothpick inserted near the center comes out with a few moist crumbs. The top should be golden brown and slightly crisp, while the center remains soft. Keep an eye on the edges—they should pull away from the pan, signaling readiness.
- Remove from the oven and let the brookies cool in the pan for 10 minutes before transferring to a wire rack. This cooling period allows the layers to set, preventing them from breaking apart. The aroma that fills the kitchen at this stage is a promise of the indulgent experience to come.
- Once completely cooled, cut into squares or bars. Serve immediately, or wrap in parchment for a portable treat. The first bite should be a symphony of textures: a crisp cookie edge, a fudgy brownie center, and a burst of chocolate. If you’re a fan of a gooey center, keep the interior slightly warm.
That’s it—you did it. But hold on, I’ve got a few more tricks that will take this to another level…
Insider Tricks for Flawless Results
The Temperature Rule Nobody Follows
Many bakers think a higher oven temperature means a crisper top, but for brookies, a steady 350°F is essential. The lower temperature allows the chocolate chips to melt slowly, creating those coveted gooey pockets. If you crank the heat up to 375°F, you risk burning the edges before the center sets. Keep the oven rack in the middle to ensure even heat distribution.
Why Your Nose Knows Best
Your nose is your best judge of doneness. When the aroma shifts from sweet chocolate to a slightly nutty, toasted scent, it’s time to pull them out. The scent of caramelizing sugar is a clear indicator that the cookie top has reached the perfect crispness. Trust your senses; the oven dial is just a tool.
The 5-Minute Rest That Changes Everything
Letting the brookies rest for 5 minutes after baking is more than a courtesy; it allows the layers to set, preventing them from breaking apart when you cut. This short pause also lets the chocolate chips solidify just enough to hold their shape, giving each bite a satisfying snap. Skip this step and you’ll end up with a mess of melted chocolate and broken cookie pieces.
The Secret to a Crispy Edge
Sprinkling a pinch of fine sea salt on the top before baking enhances the crunch. The salt draws out moisture, allowing the cookie layer to crisp up without becoming hard. It also brightens the chocolate flavor, making each bite more complex.
The Final Flourish
After baking, drizzle a thin line of vegan chocolate ganache over the top for an elegant finish. The ganache should be glossy, not too thick. This not only adds a glossy look but also introduces a silky texture that complements the chewy and fudgy layers.
Creative Twists and Variations
Salted Caramel Brookies
Swap the almond milk for a splash of salted caramel sauce and add a drizzle of caramel over the top before baking. The caramel will seep into the brownie layer, creating a sweet‑salty explosion. This variation is perfect for those who love a buttery, caramel‑laden treat.
Minty Green Tea Edition
Add a teaspoon of matcha powder to the dry mix and a few drops of peppermint extract to the wet mix. The green tea adds a subtle earthy note, while the mint provides a refreshing finish. This version is a great palate cleanser after a heavy meal.
Spiced Chai Brookies
Infuse the batter with a pinch of ground cinnamon, cardamom, and ginger. Replace the vanilla with a splash of chai concentrate for a warm, aromatic flavor profile. The spices add depth and make the brookies feel like a cozy winter treat.
Nutty Trail Mix Variation
Fold in a cup of mixed nuts—almonds, cashews, and pecans—into the top layer before adding the chocolate chips. The nuts add crunch and a nutty aroma that pairs wonderfully with the chocolate. This version is ideal for those who love a bit of texture in every bite.
Berry‑Burst Brookies
Stir in a cup of frozen mixed berries into the brownie batter before baking. The berries release a burst of juice, creating a moist, fruity center. The contrast between the sweet berries and the chocolate creates a delightful flavor harmony.
Coconut‑Lime Twist
Replace the shredded coconut with toasted coconut flakes and add a splash of lime zest to the batter. The citrus brightens the chocolate, while the coconut adds a tropical crunch. This variation feels like a beach‑side dessert, even in winter.
Storing and Bringing It Back to Life
Fridge Storage
Store the cooled brookies in an airtight container at room temperature for up to 3 days. If you prefer a slightly firmer bite, refrigerate them for 24 hours before serving. The fridge helps the chocolate set firmly, making each slice crisp on the outside.
Freezer Friendly
Wrap each piece individually in parchment and place them in a freezer bag. They stay fresh for up to 3 months. When you’re ready, let them thaw at room temperature for 30 minutes before serving to restore their original texture.
Best Reheating Method
Reheat the brookies in a preheated oven at 300°F for 5 minutes. The gentle heat warms the chocolate without over‑baking the cookie layer. Add a tiny splash of water before reheating to create steam, which keeps the brownie center moist and prevents it from drying out.