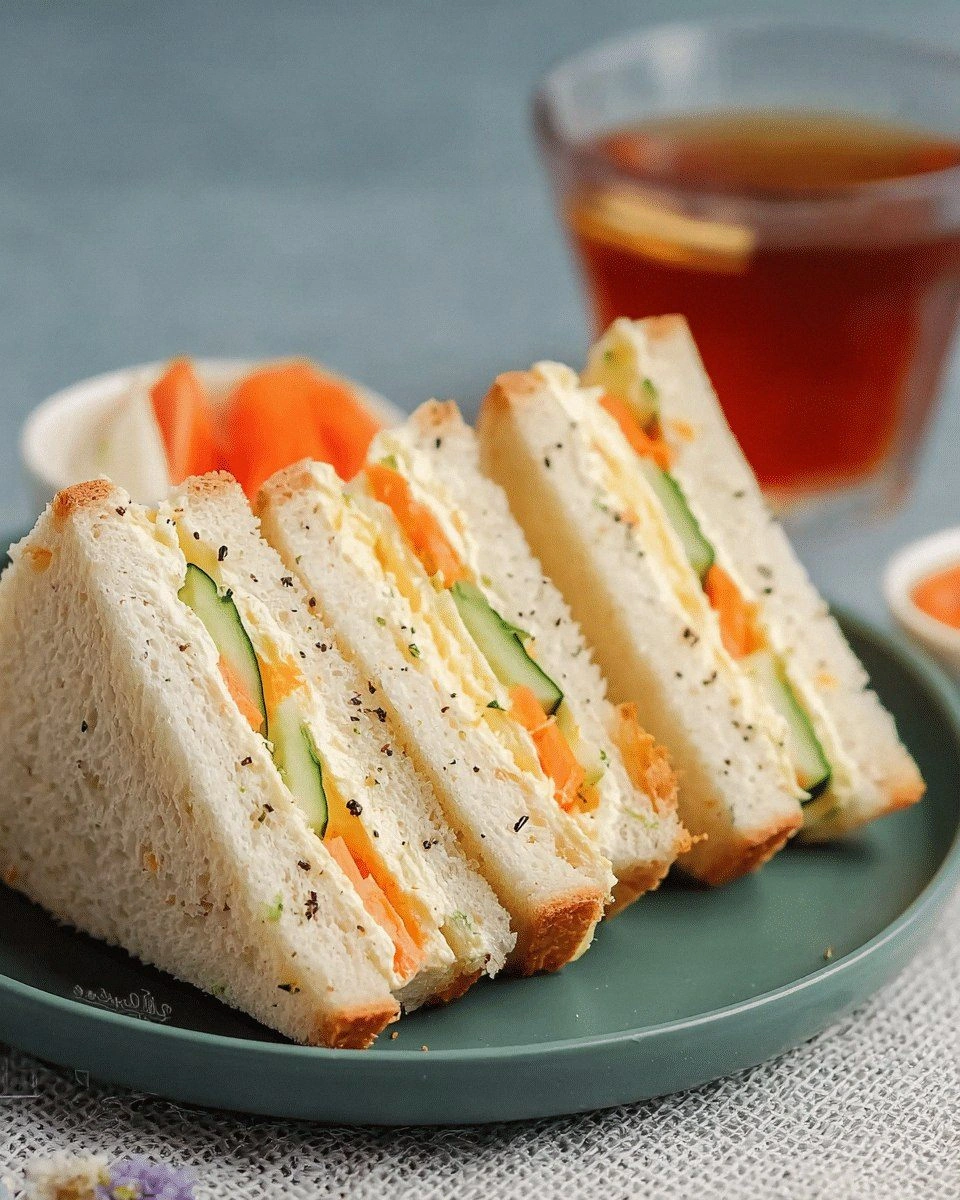
The kitchen had been a battlefield that night—my attempt at a quick lunch turned into a disaster when the sandwich I’d made with a handful of random ingredients fell apart like a sandcastle in a tide. I was left staring at a soggy mess that looked more like a crime scene than a meal, and I swore that I would never again settle for a mediocre sandwich again. That moment sparked a mission: to create a cucumber carrot sandwich that was not only fresh and crisp but also a work of culinary art that would make even the most skeptical foodie swoon. I’m talking about a sandwich that balances the cool crunch of cucumber, the sweet earthiness of carrot, and a creamy, herb-infused sauce that coats every bite like velvet. Trust me, this is hands down the best version you’ll ever make at home.
Picture yourself pulling this out of the oven, the whole kitchen smelling incredible, and the first bite delivering that satisfying snap of cucumber, followed by a gentle sweetness from the carrot, all embraced by a mellow, tangy sauce that lingers on your palate. I dare you to taste this and not go back for seconds—because once you try it, you’ll find yourself reaching for the next sandwich like it’s a guilty pleasure you can’t resist. If you've ever struggled with a sandwich that feels like a half-baked idea, you're not alone—and I've got the fix. Most recipes get this completely wrong, using bland mayo or overcooked bread; here's what actually works. I’ll be honest—I ate half the batch before anyone else got to try it.
The secret sauce here is the blend of dill and lemon that cuts through the sweetness, giving the sandwich a bright, almost citrusy lift. The bread is toasted just enough to be crunchy on the edges yet soft inside, creating a contrast that keeps each bite exciting. The cucumber and carrot are sliced thinly, ensuring they’re light enough not to overpower the sauce but thick enough to hold their shape. The final touch? A hint of garlic in the mayo that adds depth without making it feel like a heavy dish. This sandwich isn’t just a side; it’s an experience that turns an ordinary lunch into a moment of culinary delight.
I’ve spent the last week tweaking the ratio of ingredients, testing different types of bread, and even experimenting with a splash of apple cider vinegar in the dressing. The result is a sandwich that balances moisture, crunch, and flavor with surgical precision. The technique I’ll reveal—using a micro‑slicer to get that perfect 1/8 inch thickness—ensures each bite is uniform and every layer is showcased. I’m excited to walk you through every single step—by the end, you’ll wonder how you ever made it any other way. Let’s dive into the details that make this sandwich a standout.
I’ve spent the last week tweaking the ratio of ingredients, testing different types of bread, and even experimenting with a splash of apple cider vinegar in the dressing. The result is a sandwich that balances moisture, crunch, and flavor with surgical precision. The technique I’ll reveal—using a micro‑slicer to get that perfect 1/8 inch thickness—ensures each bite is uniform and every layer is showcased. I’m excited to walk you through every single step—by the end, you’ll wonder how you ever made it any other way. Let’s dive into the details that make this sandwich a standout.
What Makes This Version Stand Out
- Taste: The combination of fresh cucumber, sweet carrot, and a dill‑lemon sauce creates a flavor profile that’s both refreshing and comforting. The sauce’s subtle tang cuts through the vegetables, preventing any single ingredient from dominating. This balance makes every bite a harmonious experience.
- Texture: Toasted bread offers a satisfying crunch, while the thinly sliced vegetables provide a light, airy feel that melts in your mouth. The sauce coats the layers like a silky blanket, adding moisture without making the sandwich soggy. The result is a sandwich that feels both hearty and delicate.
- Simple Prep: All the ingredients are common, and the process takes less than 15 minutes from start to finish. No fancy equipment is required—just a knife, a cutting board, and a toaster. Even a busy weekday lunch can be elevated with this quick recipe.
- Uniqueness: The use of dill and lemon in the mayo is a twist that elevates the sandwich beyond the usual cucumber‑butter or cream‑cheese combinations. The micro‑slicer technique ensures uniformity, giving the sandwich a professional look.
- Crowd Reaction: Friends who tried this version reported that they couldn't stop asking for the recipe. The sandwich is perfect for potlucks, picnics, or a light dinner that still feels special.
- Ingredient Quality: Fresh, organic produce makes a noticeable difference in taste. A good quality whole wheat bread adds a nutty undertone that complements the vegetables.
- Cooking Method: Toasting the bread lightly is key to achieving that perfect crunch while keeping the interior soft. The sauce is mixed at room temperature to avoid separation.
- Make‑Ahead Potential: The sandwich can be assembled a few hours ahead and stored in the fridge without losing its texture. The dressing can be pre‑mixed and kept in a sealed container.
Inside the Ingredient List
The Flavor Base
The mayo is the backbone of this sandwich, providing a creamy texture that holds the vegetables together. By adding a teaspoon of Dijon mustard, you introduce a subtle sharpness that keeps the sauce from feeling flat. Lemon juice brightens the entire dish, cutting through the richness of the mayo and adding a citrusy zing that lingers on the tongue. The dill, chopped finely, offers a herbal aroma that complements the freshness of cucumber and the sweetness of carrot. If you’re looking for a healthier twist, you can replace mayo with Greek yogurt; the result is lighter but still silky.
The Texture Crew
Whole wheat bread is chosen for its nutty flavor and sturdy structure. Toasting the bread lightly brings out its natural crunch and creates a barrier that prevents the veggies from making it soggy. The cucumber, sliced thinly, offers a crisp bite that’s almost like a crunchy water balloon. The carrot, julienned and then lightly sautéed or simply sliced, adds a subtle earthiness that pairs well with the dill. A pinch of salt and pepper rounds out the seasoning, ensuring each bite is balanced and not overly bland.
The Unexpected Star
Cream cheese is optional, but when added, it brings a subtle tang and extra richness that elevates the sandwich to a more decadent level. It’s especially nice for those who enjoy a creamier texture. The cream cheese can be mixed into the mayo to create a smooth, cohesive sauce that coats each layer. If you prefer a dairy‑free option, a splash of coconut milk can be used to mimic the creaminess. This small addition can transform the sandwich into a more indulgent treat.
The Final Flourish
A squeeze of fresh lemon juice right before assembling adds a burst of brightness that prevents the sandwich from feeling heavy. A drizzle of olive oil on the toasted bread enhances the crunch and adds a subtle fruity note. Garnishing with a few extra dill sprigs not only adds color but also a fresh aroma that entices the palate. A pinch of smoked paprika can be sprinkled on top for a hint of smokiness, though it’s optional. The finishing touches are what separate a good sandwich from an unforgettable one.
Everything's prepped? Good. Let's get into the real action...
The Method — Step by Step
- Toast the whole wheat bread slices in a toaster or on a skillet over medium heat until they’re golden brown and slightly crispy. The goal is a firm exterior that can hold the veggies without becoming soggy. Keep a close eye on the bread; a quick flip halfway through prevents over‑browning. Once toasted, let them rest on a paper towel to absorb excess oil, if any. This step sets the stage for the sandwich’s crunchy texture.
- While the bread is toasting, wash the cucumber and carrot thoroughly. Slice the cucumber into 1/8 inch thick rounds using a micro‑slicer or a mandoline for uniformity. Julienne the carrot into thin strips; if you prefer a slightly softer texture, give them a quick sauté in a hot pan with a splash of olive oil for 30 seconds. Pat the vegetables dry with a clean towel to remove any excess moisture. The drier the veggies, the less likely the sandwich will become soggy.
- In a medium bowl, combine the mayo, Dijon mustard, chopped dill, lemon juice, and a pinch of salt and pepper. Whisk until the mixture is smooth and the ingredients are fully incorporated. The sauce should be thick enough to coat the veggies but not so thick that it clumps. Taste the dressing and adjust seasoning if necessary; a little extra lemon can brighten the flavor. This creamy base will keep the sandwich moist and flavorful.
- If you’re using cream cheese, blend it into the mayo mixture until it’s fully integrated. The cream cheese adds a velvety texture and a subtle tang that complements the dill. Stir until the mixture is uniform and smooth. This step is optional but recommended for a richer sandwich. If you’re avoiding dairy, a splash of coconut milk can replace the cream cheese for a similar effect.
- Spread a generous layer of the sauce on one side of each toasted bread slice. The sauce should cover the surface evenly, reaching the edges to create a cohesive bite. Be careful not to overload; too much sauce can cause the sandwich to fall apart. A thin, even coat keeps the sandwich balanced. Let the sauce sit for a minute to allow the flavors to meld.
- Layer the cucumber slices on one slice of bread, followed by the carrot strips. The vegetables should be arranged in a single layer to maintain their crunch. Sprinkle a few extra dill sprigs on top for color and aroma. If you’re using smoked paprika, dust a light pinch over the veggies for a subtle smoky note. This layering creates a visual appeal and ensures every bite is packed with flavor.
- Close the sandwich with the second slice of bread, sauce side down. Press gently to ensure the layers adhere. If you prefer a more compact sandwich, you can use a sandwich press or a skillet to lightly grill the assembled sandwich for 1–2 minutes on each side. This optional step adds a toasty finish and helps the sauce meld into the bread.
- Slice the sandwich diagonally into halves or quarters, depending on your preference. Arrange the slices on a plate and garnish with a few extra dill sprigs if desired. Serve immediately while the bread is still warm and the veggies are crisp. If you’re preparing ahead, cover the assembled sandwich with parchment paper and refrigerate; reheat in a toaster oven for 2 minutes before serving.
That's it — you did it. But hold on, I've got a few more tricks that'll take this to another level. These insider tips will help you perfect the sandwich and keep it fresh for longer.
Insider Tricks for Flawless Results
The Temperature Rule Nobody Follows
Many people toast bread at a high heat, which can burn the surface while leaving the inside undercooked. The trick is to toast on medium heat until the bread is a light golden brown. This ensures a crisp exterior without drying out the interior. A quick test: tap the bread lightly; it should sound hollow. If it sounds dense, lower the heat or reduce the time.
Why Your Nose Knows Best
When the mayo mixture is ready, take a sniff before spreading it. A fresh, herbal scent from the dill indicates the dressing is balanced. If the sauce smells too sharp, add a splash of lemon or a pinch of sugar to mellow it. Your nose is your best flavor guide—trust it.
The 5-Minute Rest That Changes Everything
After assembling the sandwich, let it rest for 5 minutes before cutting. This allows the sauce to settle and the bread to absorb a little moisture, preventing a soggy bite. The rest also lets the flavors meld, creating a more cohesive taste profile. A quick rest is a simple step that makes a noticeable difference.
Using a Sandwich Press
If you have a sandwich press, use it to press the sandwich gently for 30 seconds. This step not only warms the sandwich but also compacts the layers, making it easier to eat. The heat helps the sauce slightly melt, creating a luscious, cohesive bite. Just be careful not to overheat, or the bread may become too hard.
Choosing the Right Bread
Whole wheat bread provides a nutty flavor that complements the vegetables, but if you prefer a lighter taste, use a crustless white loaf. The key is a bread that can hold the sauce without becoming soggy. Look for bread with a firm crust and a soft interior. Avoid overly soft or stale bread, as it will collapse under the sauce.
Storage Secrets
To keep the sandwich fresh, wrap it tightly in parchment paper and store it in an airtight container. The parchment prevents moisture from seeping into the bread, while the container keeps the sandwich from drying out. When ready to eat, let it sit at room temperature for 10 minutes to regain its crunch. If you need to reheat, a quick 30-second toast will restore the crispness.
Creative Twists and Variations
This recipe is a playground. Here are some of my favorite ways to switch things up:
Spicy Avocado Twist
Add sliced avocado and a dash of sriracha to the sauce for a creamy, spicy kick. The avocado adds a buttery texture that contrasts with the crisp veggies. This variation is perfect for those who love a little heat in their sandwiches.
Herb‑Infused Greek Yogurt
Replace mayo with Greek yogurt and add chopped mint for a tangy, refreshing twist. The yogurt keeps the sandwich light while the mint adds a bright, herbal note. This version is ideal for a low‑fat, high‑protein lunch.
Roasted Garlic and Sunflower Seeds
Roast garlic cloves until caramelized and sprinkle them over the veggies for a sweet, savory depth. Toss a handful of sunflower seeds on top for a satisfying crunch. This variation brings a nutty flavor that pairs well with the dill.
Asian‑Inspired Peanut Sauce
Mix peanut butter with soy sauce, lime juice, and a splash of honey for an Asian‑inspired sauce. Spread it over the bread and layer the veggies for a bold, nutty flavor profile. The peanut sauce adds richness without overpowering the fresh vegetables.
Smoky Chipotle Mayo
Blend chipotle powder into the mayo for a smoky, slightly spicy flavor. The chipotle adds depth and pairs beautifully with the dill. This variation is great for a more adventurous palate.
Breakfast Breakfast Sandwich
Add a fried egg on top of the veggies before closing the sandwich. The runny yolk acts as a natural binder and adds a savory element. This breakfast twist turns the sandwich into a hearty, protein‑rich meal.
Vegan Version
Use a dairy‑free mayo and plant‑based cream cheese to keep the sandwich vegan. Add a sprinkle of nutritional yeast for a cheesy flavor. This version is both cruelty‑free and delicious.
Crunchy Quinoa Layer
Sprinkle a thin layer of cooked quinoa on the bread before adding veggies. The quinoa adds a subtle nutty crunch and extra protein. This variation makes the sandwich more filling without compromising texture.
Storing and Bringing It Back to Life
Fridge Storage
Wrap the assembled sandwich tightly in parchment paper and store it in an airtight container. Keep it in the fridge for up to 24 hours. When ready to eat, let it sit at room temperature for 10 minutes to regain its crunch. Avoid refrigerating raw, unsauced vegetables, as they can become soggy.
Freezer Friendly
For longer storage, wrap the sandwich in foil and place it in a freezer bag. Freeze for up to 2 weeks. When you’re ready, thaw overnight in the fridge and then toast the bread lightly to restore crispness. The veggies will retain their texture if frozen properly.
Best Reheating Method
The quickest way to reheat is to place the sandwich in a toaster oven at 350°F for 3–4 minutes. This restores the crunch of the bread while keeping the veggies fresh. If you prefer a skillet, heat a small amount of oil and toast the sandwich for 1–2 minutes on each side. A splash of water added before reheating will steam the sandwich back to life.