Picture this: a rainy Saturday, the kind where the clouds look like someone draped a thick gray blanket over the sky, and you’re stuck inside with a sudden, insatiable craving for something that feels both decadent and festive. I was scrolling through endless dessert videos, each promising the “perfect” cake, when my phone buzzed with a dare from a friend – “Make a cake that can out‑shine a birthday cake, a graduation cake, and a wedding cake all at once.” I laughed, grabbed the nearest orange, and set out to prove that a chocolate orange layer cake could be the ultimate show‑stopper. The kitchen quickly turned into a battlefield of flour clouds, the scent of coffee mingling with citrus, and the occasional frantic shout of “Did I add the cocoa?” – all of which set the stage for the masterpiece you’re about to create.
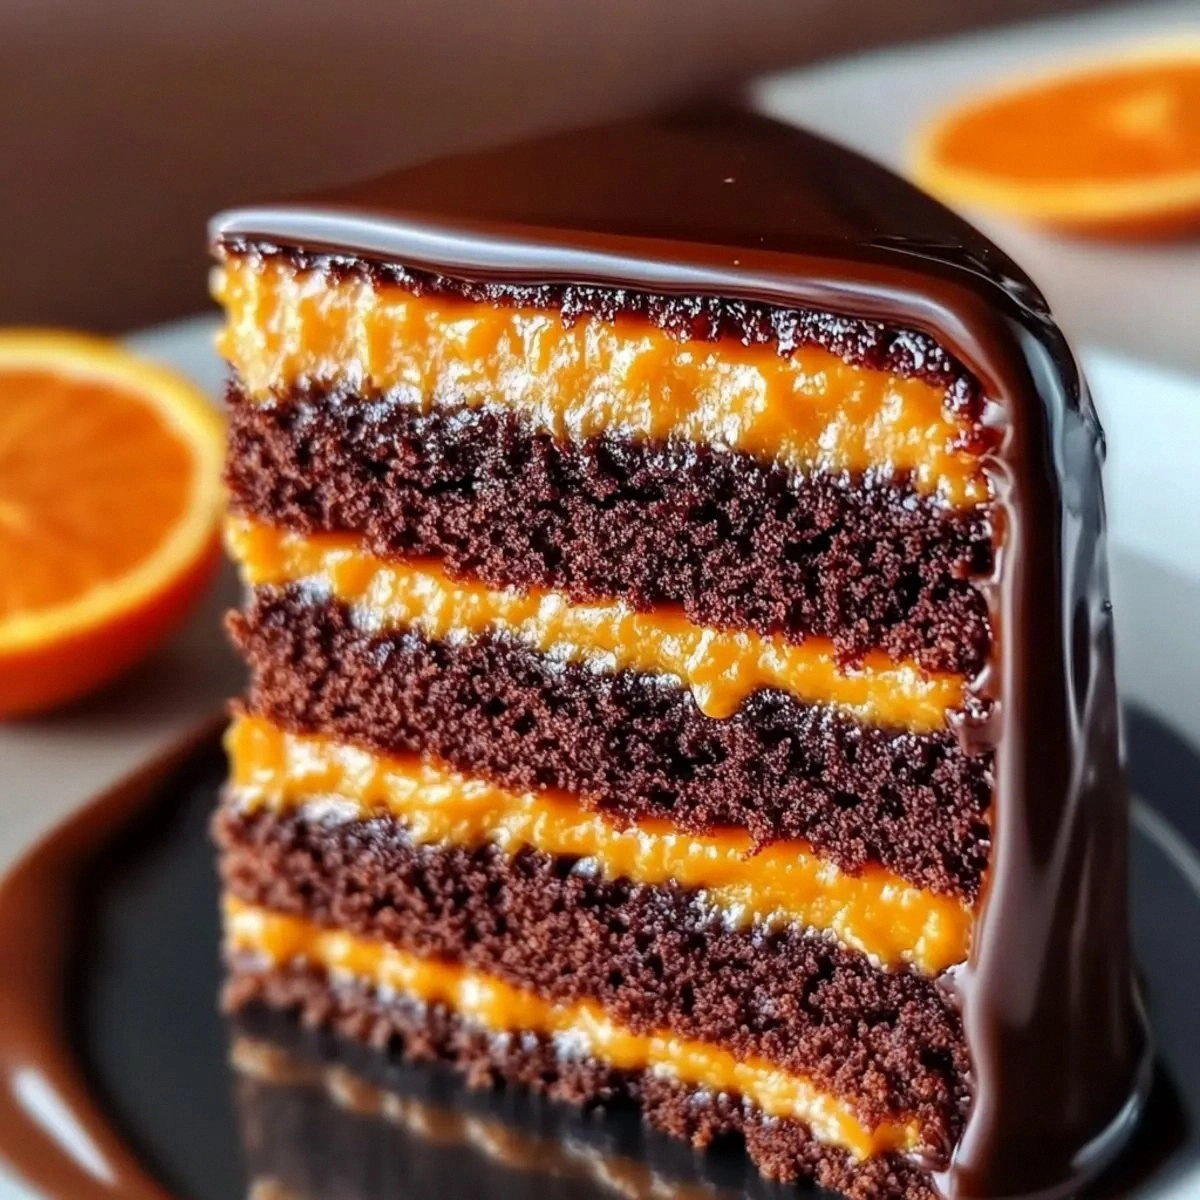
The moment the batter hit the bowl, it was love at first whisk. The deep, velvety cocoa swirled with the bright zing of orange zest, creating a visual contrast that was as striking as a sunset over a city skyline. The air filled with a perfume that was part espresso, part citrus grove, and part sweet promise – the kind of aroma that makes you pause mid‑step, close your eyes, and imagine a celebration waiting just around the corner. When the cakes finally rose, their tops were a glossy, almost glossy crown, and the crumb was so tender it practically melted on the tongue, while the ganache added a silk‑smooth finish that clung to every forkful like a lover’s embrace.
Most chocolate‑orange cakes out there either drown in sugar or miss the subtle bitterness that makes chocolate sing. I’ve tried the “quick mix” versions that turn out flat, dry, or overly sweet, and I’ve also endured the “fancy” ones that demand a sous‑vide and a pastry chef’s degree. This version? It’s the Goldilocks of cakes – not too sweet, not too bitter, just right. The secret lies in a few bold moves: using hot coffee to amplify the cocoa, folding in fresh orange juice for brightness, and finishing with a ganache that’s both glossy and glossy, thanks to a perfect emulsion of heavy cream and dark chocolate. I dare you to taste this and not go back for seconds.
Let me walk you through every single step – by the end, you’ll wonder how you ever made it any other way. Okay, ready for the game‑changer? This next part? Pure magic. Stay with me here — this is worth it.
What Makes This Version Stand Out
- Flavor Fusion: The marriage of rich dark chocolate with bright orange zest creates a symphony that dances on the palate, delivering depth without overwhelming sweetness.
- Moisture Mastery: Hot coffee and whole milk keep the crumb ultra‑moist, while the oil ensures a tender, melt‑in‑your‑mouth texture that stays soft even days later.
- Simplicity Meets Sophistication: Despite the impressive flavor profile, the ingredient list is pantry‑friendly and the technique is straightforward enough for a confident home cook.
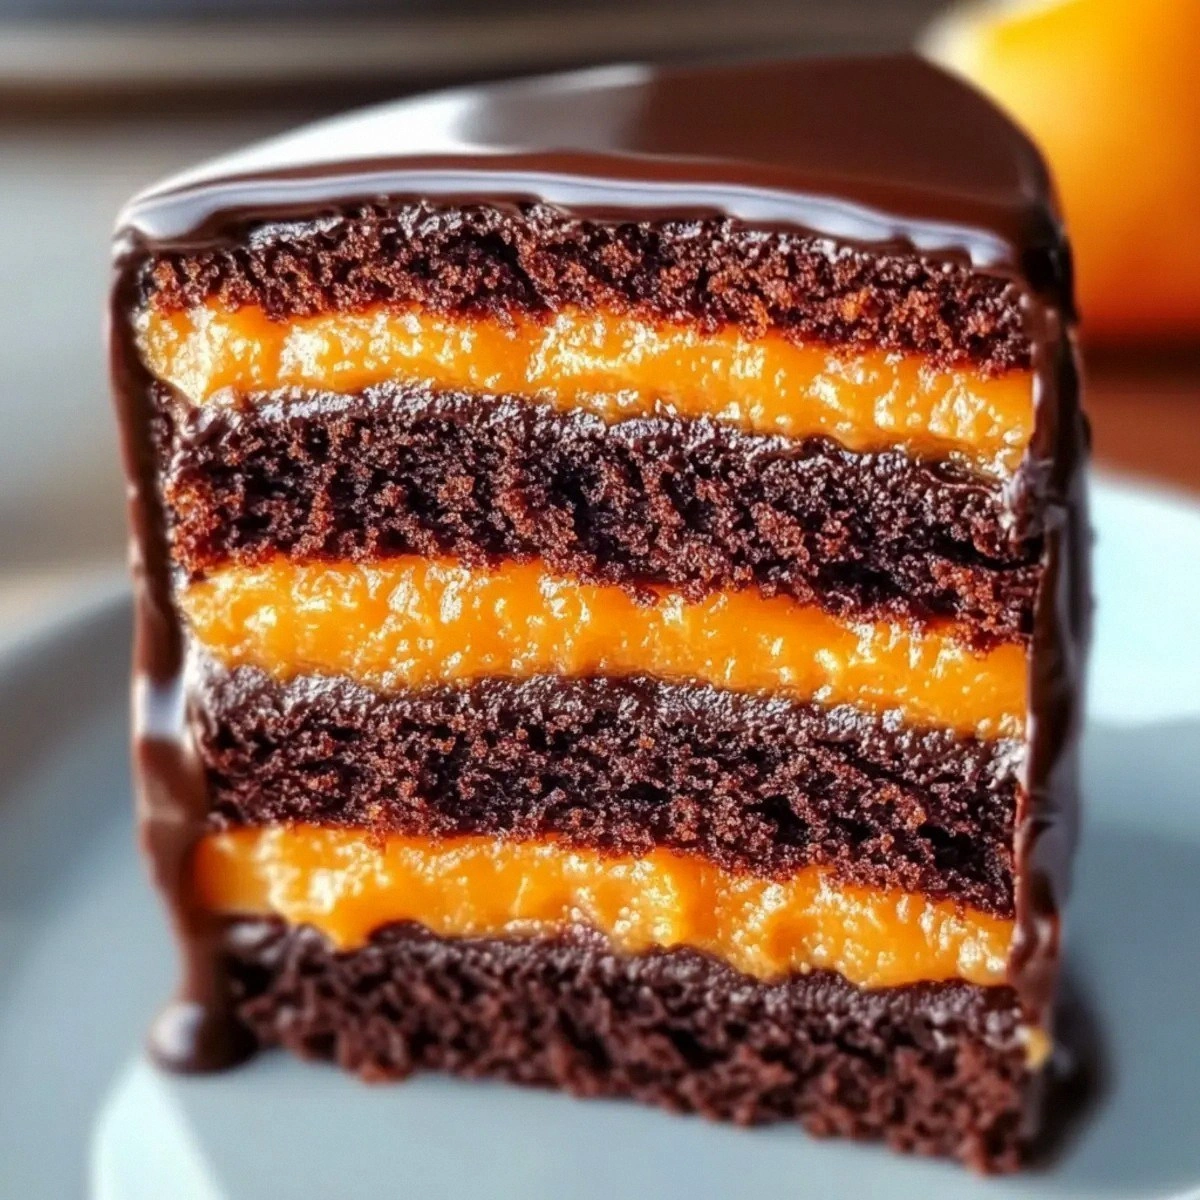
- Show‑Stopping Visuals: Three layers of deep‑brown cake stacked with glossy ganache and a glossy orange glaze make this a centerpiece that commands attention.
- Crowd‑Pleaser Factor: Whether it’s a birthday, anniversary, or just “because,” this cake earns rave reviews and Instagram envy in equal measure.
- Ingredient Quality: Using freshly squeezed orange juice and high‑quality dark chocolate elevates the flavor from good to unforgettable.
- Even Baking: The combination of baking powder and soda gives the cake a reliable rise, while the cornstarch in the custard prevents a grainy texture.
- Make‑Ahead Friendly: The cake layers can be baked ahead, wrapped, and stored, and the ganache stays glossy for days, making last‑minute assembly a breeze.
Inside the Ingredient List
The Flavor Base
Unsweetened cocoa powder (3/4 cup): This is the backbone of the cake’s chocolate intensity. It provides the deep, earthy notes that you can’t get from melted chocolate alone. If you skip it, the cake will taste like a vanilla sponge with a chocolate drizzle, which is a sad fate for a celebration cake.
Freshly squeezed orange juice (1/2 cup) & Orange zest (1 tbsp): The juice adds moisture and a bright citrus punch, while the zest injects aromatic oils that hit the nose before the palate. Use a microplane for zest; a coarse grate will leave bitter pith.
Hot coffee (1 cup): Coffee is a secret weapon that amplifies chocolate without adding a coffee flavor. It’s the culinary equivalent of turning up the bass on a song you love.
The Texture Crew
All‑purpose flour (2 cups): Provides structure, but the addition of cornstarch in the custard keeps the final texture light and prevents a dense, gummy crumb. If you use cake flour, the cake will be even softer, but you’ll need to adjust the liquid ratio.
Vegetable oil (1/2 cup): Oil stays liquid at room temperature, ensuring the cake stays moist longer than butter‑based cakes, which can dry out. If you’re a butter lover, you can swap half the oil for melted butter, but expect a slightly richer flavor.
Whole milk (1 cup): Milk adds tenderness and a subtle dairy flavor that balances the acidity of the orange. Skim milk works, but the cake will be a touch less rich.
The Unexpected Star
Egg yolks (3 large) & Whole eggs (3 large): Yolks add richness and act as emulsifiers, while whole eggs give lift and structure. Skipping the yolks will make the cake flat and dry – a tragedy for any celebration.
Granulated sugar (1 1/2 cups for cake, 1 cup for custard): Sugar sweetens and helps with browning. The split usage ensures the cake isn’t overly sweet while the custard remains silky.
The Final Flourish
Heavy cream (1 cup) & Chopped dark chocolate (8 oz): These create the ganache that drapes the cake like a glossy satin veil. Use chocolate with at least 60% cacao for a balanced bitterness.
Butter (1/4 cup): Butter enriches the custard, giving it a glossy sheen and a buttery mouthfeel that pairs beautifully with the orange notes.
Baking powder (1 tbsp) & Baking soda (1 tsp): The duo ensures a reliable rise. Baking soda reacts with the coffee’s acidity, while powder adds lift throughout the batter.
Everything's prepped? Good. Let's get into the real action...
The Method — Step by Step
Preheat your oven to 350°F (175°C) and grease three 8‑inch round cake pans. Line the bottoms with parchment circles – this is your safety net; the cake will release effortlessly, and you won’t be wrestling with a stuck bottom later. While the pans heat up, whisk together the flour, cocoa powder, baking powder, baking soda, and salt in a large bowl. The dry mix should look like a uniform chocolate dust; any clumps will turn into little pockets of dry texture.
In a separate bowl, beat the eggs, then add the milk, oil, vanilla, and hot coffee. As you pour the coffee, you’ll hear a faint sizzle – that’s the cocoa awakening, a tiny celebration in a bowl. Whisk until the mixture is smooth and glossy; it should look like a dark, velvety river. Okay, ready for the game‑changer? Add the orange juice and zest now; the citrus will instantly brighten the batter, creating a swirl of color that’s a preview of the final cake.
Kitchen Hack: If you don’t have fresh orange juice, use a high‑quality bottled juice, but add a teaspoon of orange zest to retain the aromatic punch.Combine the wet and dry ingredients, folding gently with a spatula. Stop mixing the moment the flour disappears – over‑mixing will develop gluten and give you a cakey, dense texture, which is the opposite of what we want. The batter should be thick, glossy, and a shade darker than midnight. Taste a tiny spoonful (yes, you can!) – it should taste sweet with a hint of coffee and a subtle citrus zing.
Divide the batter evenly among the three prepared pans. Use a kitchen scale for precision; each pan should receive roughly one‑third of the batter, about 1 1/3 cups. Tap the pans lightly on the counter to release any air bubbles. The surface should be smooth; if you see any peaks, use a spatula to level them out.
Slide the pans into the oven and bake for 25‑30 minutes, or until a toothpick inserted into the center comes out with a few moist crumbs but no wet batter. The edges will start pulling away from the pan, a visual cue that the cake is done. This is the moment of truth. Rotate the pans halfway through for even baking.
Watch Out: Opening the oven door too often will cause the cake to sink in the middle. Trust the timer and resist the urge to peek.While the cakes cool, prepare the orange custard. In a saucepan, whisk together 1 cup granulated sugar, 1/4 cup cornstarch, and 3 egg yolks until pale and thick. Gradually whisk in 1/2 cup orange juice and 1 cup whole milk, then place the pan over medium heat. Stir constantly; the mixture will thicken and become silky, resembling a glossy orange‑kissed pudding. Once thick, remove from heat and whisk in 1/4 cup butter until fully incorporated. Let it cool slightly while you finish the ganache.
For the ganache, heat 1 cup heavy cream until it just begins to simmer – you’ll see tiny bubbles forming around the edges. Pour the hot cream over the 8 oz chopped dark chocolate in a heat‑proof bowl. Let it sit for a minute, then whisk until the chocolate is fully melted and the ganache is glossy and smooth. If you prefer a glossy finish that sets firm, let the ganache cool to about 90°F before spreading.
Assemble the cake: place the first layer on a serving plate, spread a generous amount of orange custard over it, then drizzle a thin layer of ganache. Repeat with the second and third layers, ending with a thick blanket of ganache that drips down the sides. Use an offset spatula to smooth the sides, then dip the top into the remaining ganache for a glossy crown. Finally, sprinkle a pinch of orange zest over the top for a burst of aroma.
Chill the assembled cake for at least 30 minutes to let the ganache set. This step is non‑negotiable; the ganache will firm up, creating clean slices that hold their shape. Once set, bring the cake to room temperature before serving – the flavors will open up, and the texture will be perfect. That's it — you did it. But hold on, I've got a few more tricks that'll take this to another level...
Insider Tricks for Flawless Results
The Temperature Rule Nobody Follows
Never bake a cake straight from the fridge. Let the batter sit at room temperature for 10‑15 minutes before pouring it into the pans. This small pause allows the leavening agents to activate uniformly, giving you an even rise. I once tried skipping this step in a rush, and the cake rose unevenly, creating a lopsided disaster that looked like a collapsed skyscraper.
Why Your Nose Knows Best
When the cake is baking, trust your nose more than the timer. Around the 20‑minute mark, you’ll notice a sweet, slightly caramelized aroma wafting through the kitchen. That’s the cue that the cake’s crust is forming and the interior is setting. If you smell a burnt scent early, lower the oven temperature by 10‑15°F and cover the top loosely with foil.
The 5‑Minute Rest That Changes Everything
After removing the cakes from the oven, let them rest in the pans for exactly 5 minutes before turning them out onto a wire rack. This short rest lets the steam finish cooking the center gently, preventing a soggy crumb. Skipping this step often results in a cake that cracks when you try to lift it, which is a heartbreaking mess.
Ganache Gloss Secrets
For a mirror‑like shine, let the ganache cool to about 85‑90°F before spreading. If it’s too warm, it will run down the sides; too cool, and it will set before you can smooth it. A quick test: dip a spoon; the ganache should coat the spoon and flow slowly back into the bowl.
Layer Alignment Trick
Use a thin strip of parchment paper as a guide on the serving plate. Place the first layer, then align the second layer using the strip to ensure a perfectly centered stack. This tiny trick saves you from a lopsided tower that looks like a wobbly Jenga tower.
Creative Twists and Variations
This recipe is a playground. Here are some of my favorite ways to switch things up:
Blood Orange Burst
Swap the regular orange juice for freshly squeezed blood orange juice and add a tablespoon of raspberry puree to the custard. The resulting cake has a gorgeous pink hue and a tart‑sweet flavor that’s perfect for a summer soirée.
Espresso Explosion
Replace half of the hot coffee with strong espresso and add a teaspoon of instant coffee granules to the dry mix. The cake becomes a mocha‑lover’s dream, with a deep, earthy bitterness that balances the sweetness beautifully.
Spiced Holiday Version
Incorporate a pinch of ground cinnamon, nutmeg, and clove into the dry ingredients, and garnish the top with candied orange peel. This variation brings warm holiday spices to the fore, making it an ideal centerpiece for a winter gathering.
Vegan Adaptation
Swap the eggs for flaxseed “egg” (1 tbsp ground flax + 3 tbsp water per egg) and use coconut oil instead of vegetable oil. Use a plant‑based milk and cream, and choose a dairy‑free dark chocolate. The texture will be slightly denser, but the flavor remains spectacular.
Mini Cake Pops
Crumb the baked cake, mix with a little orange‑infused frosting, roll into balls, dip in ganache, and chill. These bite‑size delights are perfect for cocktail parties and add a playful twist to the classic cake.
Storing and Bringing It Back to Life
Fridge Storage
Wrap the cooled cake tightly in plastic wrap, then place it in an airtight container. It will stay fresh for up to 5 days. The ganache may firm up a bit; let it sit at room temperature for 20 minutes before slicing.
Freezer Friendly
Freeze the cake layers separately, wrapped in freezer‑grade foil, for up to 3 months. The ganache can also be frozen; just thaw it in the refrigerator overnight, then bring to room temperature and give it a quick whisk.
Best Reheating Method
When you’re ready to serve, preheat the oven to 300°F (150°C), place a slice on a baking sheet, and cover loosely with foil. Heat for 8‑10 minutes. Add a tiny splash of water to the foil before sealing – the steam revives the crumb and restores that melt‑in‑your‑mouth softness.