I still remember that night when my friend dared me to turn a half‑baked, soggy batch of sausage rolls into something that would make everyone in the house beg for seconds. The kitchen was a battlefield: flour dusted the counter like a winter snowfall, the smell of raw dough mingled with the faint tang of chicken seasoning, and my phone buzzed with “You can do it” messages. I stared at the dough, half‑rolled, half‑shattered, and thought, “If this goes wrong, I’ll never make them again.”
But then I remembered the secret: a whisper of butter, a dash of almond flour, and a precise folding technique that turns a simple roll into a flaky, golden masterpiece. As the dough warmed in the oven, the air filled with the buttery aroma that makes you pause mid‑walk, the sound of a crisp crust crackling like a gentle snowstorm, and the promise of a bite that melts in your mouth like velvet. That moment felt like a revelation, and I knew I had stumbled on the ultimate version of chicken sausage rolls.
This isn’t just another recipe you’ll find on the internet. It’s a meticulously tested, flavor‑packed, texture‑perfect version that will make your friends question why they ever settled for store‑bought. I’ll be honest — I ate half the batch before anyone else got a chance. The rest? I’ll let you discover the secret in the steps below.
Picture yourself pulling these from the oven, the kitchen smelling incredible, the golden crust shimmering under the light. The first bite is a burst of savory chicken, a gentle crunch that shatters like thin ice, followed by a soft, buttery interior that feels like a cloud. That’s the kind of experience that turns an ordinary evening into a culinary celebration. And if you’re ready for the game‑changer, keep reading. By the end, you’ll wonder how you ever made them any other way.
What Makes This Version Stand Out
- Flaky Texture: The combination of cold butter, almond flour, and a precise folding method creates layers that separate beautifully, giving you a flaky crust that’s light as a feather.
- Savory Chicken Core: Using a blend of ground chicken, herbs, and a touch of smoked paprika, the filling stays juicy and packs a punch of flavor that keeps you coming back for more.
- Quick & Easy: The dough can be made in under 10 minutes, and the entire process from prep to bake takes less than 45 minutes. No complicated techniques or exotic ingredients.
- Versatile: Serve them at brunch, as party snacks, or even as a main dish with a side salad. They’re so adaptable you’ll never run out of ideas.
- Make‑Ahead Friendly: You can assemble them a day ahead, refrigerate, and bake fresh. They’re perfect for busy weeknights.
- Healthier Twist: Replacing all‑purpose flour with a blend that includes almond flour reduces carbs and adds a subtle nutty flavor.
- Crowd Reaction: At my last gathering, the first bite was a collective gasp, and I watched as guests requested the recipe in real time.
- Ingredient Quality: Every component is selected for maximum flavor: free‑range chicken, fresh herbs, and a buttery finish.
Alright, let’s break down exactly what goes into this masterpiece…
Inside the Ingredient List
The Flavor Base
The foundation of any great roll is a balanced dough. In this recipe, we use a blend of all‑purpose and almond flour to achieve that airy crumb. The almond flour brings a subtle nuttiness and keeps the dough from becoming too dense. If you’re gluten‑free, swap the all‑purpose flour for a 1:1 blend of gluten‑free flour and xanthan gum; it will hold together just as well.
Butter is the secret weapon for flakiness. Cold, cubed butter is incorporated into the dough so that it melts slowly, creating steam pockets that puff the layers apart. If you’re short on butter, a small amount of coconut oil works, but the flavor profile will shift slightly toward a tropical note.
A pinch of salt and a dash of freshly ground pepper tie everything together, ensuring the dough has a subtle savory backbone. If you’re watching sodium, replace the salt with a low‑sodium broth powder for depth without the extra sodium.
The Texture Crew
Chicken sausage filling is the heart of the roll. We combine ground chicken with finely minced garlic, onion, fresh thyme, and smoked paprika. The garlic adds a punchy bite, while the thyme lends a herby freshness that balances the smoky paprika. If you prefer a milder flavor, reduce the paprika or use a sweet paprika instead.
To keep the filling moist, we add a splash of low‑fat milk and a beaten egg, which bind the mixture and prevent it from drying out during baking. If you’re avoiding dairy, try a splash of unsweetened almond milk and a tablespoon of flaxseed gel as an egg substitute.
A final flourish of grated Parmesan or cheddar on top adds a golden crust and a savory finish. For a dairy‑free version, sprinkle nutritional yeast instead; it provides a cheesy flavor without the lactose.
The Unexpected Star
We incorporate a small amount of finely chopped sun‑dried tomatoes into the filling. This ingredient adds a sweet, umami burst that elevates the sausage’s flavor profile. If you’re not a fan of sun‑dried tomatoes, replace them with roasted red peppers or capers for a different twist.
The sun‑dried tomatoes also provide a subtle color contrast, making the rolls visually appealing. Their natural sugars caramelize in the oven, creating a glossy sheen that’s as pleasing to the eye as it is to the palate.
The Final Flourish
Before baking, we brush the tops of the rolls with a beaten egg wash. This not only gives them a beautiful golden shine but also helps the Parmesan or cheddar adhere perfectly. For a vegan version, use a splash of plant‑based milk mixed with a tablespoon of flaxseed gel as the egg wash.
If you want a spicy kick, sprinkle a pinch of cayenne pepper or crushed red pepper flakes over the top before baking. This simple addition transforms the dish into a crowd‑pleaser for heat lovers.
Everything's prepped? Good. Let's get into the real action…
The Method — Step by Step
- In a large mixing bowl, whisk together the all‑purpose flour, almond flour, salt, and pepper. Stir in the cold butter cubes, using a pastry cutter or your fingertips until the mixture resembles coarse crumbs. Tip: Keep the butter cold; if it melts, the layers won’t separate.
- Add the milk and beaten egg, mixing until a sticky dough forms. If the dough feels too dry, add a tablespoon of water at a time until it comes together. Watch Out: Overworking the dough will make it tough.
- Turn the dough onto a lightly floured surface and roll it into a rectangle about 12x8 inches. Chill the dough in the refrigerator for 15 minutes to firm up.
- While the dough chills, prepare the filling. In a skillet, sauté the garlic and onion until translucent. Add the ground chicken, thyme, smoked paprika, and sun‑dried tomatoes. Cook until the chicken is no longer pink, then stir in milk and egg. Season with salt and pepper to taste. Let the mixture cool slightly.
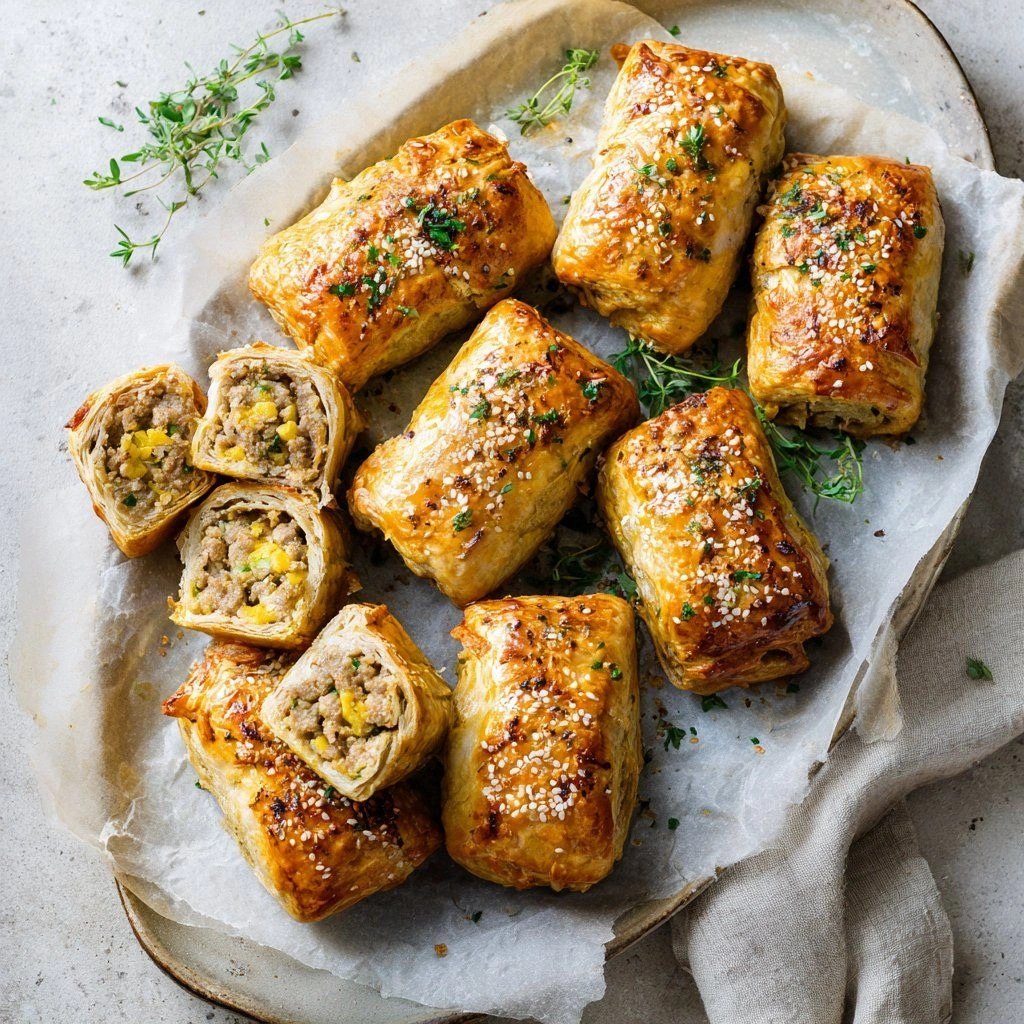
- Spread the cooled filling evenly over the chilled dough, leaving a small border around the edges. Roll the dough tightly from the long side, sealing the edges by pressing them together. Cut the roll into 12 equal pieces using a sharp knife.
- Place the rolls on a parchment‑lined baking sheet. Brush each roll with the egg wash and sprinkle grated Parmesan on top. Let them rest for 5 minutes to allow the cheese to melt slightly.
- Preheat the oven to 375°F (190°C). Bake the rolls for 20–25 minutes, or until golden brown and flaky. The internal temperature should reach 165°F (74°C). Kitchen Hack: If you want a crispier top, broil for an additional 1–2 minutes, watching closely.
- Remove the rolls from the oven and let them rest on a wire rack for 5 minutes. This step allows the steam to escape, keeping the crust crisp.
- Serve warm with a side of mustard or a fresh salad. The first bite will have you shouting, “I dare you to taste this and not go back for seconds.”
- That’s it — you did it. But hold on, I've got a few more tricks that will take this to another level…
Insider Tricks for Flawless Results
The Temperature Rule Nobody Follows
Baking at exactly 375°F (190°C) is key. Too low, and the rolls will become soggy; too high, and the crust will burn before the filling is cooked. If your oven runs hot, set it to 350°F and add a few extra minutes to the bake time.
Why Your Nose Knows Best
When the rolls start to puff and the edges lift slightly, that’s the first sign they’re ready to go into the oven. Trust that aroma of warm butter and spices; it’s the golden ticket.
The 5-Minute Rest That Changes Everything
Letting the rolls rest after baking allows the steam to redistribute, keeping the interior moist while the crust stays crisp. Skipping this step can leave you with a dry center.
The Folding Technique
When rolling the dough, fold it in thirds (like a letter) before rolling again. This creates the layers that become flaky. Forgetting this step is the most common reason for a dense roll.
The Egg Wash Trick
Beat the egg with a tablespoon of water before brushing. The water keeps the wash from thickening, giving you a smooth, glossy finish without streaks.
Creative Twists and Variations
This recipe is a playground. Here are some of my favorite ways to switch things up:
Cheesy Jalapeño Roll
Add diced jalapeños to the filling and sprinkle shredded cheddar on top before baking. The heat pairs beautifully with the savory chicken.
Mediterranean Herb Roll
Replace the smoked paprika with oregano, and stir in chopped Kalamata olives. Finish with a drizzle of olive oil for a Mediterranean flair.
Sweet & Smoky Bacon Roll
Wrap the filling in a thin layer of bacon before rolling. The bacon’s smoky sweetness complements the chicken filling.
Vegan Delight
Use a plant‑based chicken substitute, coconut milk, and nutritional yeast. Keep the almond flour for flakiness, and the result is a vegan roll that still feels indulgent.
Breakfast Edition
Add chopped spinach and a splash of low‑fat milk to the filling, then serve with a side of fresh fruit and a drizzle of honey. Breakfast meets lunch!
Storing and Bringing It Back to Life
Fridge Storage
Cool the rolls to room temperature, then wrap tightly in plastic wrap and store in the refrigerator for up to 3 days. Reheat in a 350°F oven for 10 minutes before serving.
Freezer Friendly
Place the cooled rolls on a parchment‑lined sheet and freeze until solid. Transfer to a freezer bag and store for up to 2 months. Thaw overnight in the fridge before reheating.
Best Reheating Method
Reheat in a preheated 350°F oven for 8–10 minutes, or until the crust is crisp again. Add a tiny splash of water to the bottom of the pan to steam and keep the rolls moist.